
By Edy Werder — IT Consultant & Tech Blogger
In this guide, I show you how to SSH into Synology NAS using DSM 7. You’ll learn how to enable SSH, connect from your computer, and apply a few simple steps to keep access secure.

Enable SSH in Control Panel → Terminal & SNMP, then connect from your computer with ssh username@nas-ip (port 22 by default). For better security, restrict SSH to trusted IPs and use SSH keys.
What is SSH?
Before we dive into SSH into your Synology NAS, let’s quickly talk about what SSH encryption is. SSH, or Secure Shell, is a secure way to access and manage another computer, like your Synology NAS, remotely over the internet. It’s like having a safe, encrypted tunnel to send commands and manage your NAS, no matter where you are.
SSH lets you manage your Synology NAS securely from a terminal, which is handy for troubleshooting and advanced setup tasks. Next, I’ll walk you through enabling SSH and connecting safely.
Enable SSH into Synology NAS
How to turn on Synology SSH Service
Enabling the SSH service on your Synology NAS is an easy and crucial part of the setup process. Here’s how you can do it by making a few configurations:
- Make sure you’re logged into your Synology NAS device using the web browser (WebGUI)
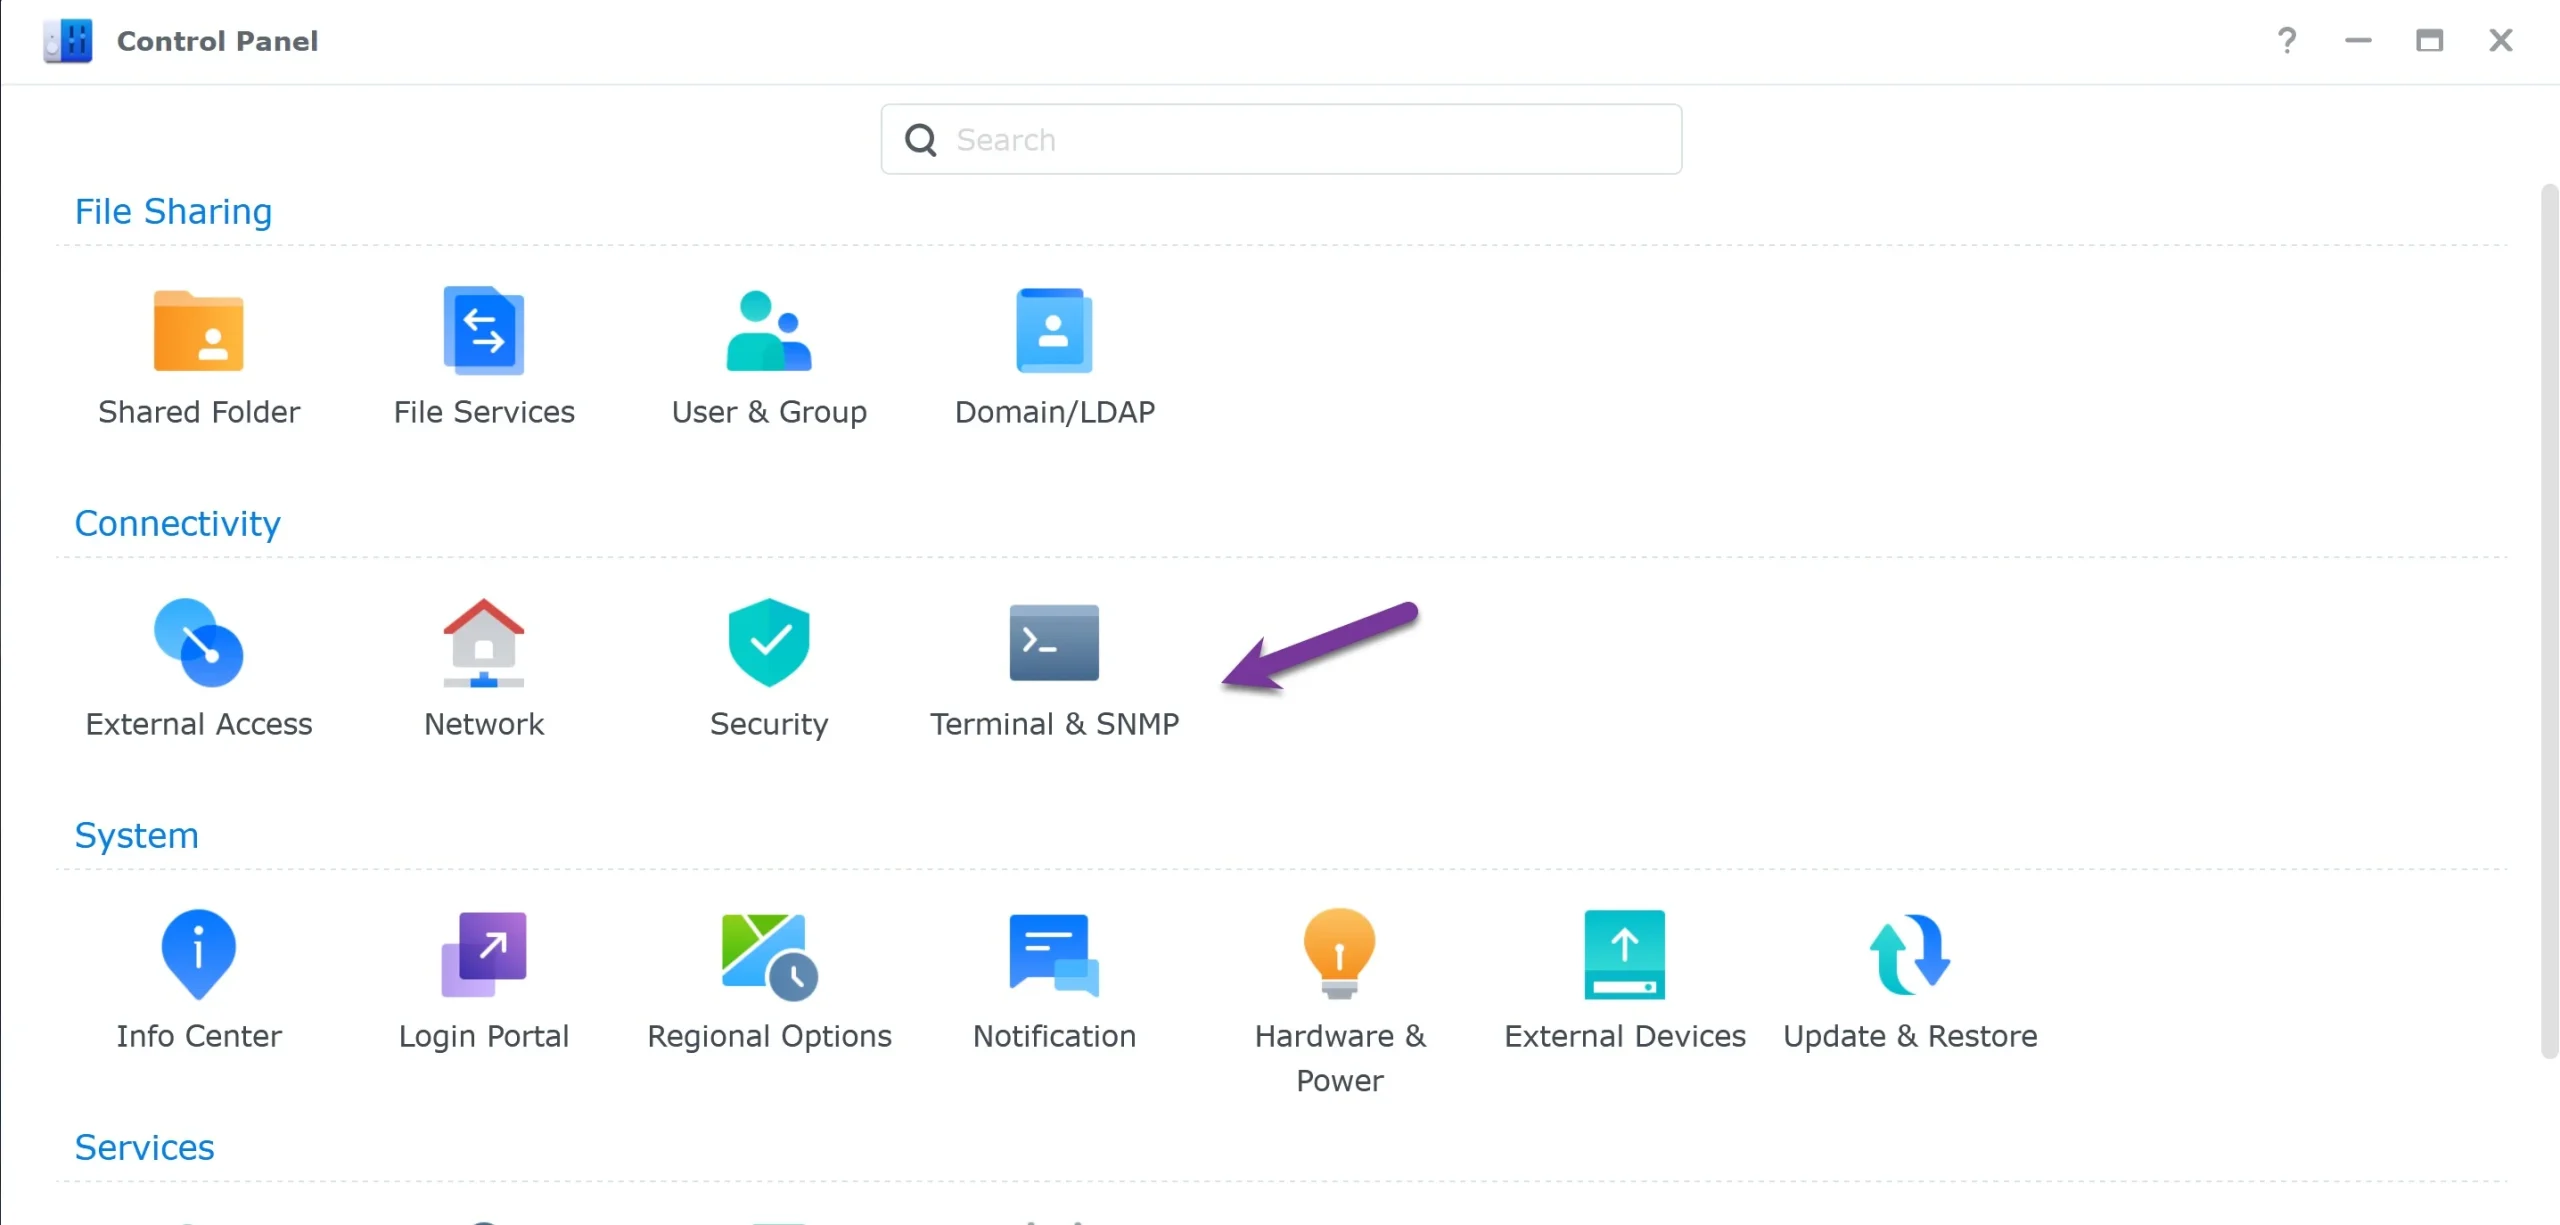
- Navigate to the Control Panel via your DSM web management interface.
- Find and click on ‘Terminal & SNMP’.
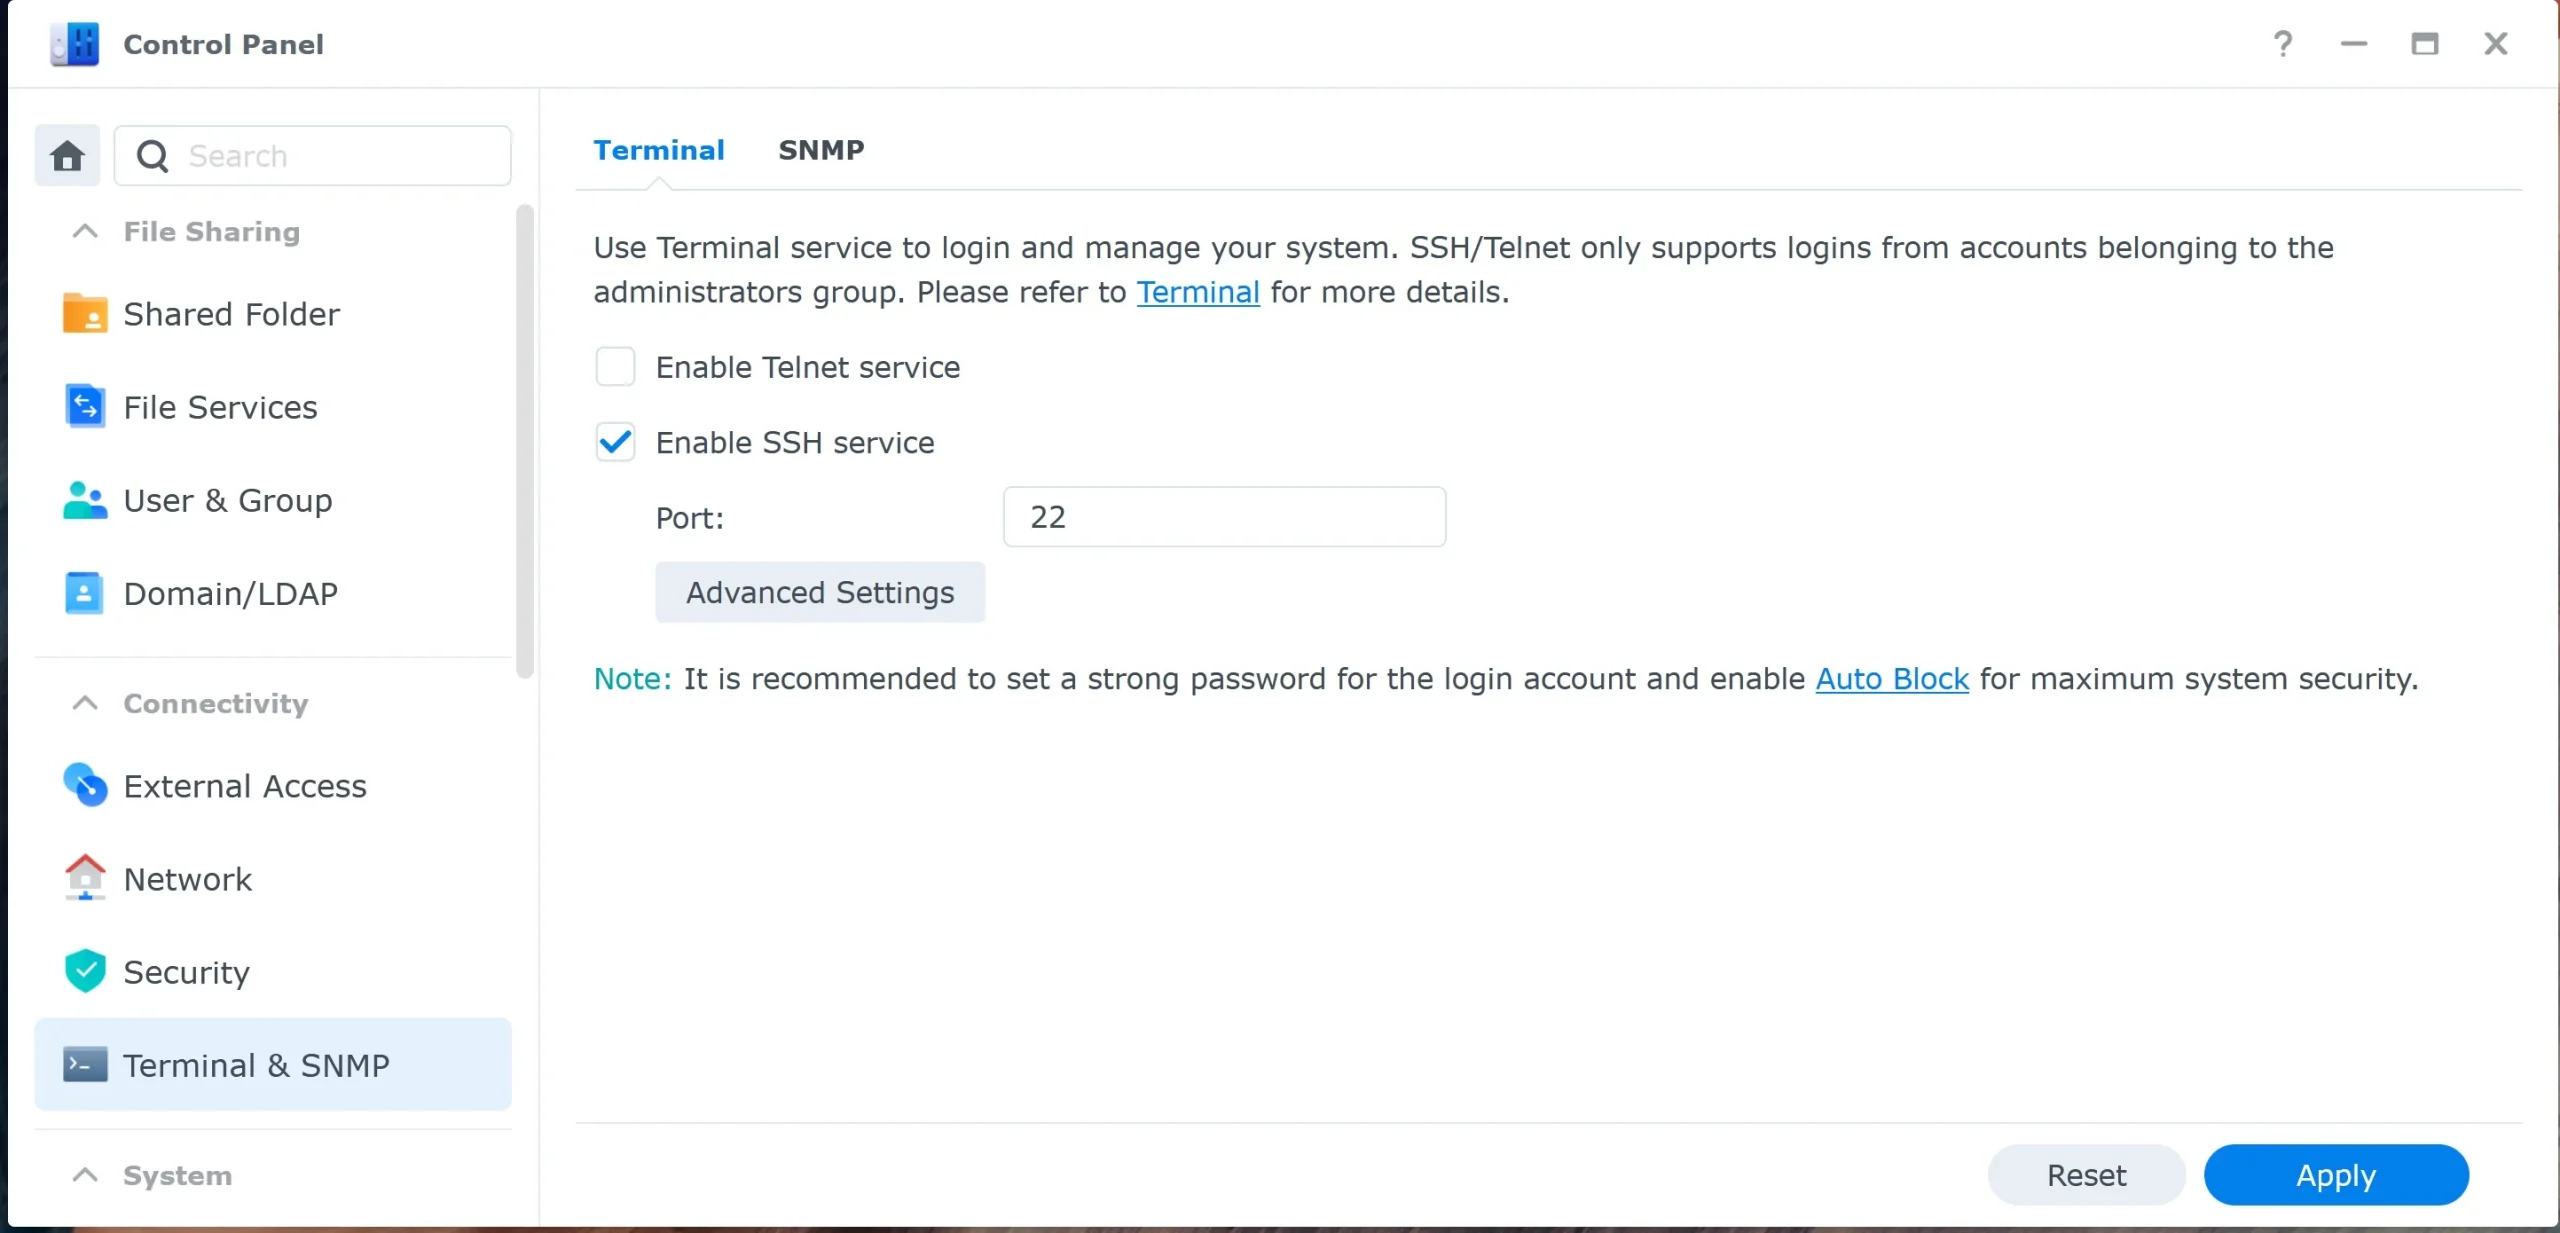
- On the Terminal tab, locate the ‘Enable SSH service’ checkbox and click to check it.
- You can also adjust the SSH port; the default is 22, but for better security, especially if your NAS is exposed to the internet, consider changing it to something like 8022 or 2222.
- Finally, click ‘Apply’ to save all your changes.
And there you have it! The SSH service should now be enabled on your Synology NAS.
Enable SSH in Synology Firewall if you have enabled it.
If you’ve strengthened your Synology NAS device’s security with a firewall, creating an allow rule for the SSH port to function correctly is essential. To do this, follow the steps below:
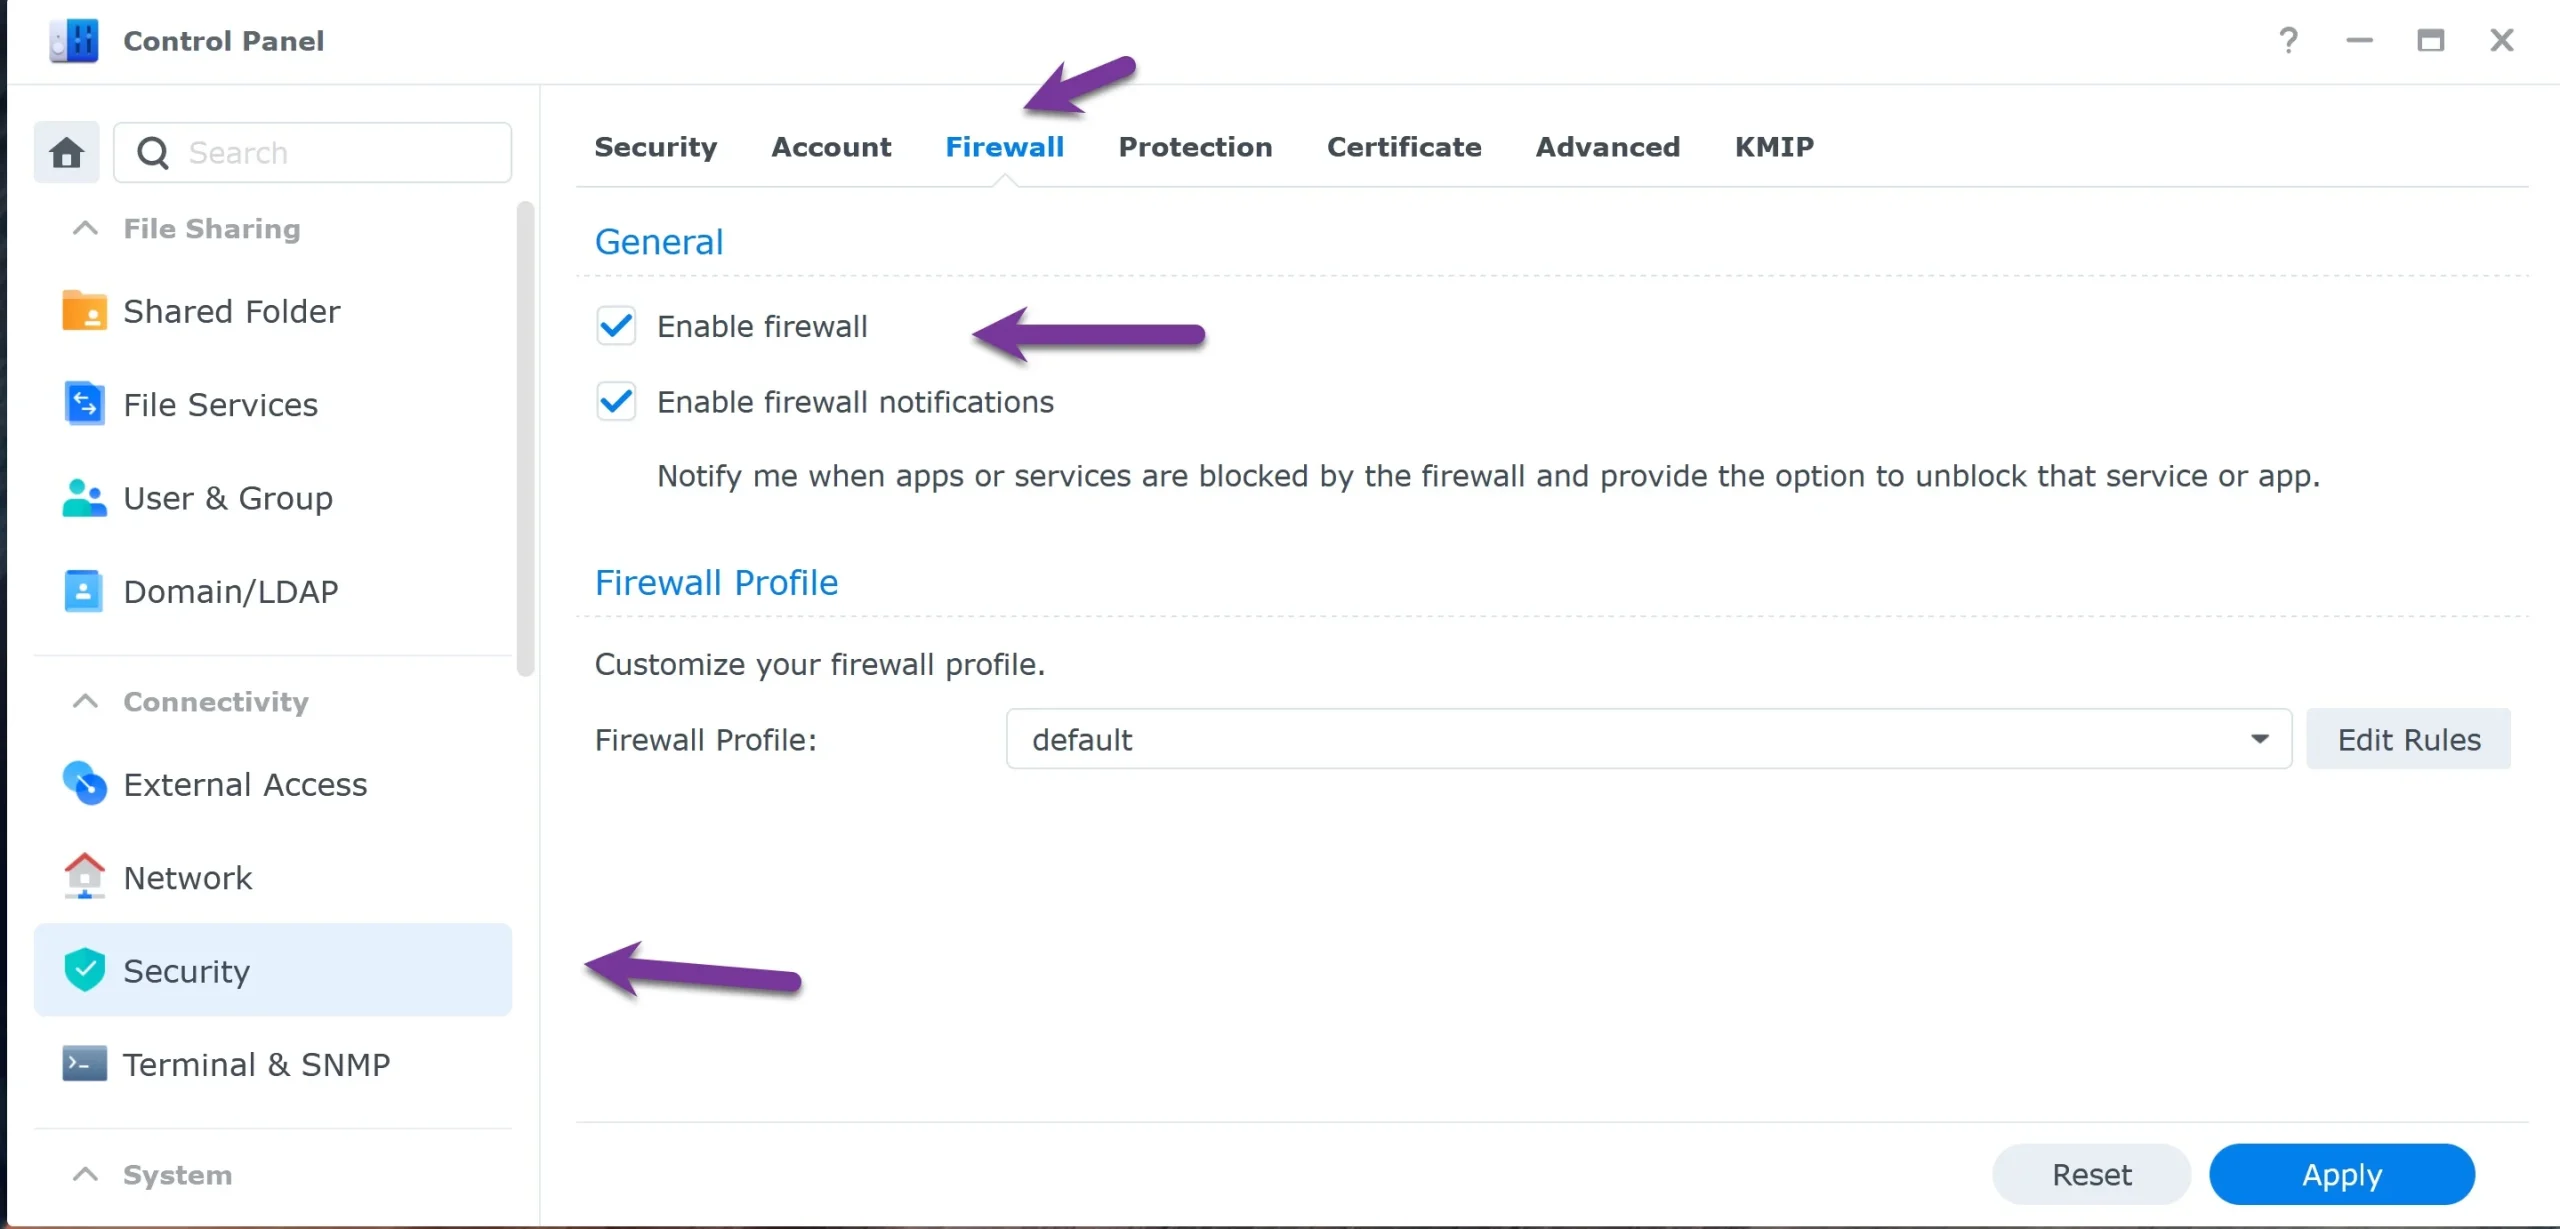
- Go to the Control Panel and click on ‘Security’.
- Once in the Security panel, click on ‘Firewall’.
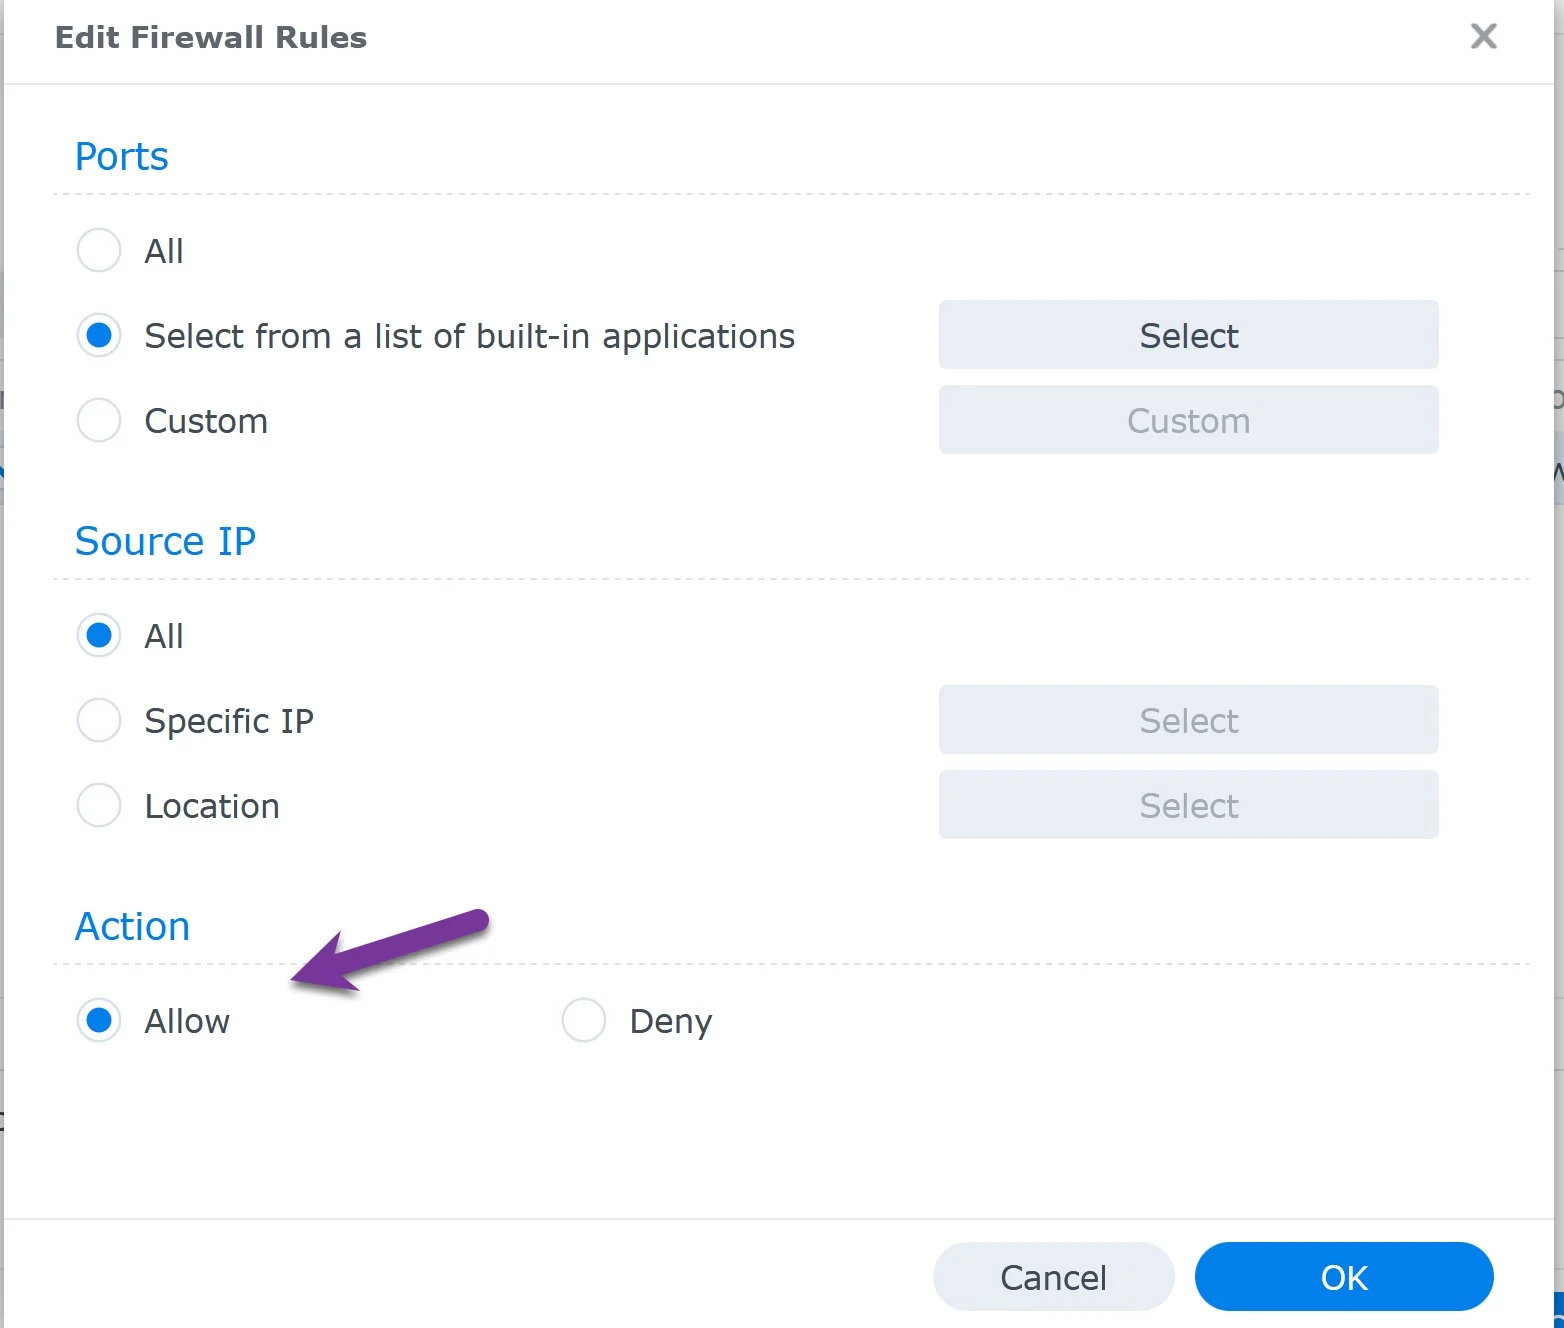
- Inside the Firewall settings, find and click on ‘Edit Rules.’
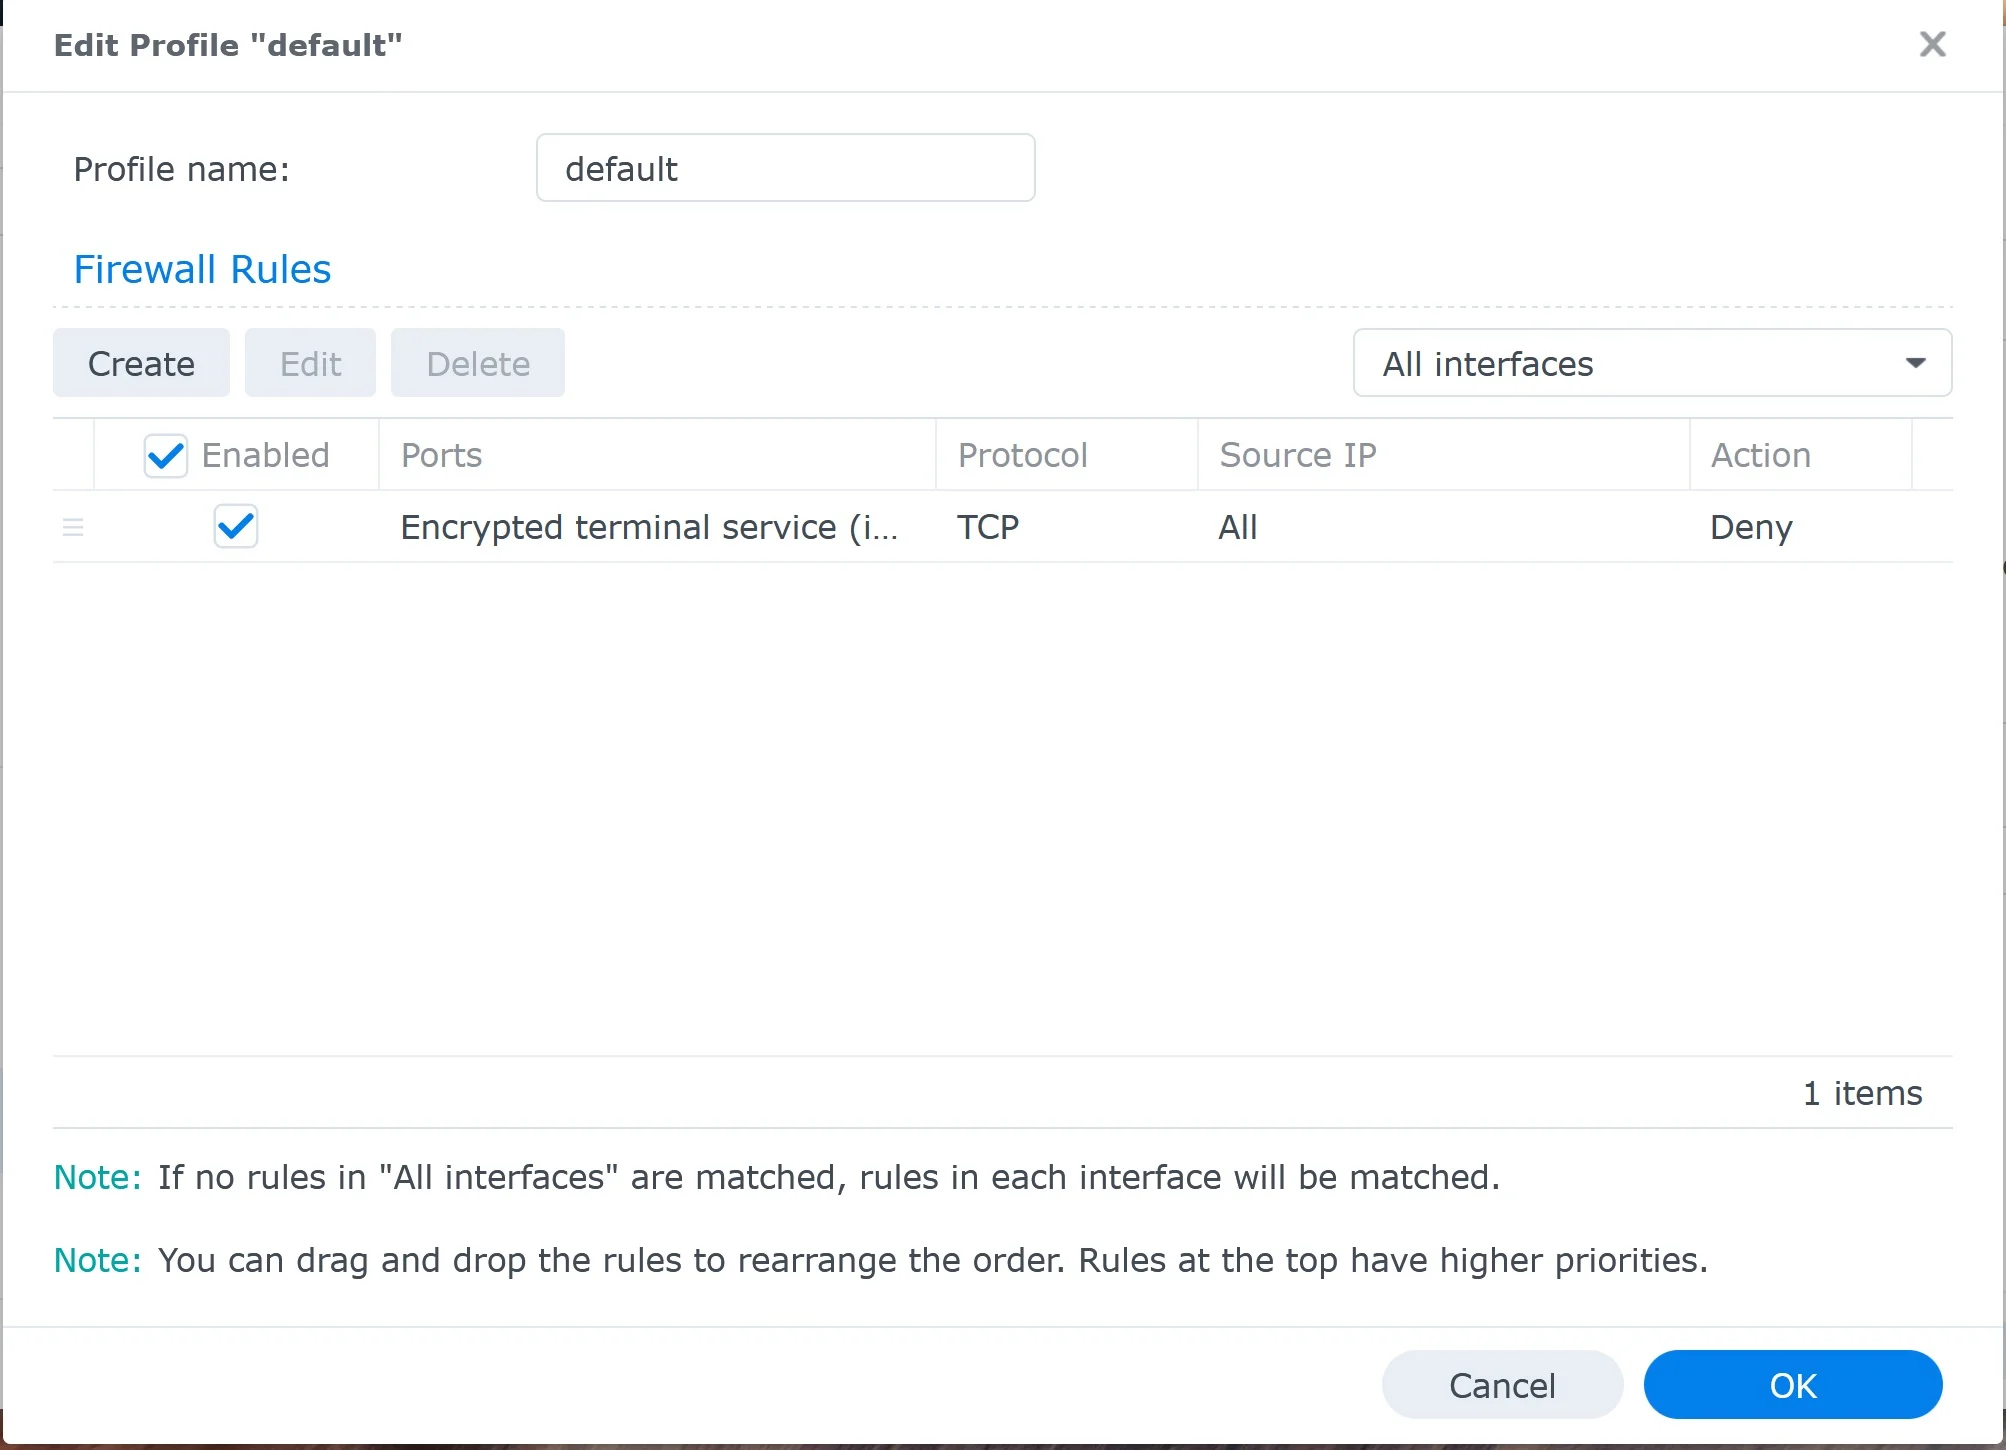
- A list of built-in applications will appear. Scroll down until you find ‘SSH’ or the custom-named entry for your SSH service.
- Select it and approve the ‘Allow’ rule.
- Lastly, remember to save the changes by clicking ‘OK.’
In the below case, the firewall rule for the SSH service is present and not allowed. I need to allow it first, before SSH will work.
I recommend reading my article Synology Firewall, describing how to effectively enable and configure the firewall. Understanding the Synology Firewall’s unique functionalities is crucial for enhancing your NAS security.
Configuring SSH Access on Synology NAS
Setting up SSH access on your Synology NAS is not just about enabling the SSH service; it’s also about deciding who gets to use it. In Synology DSM (DiskStation Manager), users are organized into groups, each with its own permissions set.
- Administrators Group:
- A user typically needs to be part of the group for SSH access. This group has the necessary permissions to access and manage the NAS via SSH.
- Being in the
administrators(admin account) allows the user to perform a wide range of tasks, similar to having administrative privileges. - Creating a New User and Assigning to a Group:
- If you’re making a new user specifically for SSH access, you can assign them to the
administratorsgroup during the creation process in the DSM Control Panel. - Remember to give a strong password and, if possible, limit their permissions to only what’s necessary for their tasks.
- Balancing Convenience and Security:
- While it’s convenient to have SSH access with administrative privileges, it’s crucial to balance this convenience with security.
- Consider the principle of least privilege: only grant enough permissions to perform the required tasks, nothing more. This minimizes potential security risks.
How to install SSH client on Windows and Mac?
Installing an SSH server client is straightforward on Windows 10 and MacOS. Here, we look at how to do it on both operating systems. Once the server client is installed, you can easily connect to a remote server using the command line interface.
For Windows 10 (1809 or newer): Microsoft incorporated an OpenSSH client for these versions. Here’s how to install it, with all the necessary info.
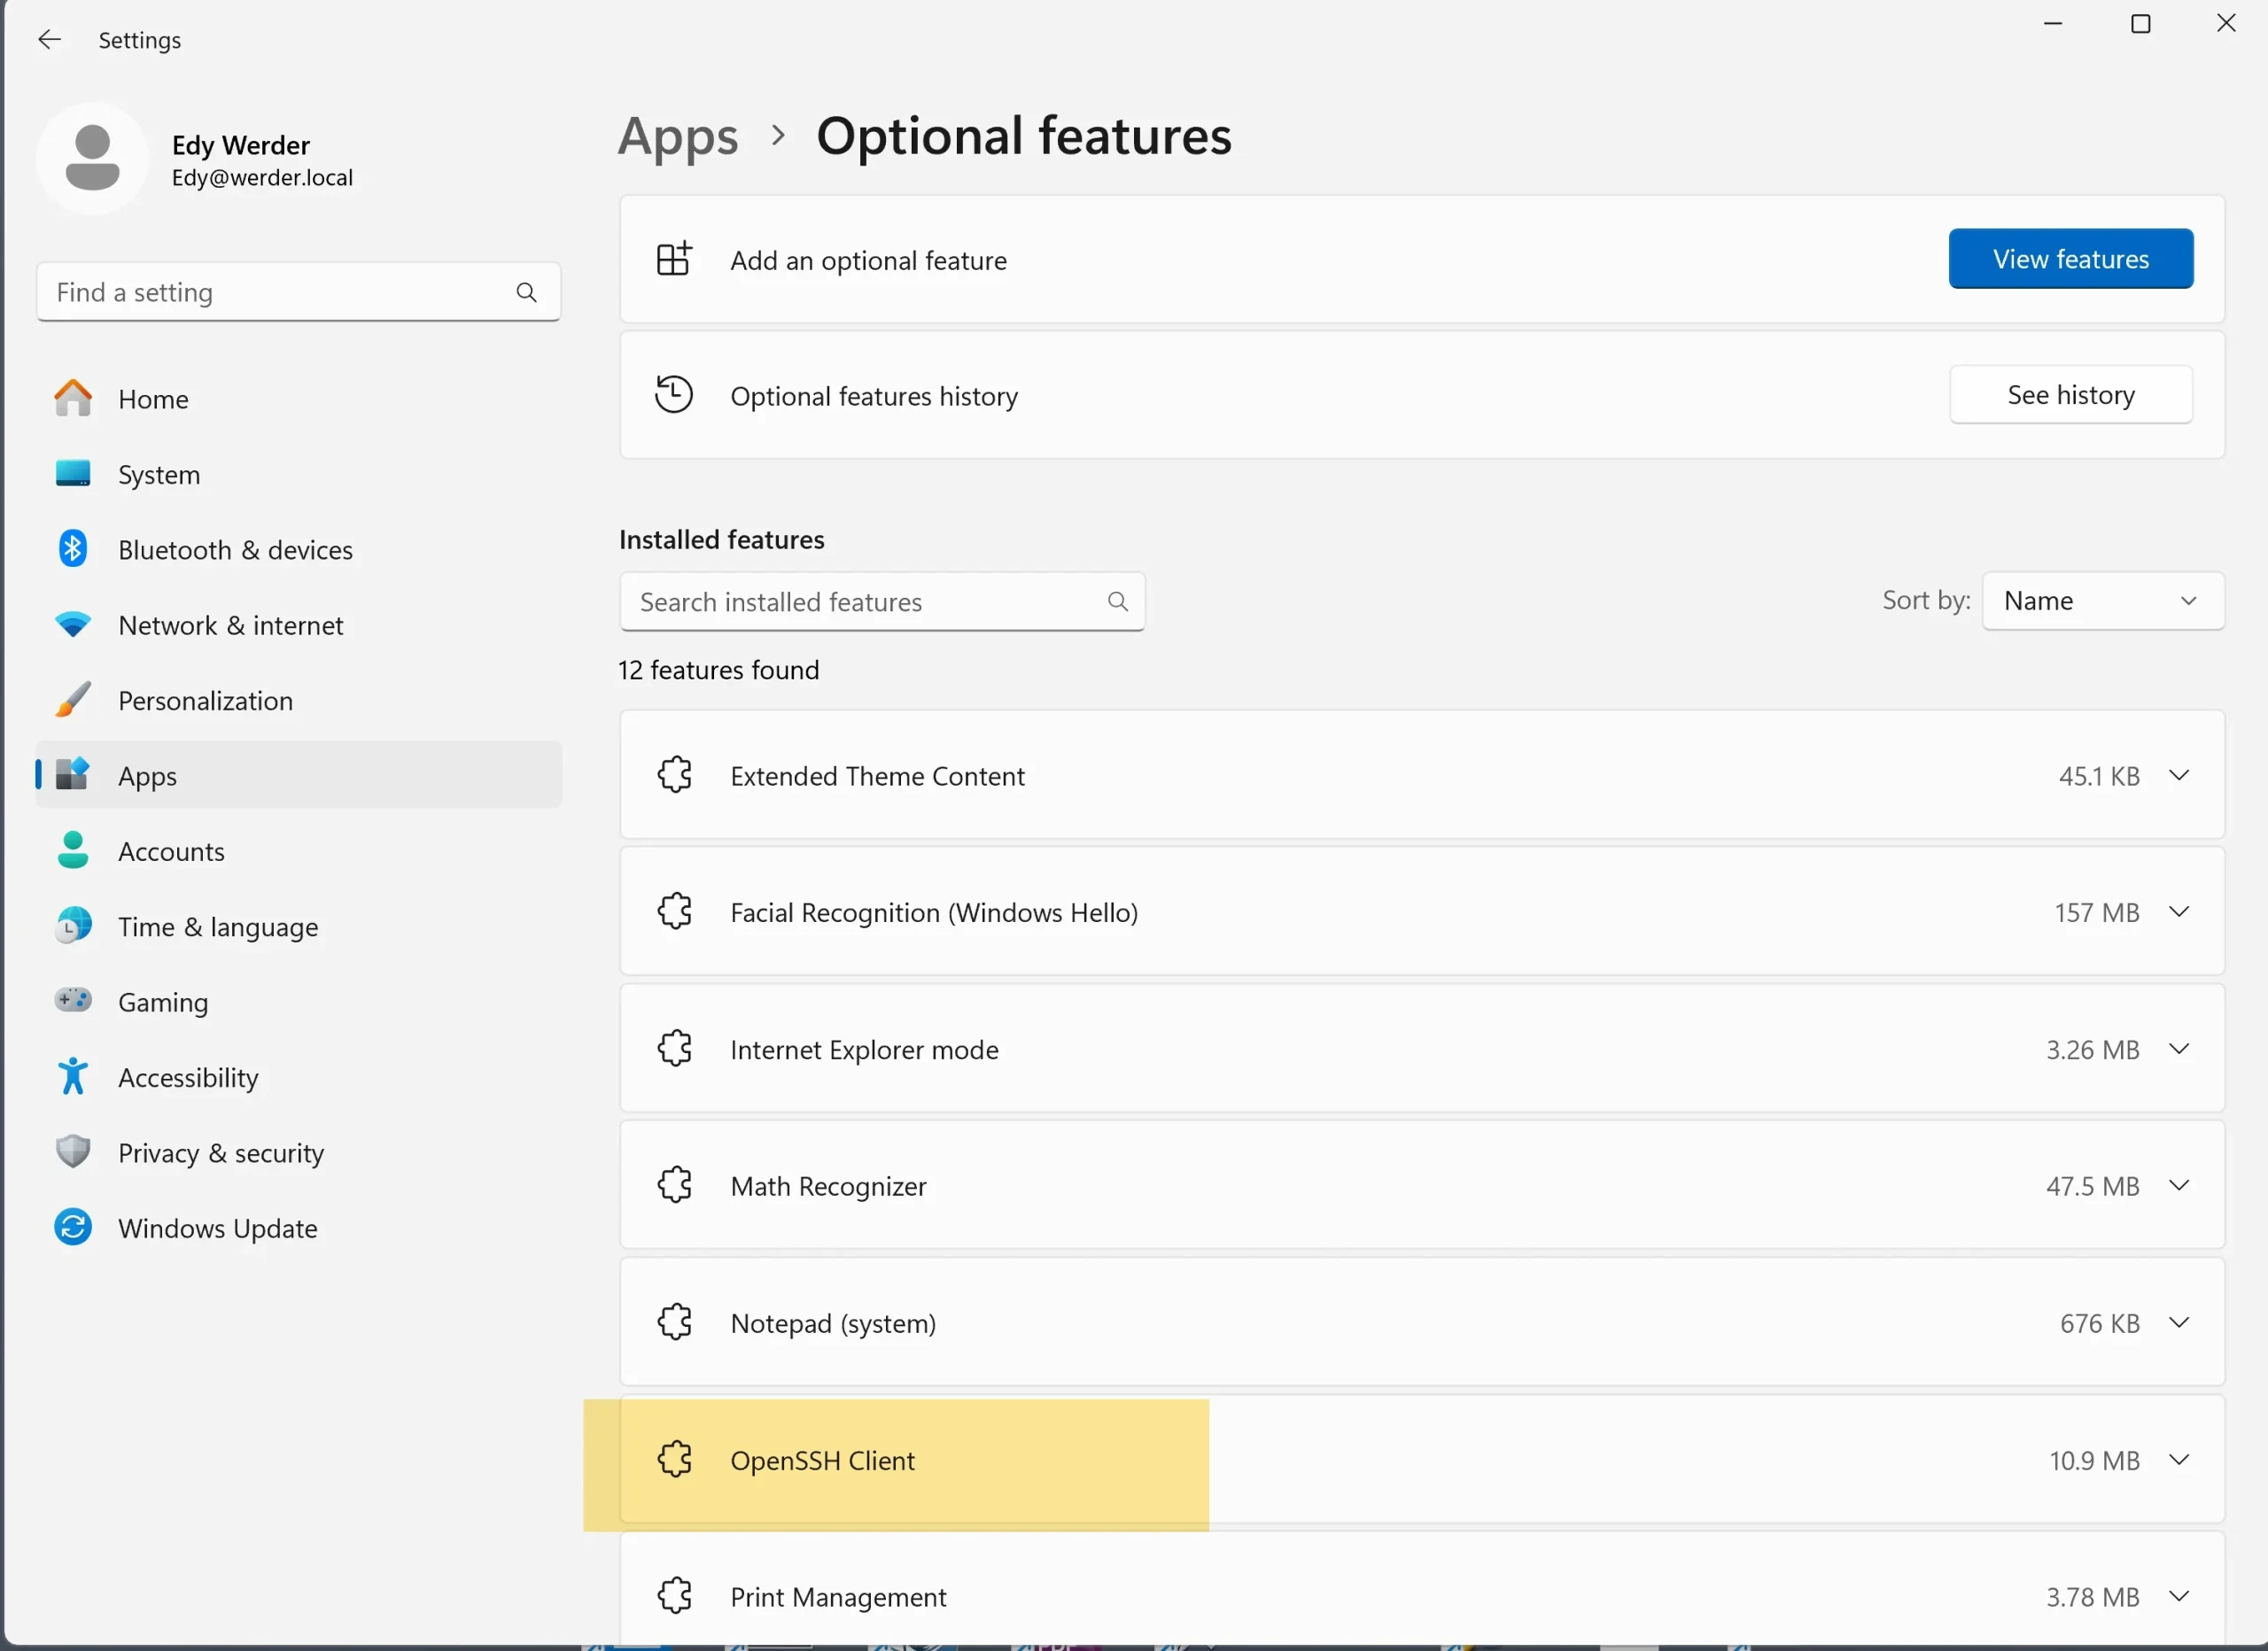
- Open ‘Settings’ and go to ‘Apps > Apps and Features > Optional Features.’
- Review the list to check if the OpenSSH client is already installed. Note: You’ll need to add it if it’s not installed.
- Click ‘Add a feature’ at the top of the page.
- Locate the ‘OpenSSH Client’ and click ‘Install’.
- After installation, return to ‘Apps > Apps and Features > Optional Features’. You should now see the OpenSSH client listed.
For MacOS: Fortunately, for MacOS users, Terminal has the ssh tool built-in SSH capabilities. Therefore, no additional installation is necessary. You can access the ssh tool by launching Terminal and executing your SSH commands there.
For those who prefer a more graphical interface, PuTTY is an excellent alternative. Initially designed for Windows, it’s ported over to other operating systems. PuTTY is easy to operate and free to download.
Once you’ve installed the SSH client, you can establish a secure connection to the Synology NAS.
featured blog
Best Mini PC for Home Server
A Complete Buying Guide
How to access Synology NAS with SSH
Using Windows
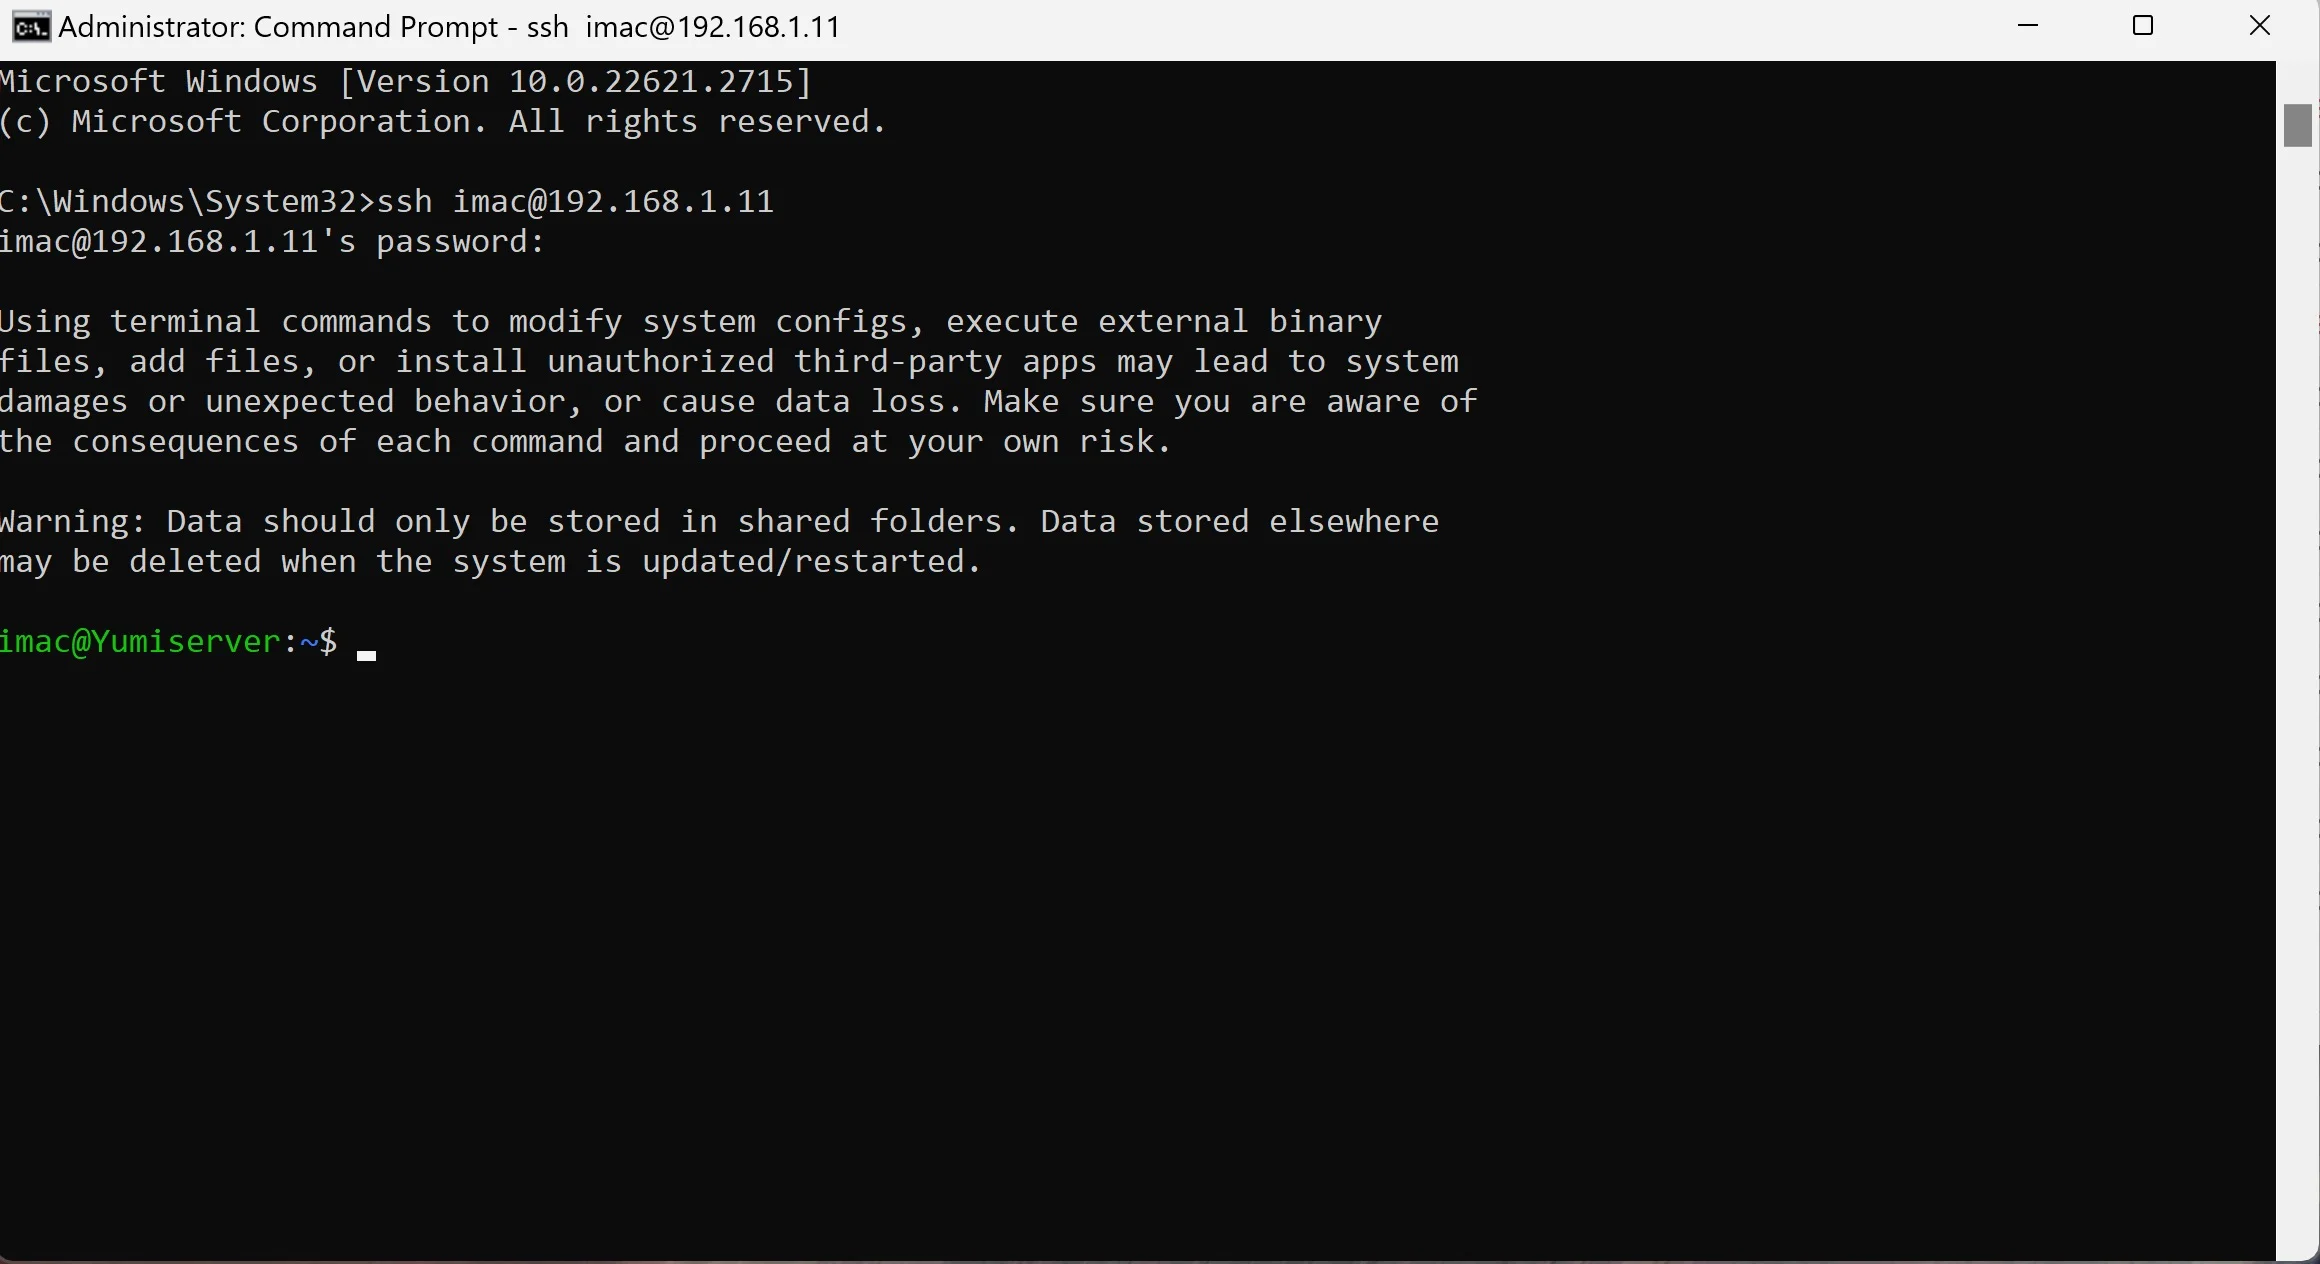
If you’re a Windows user, you can use the Command Prompt or PowerShell window to access your Synology NAS via SSH. Here’s how:
- Open either a Command Prompt or a PowerShell window. To open a PowerShell window quickly, right-click the Start button or press Windows+X and choose “Windows PowerShell” from the menu.
- Once your preferred terminal is opened, run the ssh command. Just type
sshfollowed by your Synology NAS user name and the IP address of your Synology NAS. The command format should look like this:ssh username@IPaddress - If it’s your first time connecting, you’ll be prompted to verify the host key fingerprint of your Synology NAS. Type
yesto establish the connection. - Finally, you’ll be asked for your password. Enter it, and you should be logged in!
Remember: Replace “username” and “IPaddress” with your actual Synology NAS username and the device’s IP address.
Using MAC
If you’re a MAC user, the Terminal application comes preinstalled and has built-in support for ssh. Here’s an overview of how you can use it:
- Start by opening the Terminal. You can quickly launch it from Spotlight by hitting Command+Spacebar and typing ‘Terminal’, followed by ‘Return.’
- Once the Terminal is open, you must type the ssh command. It’ll be formatted as follows:
ssh username@IPaddress - If it’s your first time connecting, the Terminal will prompt you to verify the NAS’s host key fingerprint. Just type ‘yes’ to proceed.
- Next, you’ll be prompted to enter your password. Type it in to log in!
Remember to replace ‘username’ and ‘IPaddress’ with your Synology NAS username and the device’s IP address.
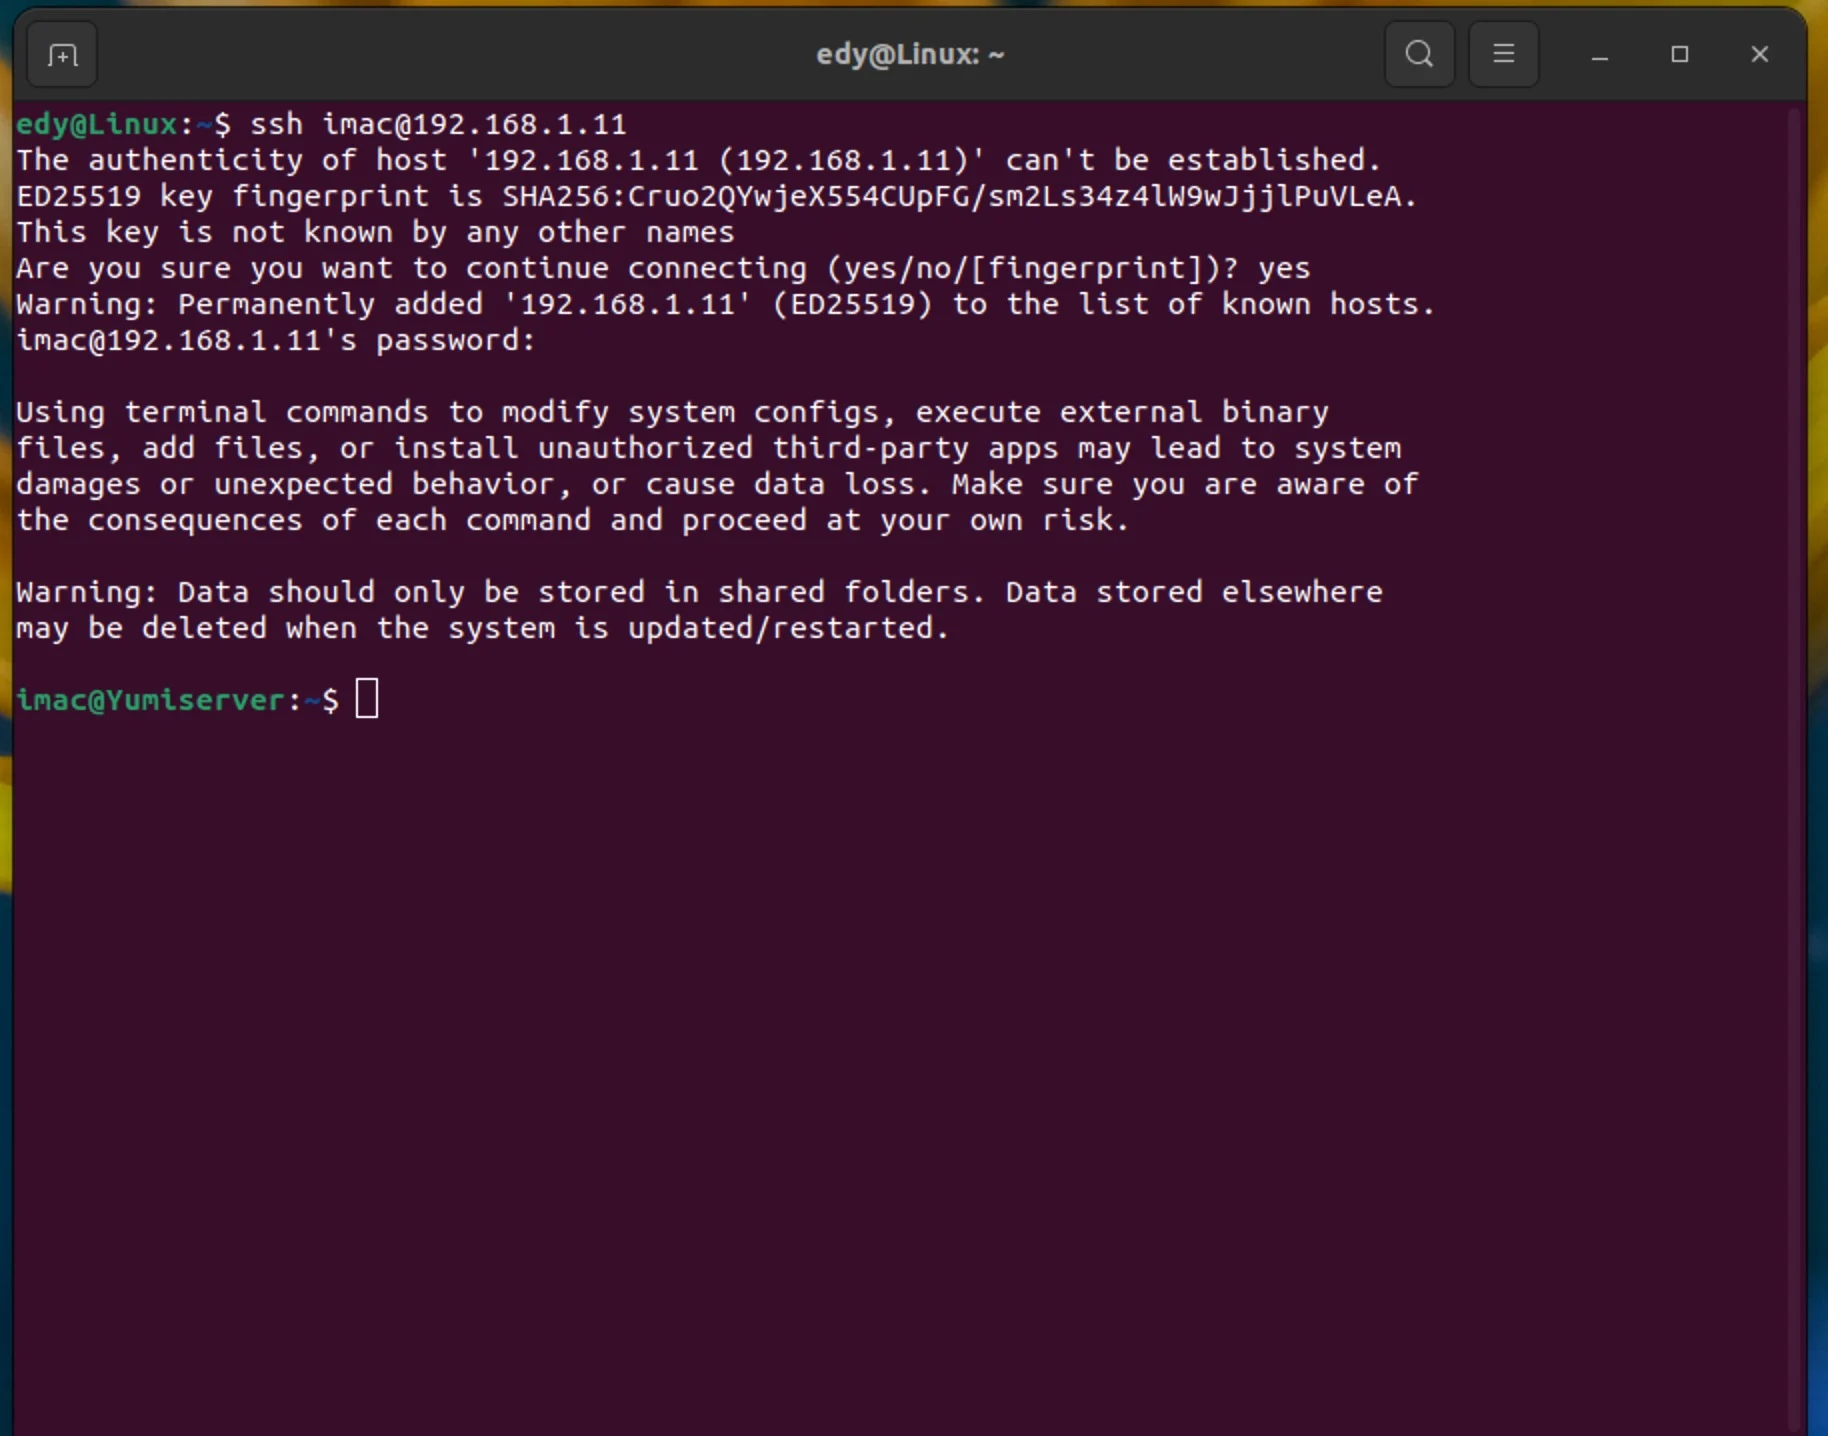
Using Linux
SSH comes pre-installed on most Linux distributions, which means accessing the Synology NAS via SSH is painless. Here’s how to do it:
- Open a Linux terminal application. This can be done by pressing ‘Ctrl+Alt+T’ on most distributions or searching for ‘Terminal’ on others.
- Once your terminal is open, type the ssh command:
ssh username@IPaddress - You’ll be prompted for host key verification if it’s your first time establishing an SSH connection with your Synology NAS. Type
yesto proceed. - Finally, you’ll need to input your password. After doing this, you’re in!
Remember: replace “username” and “IP address” with your Synology NAS username and IP address, respectively.
Now that you’re connected, you can use the essential SSH commands to manage your Synology NAS from the Linux terminal.
Essential SSH Commands
Knowing some essential SSH commands, such as the ls command or cd command, can significantly improve your experience with the Synology NAS. Here are a few important ones you might find handy:
ls: List all files and directories in the current directory.cd [directory]: Change your current directory to the specified directory.pwd: Print the full filepath of the current directory.cp [file1] [file2]: Copy the contents offile1tofile2.mv [file1] [file2]: Move or renamefile1tofile2.rm [file]: Delete the specified file.exit: Terminate the SSH session and return to your local terminal.
Remember, when executing commands, replace brackets and the content inside with your filenames or directories.
With a bit of practice, following this tutorial, you’ll become more proficient with these commands, unlocking the full potential of your Synology NAS.
My pick
My Synology NAS recommendations
Ensuring Safety and Security with SSH Protocol
SSH provides robust security for network communications, but it’s crucial to adhere to best practices to protect your Synology NAS. Here are some tips:
- Enable auto block: This feature blocks an IP address after multiple failed login attempts, adding an extra layer to SSH security.
- Regularly update: Periodically updating the SSH protocol can help protect against known vulnerabilities.
- Adjust SSH Port: The default port is 22, but it’s good practice to change it to a less predictable number.
- Limited access: Only grant SSH access to trusted users and only when necessary.
- Enable Firewall: Incorporate a firewall on your Synology NAS for added security. Be sure to allow the SSH port to function correctly.
Remember, it’s paramount to safeguard your Synology NAS, especially when enabling powerful features like SSH, which can compromise the entire filesystem if mishandled. With these safety measures in place, such as securing your credentials, you can securely unlock the potential of your NAS device.
I’d love to hear from you. Was this article helpful? Share your thoughts in the comments below. If you prefer, you can also reach me by email or connect with me on Reddit at Navigatetech.
Before you go …
Before you go, if you found the guide on SSHing into Synology insightful, I highly recommend checking out WordPress on Synology. This article is a fantastic follow-up, especially if you want to leverage your Synology NAS for more than just file storage. It dives into how you can host your own WordPress site directly from your Synology device, combining the convenience of NAS with the power of the world’s most popular content management system.
Related Articles


About the author
Hi, I’m Edy Werder. I write hands-on guides about Proxmox, homelab servers, NAS, and WordPress, based on real setups I run and document.
No sponsors, no fluff—just real configs and results.
Enjoying the content?
