By Edy Werder — IT Consultant & Tech Blogger
I got my Fail2ban email notifications working by installing Postfix, setting destemail and mta = sendmail in jail.local, and restarting Fail2ban. Test it with a valid email before you trust it.
I found that Fail2ban was easy to install. Getting email notifications to work took way more effort than I expected. Bans worked fine, but I was frustrated that no alerts were landing in my inbox. This is my experience for anyone running Fail2ban on a self-hosted Ubuntu or Debian server, homelab, or VPS, as I do.
The good thing is that email really matters because it’s your only warning when Fail2ban blocks the wrong IP. It actually saved me once, when my Proxmox box got banned by mistake. I caught it immediately and fixed it with an ignoreip. Without that alert, I would have been in trouble for much longer.
My full setup: Fail2ban installation, Postfix for sending mail, jail configuration, and testing to confirm emails actually arrive. I was using Ubuntu 22.04/24.04, but I’m pretty sure the same principles apply to other distros.
Fail2ban is a free, open-source tool that monitors log files for suspicious activity, such as repeated failed logins. When it detects an attack, it automatically blocks the offending IP address using firewall rules. That’s the default action. Add an action like email notifications, and it also alerts you when it happens.
This guide focuses on protecting the SSH protocol with Fail2ban. But Fail2ban can monitor many other services too, such as Asterisk (VoIP), Postfix, https like Nginx, or Apache, and even custom iptables rules. The setup principle is the same for the following services: define a jail, point it at a log file, and choose an add action.
I’m using Ubuntu for this example. The installation is quick; make sure your server is up to date first:
sudo apt update && sudo apt upgrade -yNow install Fail2ban:
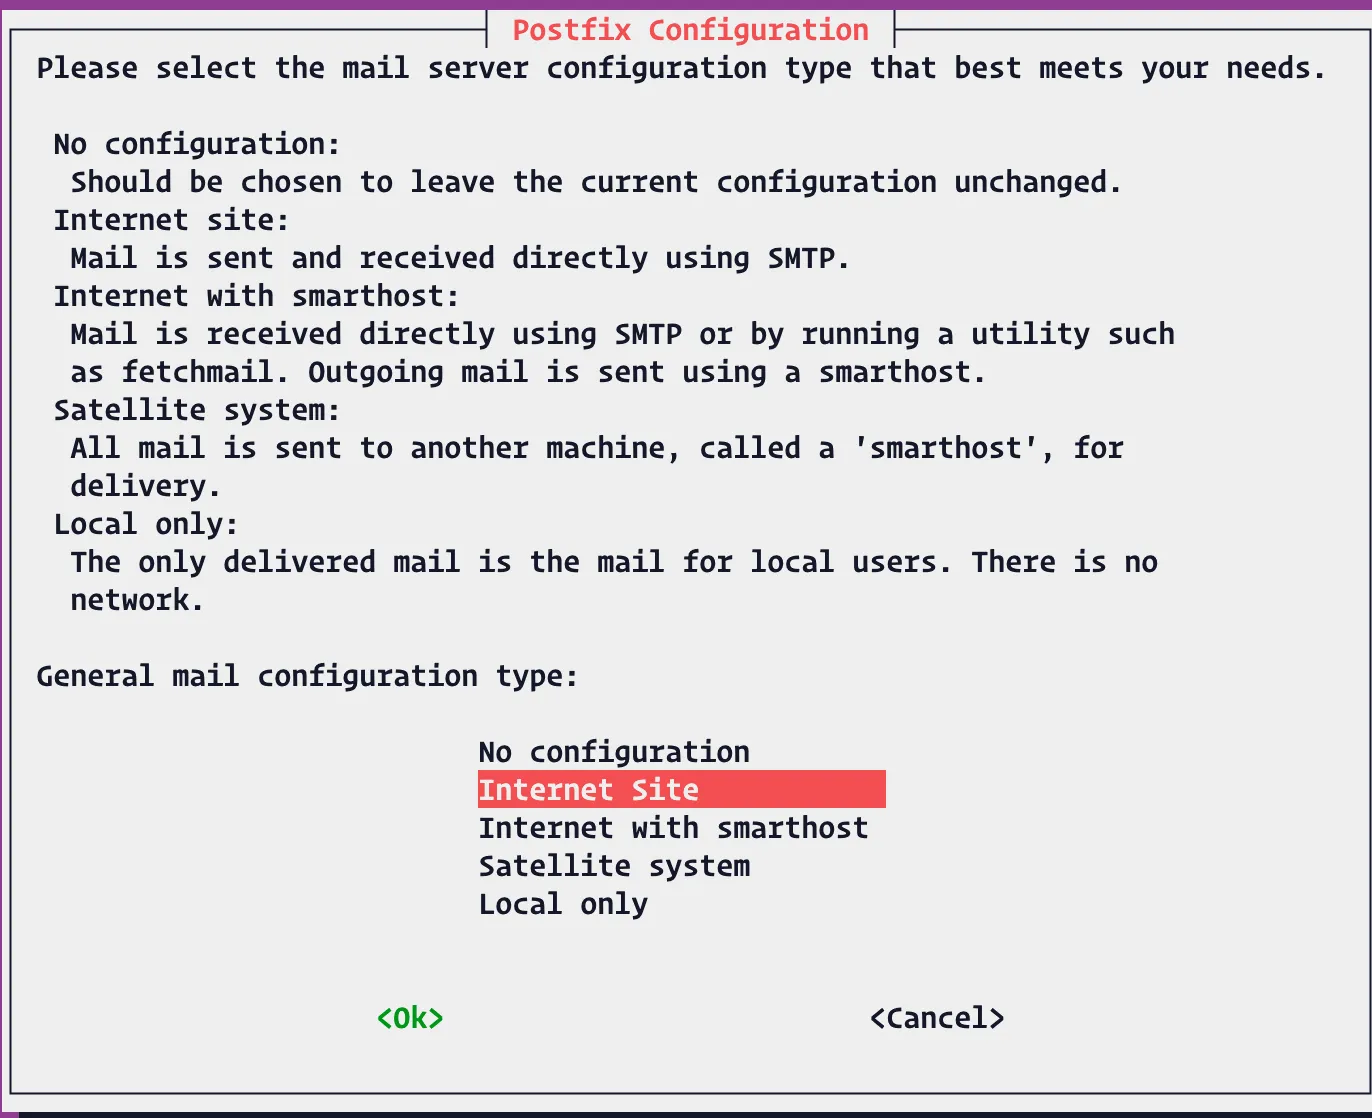
sudo apt install fail2ban -yFor email alerts, you also need a mail transfer agent (MTA). The simplest option is Postfix, which works out of the box with Fail2ban:
sudo apt install postfix -yDuring installation, Postfix asks for a configuration type. Choose ‘Internet Site’ and enter your server’s hostname.

Confirm your server clock is correct (important for logs and email headers).
timedatectlIf the time is wrong, adjust it with timedatectl set-timezone before continuing.
To configure Fail2ban for email notifications, add specific actions to the jail configuration files.
Fail2ban’s main configuration file is /etc/fail2ban/jail.conf. Never edit this file directly. It may be overwritten by updates.
Instead, create /etc/fail2ban/jail.local. Settings in jail.local override jail.conf and stay safe during package upgrades.
In jail.local, you define:
Here’s an example configuration file for SSH with email notifications:
sudo nano /etc/fail2ban/jail.local[DEFAULT]
ignoreip = 127.0.0.1
bantime = 86400
findtime = 120
maxretry = 3
destemail = yourname@example.com
sender = fail2ban@example.com
sendername = Fail2ban
mta = sendmail
action = %(action_mwl)s
[sshd]
enabled = true
port = 12522
filter = sshd
logpath = /var/log/auth.logTip: Don’t leave SSH on port 22. Update your firewall rules and reflect that port in your jail configuration.
Explanation:
mta = sendmail this works even though we installed Postfix.action_ = ban only. action_mw = ban + email. action_mwl = ban + email + log lines.Restart the Fail2Ban service after making configuration changes for the changes to take effect.
sudo systemctl restart fail2banOnce the command executed, Fail2ban reloads with your new jail configuration.
After editing jail.local, reload Fail2ban and check the SSH jail:
sudo systemctl restart fail2ban
sudo fail2ban-client status
sudo fail2ban-client status sshd
Status for the jail: sshd
|- Filter
| |- Currently failed: 0
| - Total failed: 0 – Actions
|- Currently banned: 0
`- Total banned: 0
You should see the sshd jail enabled, with a list of log paths and zero banned IPs.
Make sure the server can send mail before you test bans:
printf "Subject: Fail2ban Test
Fail2ban email test" | sendmail yourname@example.com
If nothing arrives, check your mail logs:
sudo tail -n 50 /var/log/mail.logOn some systems using systemd only: journalctl -u postfix -n 50
To test email notifications in Fail2Ban, deliberately fail an authentication attempt (e.g., by entering a wrong password multiple times) and check email for alerts.(use your custom SSH port):
Important: Do this from a different machine or IP. If you test from your current SSH session, you might lock yourself out.
ssh -p 12522 wronguser@your.server.ip
# enter a wrong password 3+ times (based on your maxretry)
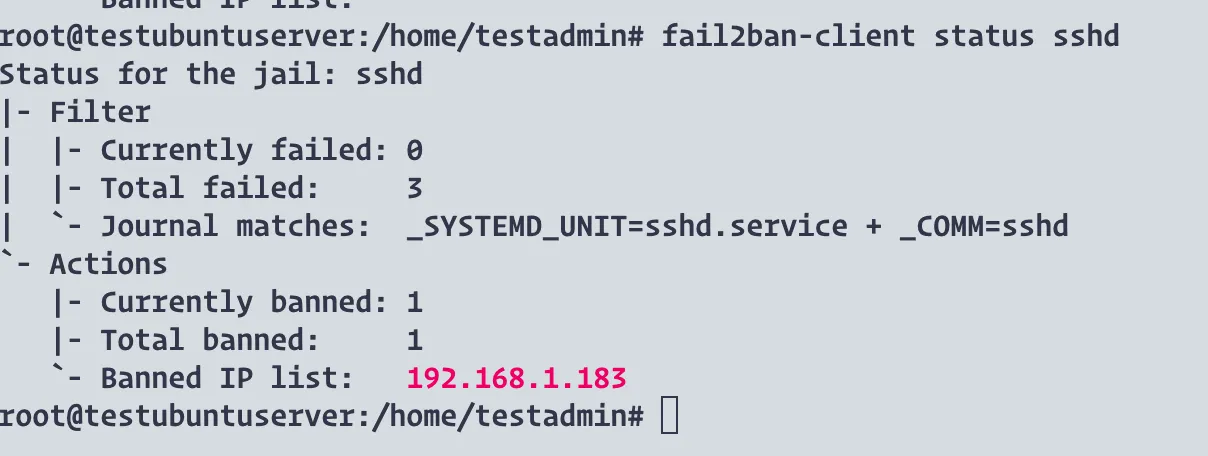
# - p is the ssh port numberNow confirm the ban:
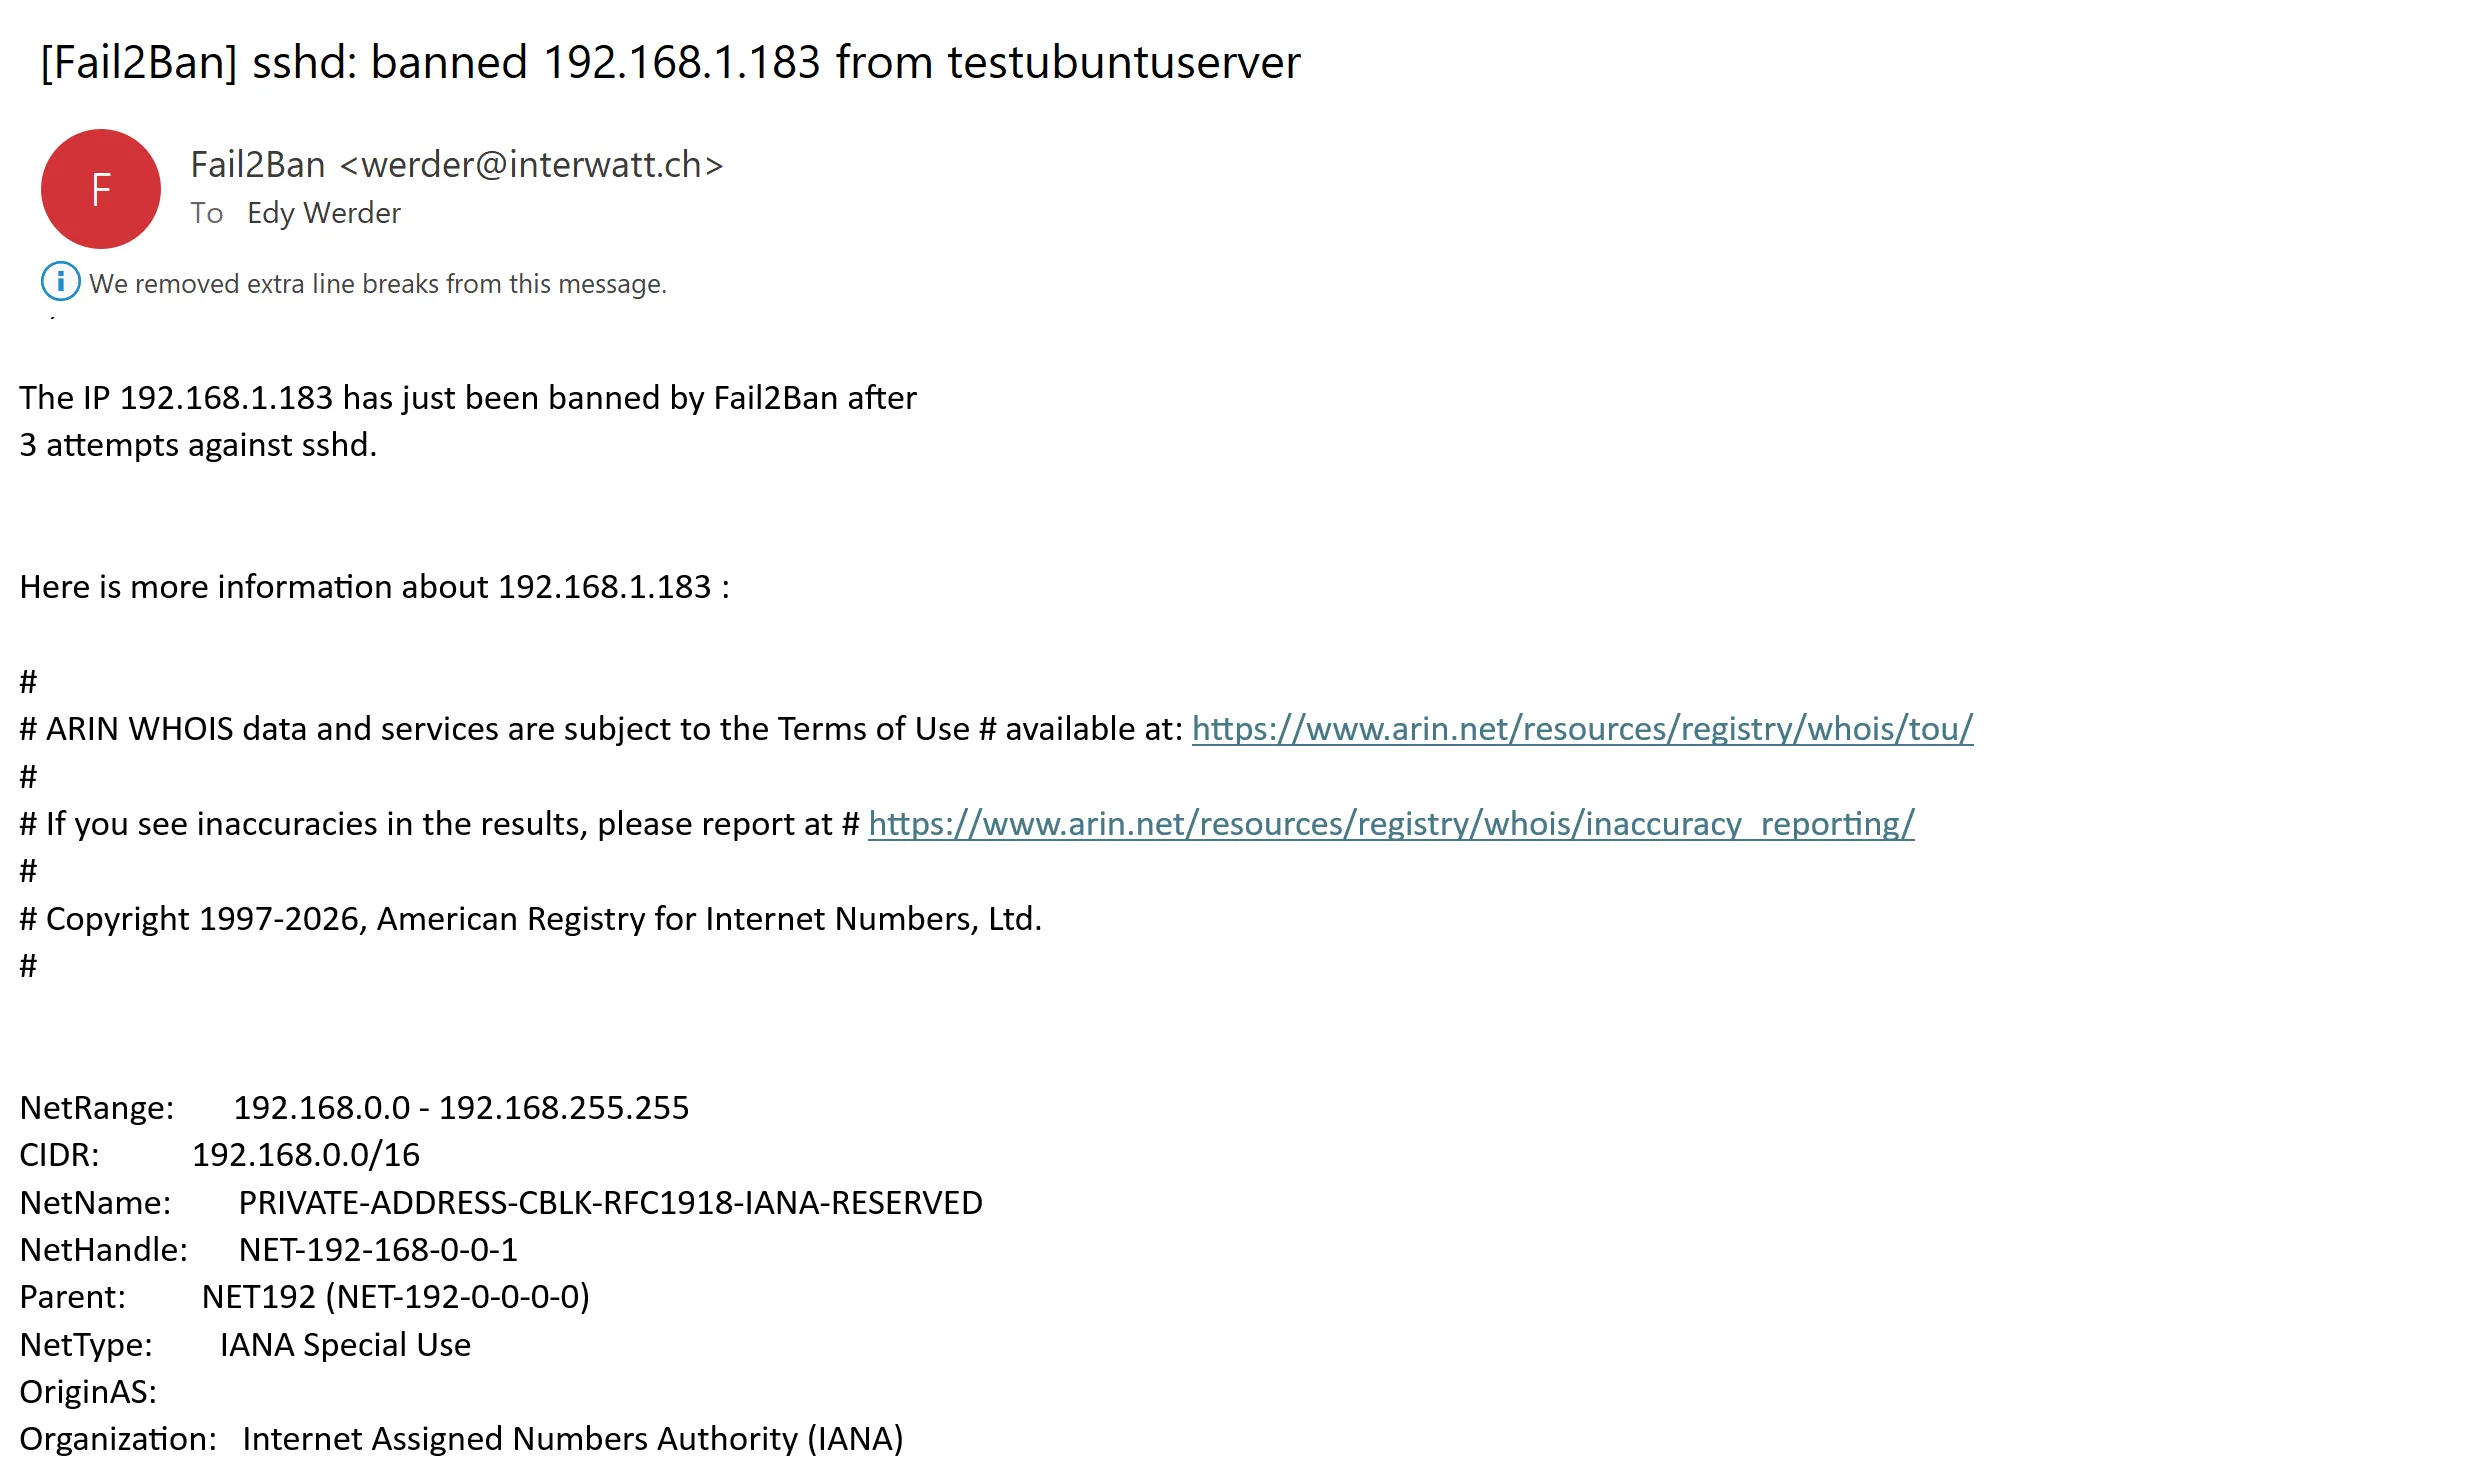
sudo fail2ban-client status sshdYou should see 1 banned IP. An email with subject similar to [Fail2Ban] sshd should land in your inbox (with logs, because we used %(action_mwl)s).
To find the banned IP, run:
sudo fail2ban-client status sshdIf you locked out a legit IP during testing:
sudo fail2ban-client set sshd unbanip <YOUR_IP>Most issues after following this post come down to one of these:
edit /etc/fail2ban/jail.local
[DEFAULT]
ignoreip = 127.0.0.1 ::1 192.0.2.10 203.0.113.0/24
Only for SSH (put inside the jail):
[sshd]
ignoreip = 127.0.0.1 ::1 192.0.2.10 203.0.113.0/24– Postfix: full MTA, reliable defaults, provides /usr/sbin/sendmail.
– msmtp-mta: lightweight relay to external SMTP (simple, minimal).
– Sendmail: classic but complex—only if you specifically want it.
Tip: For most, Postfix or msmtp-mta is best. Both work with mta = sendmail.
Fail2ban doesn’t send email directly. It hands alerts to your server’s mail system (Postfix, Sendmail interface, msmtp). That works instantly on some servers, but it often fails in homelab and VPS setups.
A common scenario looks like this:
That’s usually not a Fail2ban problem. It’s mail delivery.
Typical causes:
If your alerts don’t show up, check /var/log/mail.log. Once the mail system can deliver, Fail2ban emails work automatically.
Because internal mail stays inside your network. Exchange typically accepts SMTP from trusted local IPs and delivers to local mailboxes. Sending to Gmail needs a working outbound path to the internet.
Proxmox comes with sendmail already installed for email alerts. Many don’t know that sendmail looks for Postfix servers on your network and tries to connect to them.
I have a Postfix server at home that uses Fail2ban with email notifications. One day, I got an unexpected email alert. Surprise! My own Fail2ban setup was banning my Proxmox server.
Without these email alerts, I might never have noticed this problem. My servers would have been fighting each other silently for weeks.
The alerts showed me exactly what was happening: Proxmox’s sendmail was trying to connect to my Postfix server, and Fail2ban saw these attempts as suspicious.
The fix was simple: I added the Proxmox server’s IP to the safe list.
ignoreip = 127.0.0.1 <Proxmox-IP>This experience reinforced why I always enable email alerts. They don’t just warn you about hackers — they also reveal when your own devices misbehave.
Quiet mini-PC (32GB-capable) – perfect for Ubuntu + Fail2ban.

I earn a commission if you make a purchase, at no additional cost to you.
Setting up Fail2ban with email notifications takes only a few extra steps. You’ll know right away when suspicious activity occurs, or when your own devices misbehave.
If you’re running this on a VPS or cloud provider, many data centers block or limit outgoing SMTP (port 25). If emails don’t arrive, check with your host. A workaround is to configure Postfix (or msmtp) to relay mail through a trusted SMTP service like Gmail, your ISP, or a transactional email provider. Even when mail is sent successfully, it may land in spam. Adding an SPF record for your domain helps.
With that in place, Fail2ban isn’t just silently protecting your server — it’s actively keeping you informed.
If you are evaluating whether to stick with Fail2ban or switch to CrowdSec, I compared both tools in detail.
If you found the Fail2Ban email notification setup helpful, there’s more you can do to strengthen your server’s security. A great next step is implementing two-factor authentication for SSH access. It’s especially valuable for platforms like Proxmox or any Linux-based system where SSH is a key entry point.
For a clear walkthrough on adding this extra layer of protection, check out securing SSH with 2FA on Linux and Proxmox. It’s a practical way to stay one step ahead of unauthorized access.
Hi, I’m Edy Werder. I write hands-on guides about Proxmox, homelab servers, NAS, and WordPress, based on real setups I run and document.
No sponsors, no fluff—just real configs and results.
Enjoying the content?