
By Edy Werder — IT Consultant & Tech Blogger
VMware snapshots are potent tools, but when mismanaged, they can significantly impact your virtual machine performance. As an experienced VMware administrator, I’ve seen firsthand the consequences of improper snapshot use.
In this article, I’ll share VMware snapshot best practices to help you boost VM performance through correct snapshot management. I’ll explain snapshots, how to use them effectively, and tips for troubleshooting common issues.
A VMware snapshot is a point-in-time copy of a virtual machine’s state. It captures the VM’s disk, memory, and settings, allowing you to revert to that exact state later. Think of it as a “save point” in a video game – you can always return to it if something goes wrong.
When you create a snapshot, VMware doesn’t copy all the data. Instead, it uses a clever technique called “copy-on-write.” Here’s how it works:
This approach saves time and storage space, as only the changes are tracked rather than creating a full VM copy.
-000001.vmdk, -000002.vmdk, etc.) is created. This file captures all the changes made to the virtual disk from the moment the snapshot is taken..vmsd) contains metadata about the snapshot, such as the hierarchy and relationship between different snapshots. It’s crucial for managing the snapshot chain..vmem) is created. This file captures the state of the VM’s RAM at the time of the snapshot..vmsn file. This includes the VM’s settings and hardware configuration.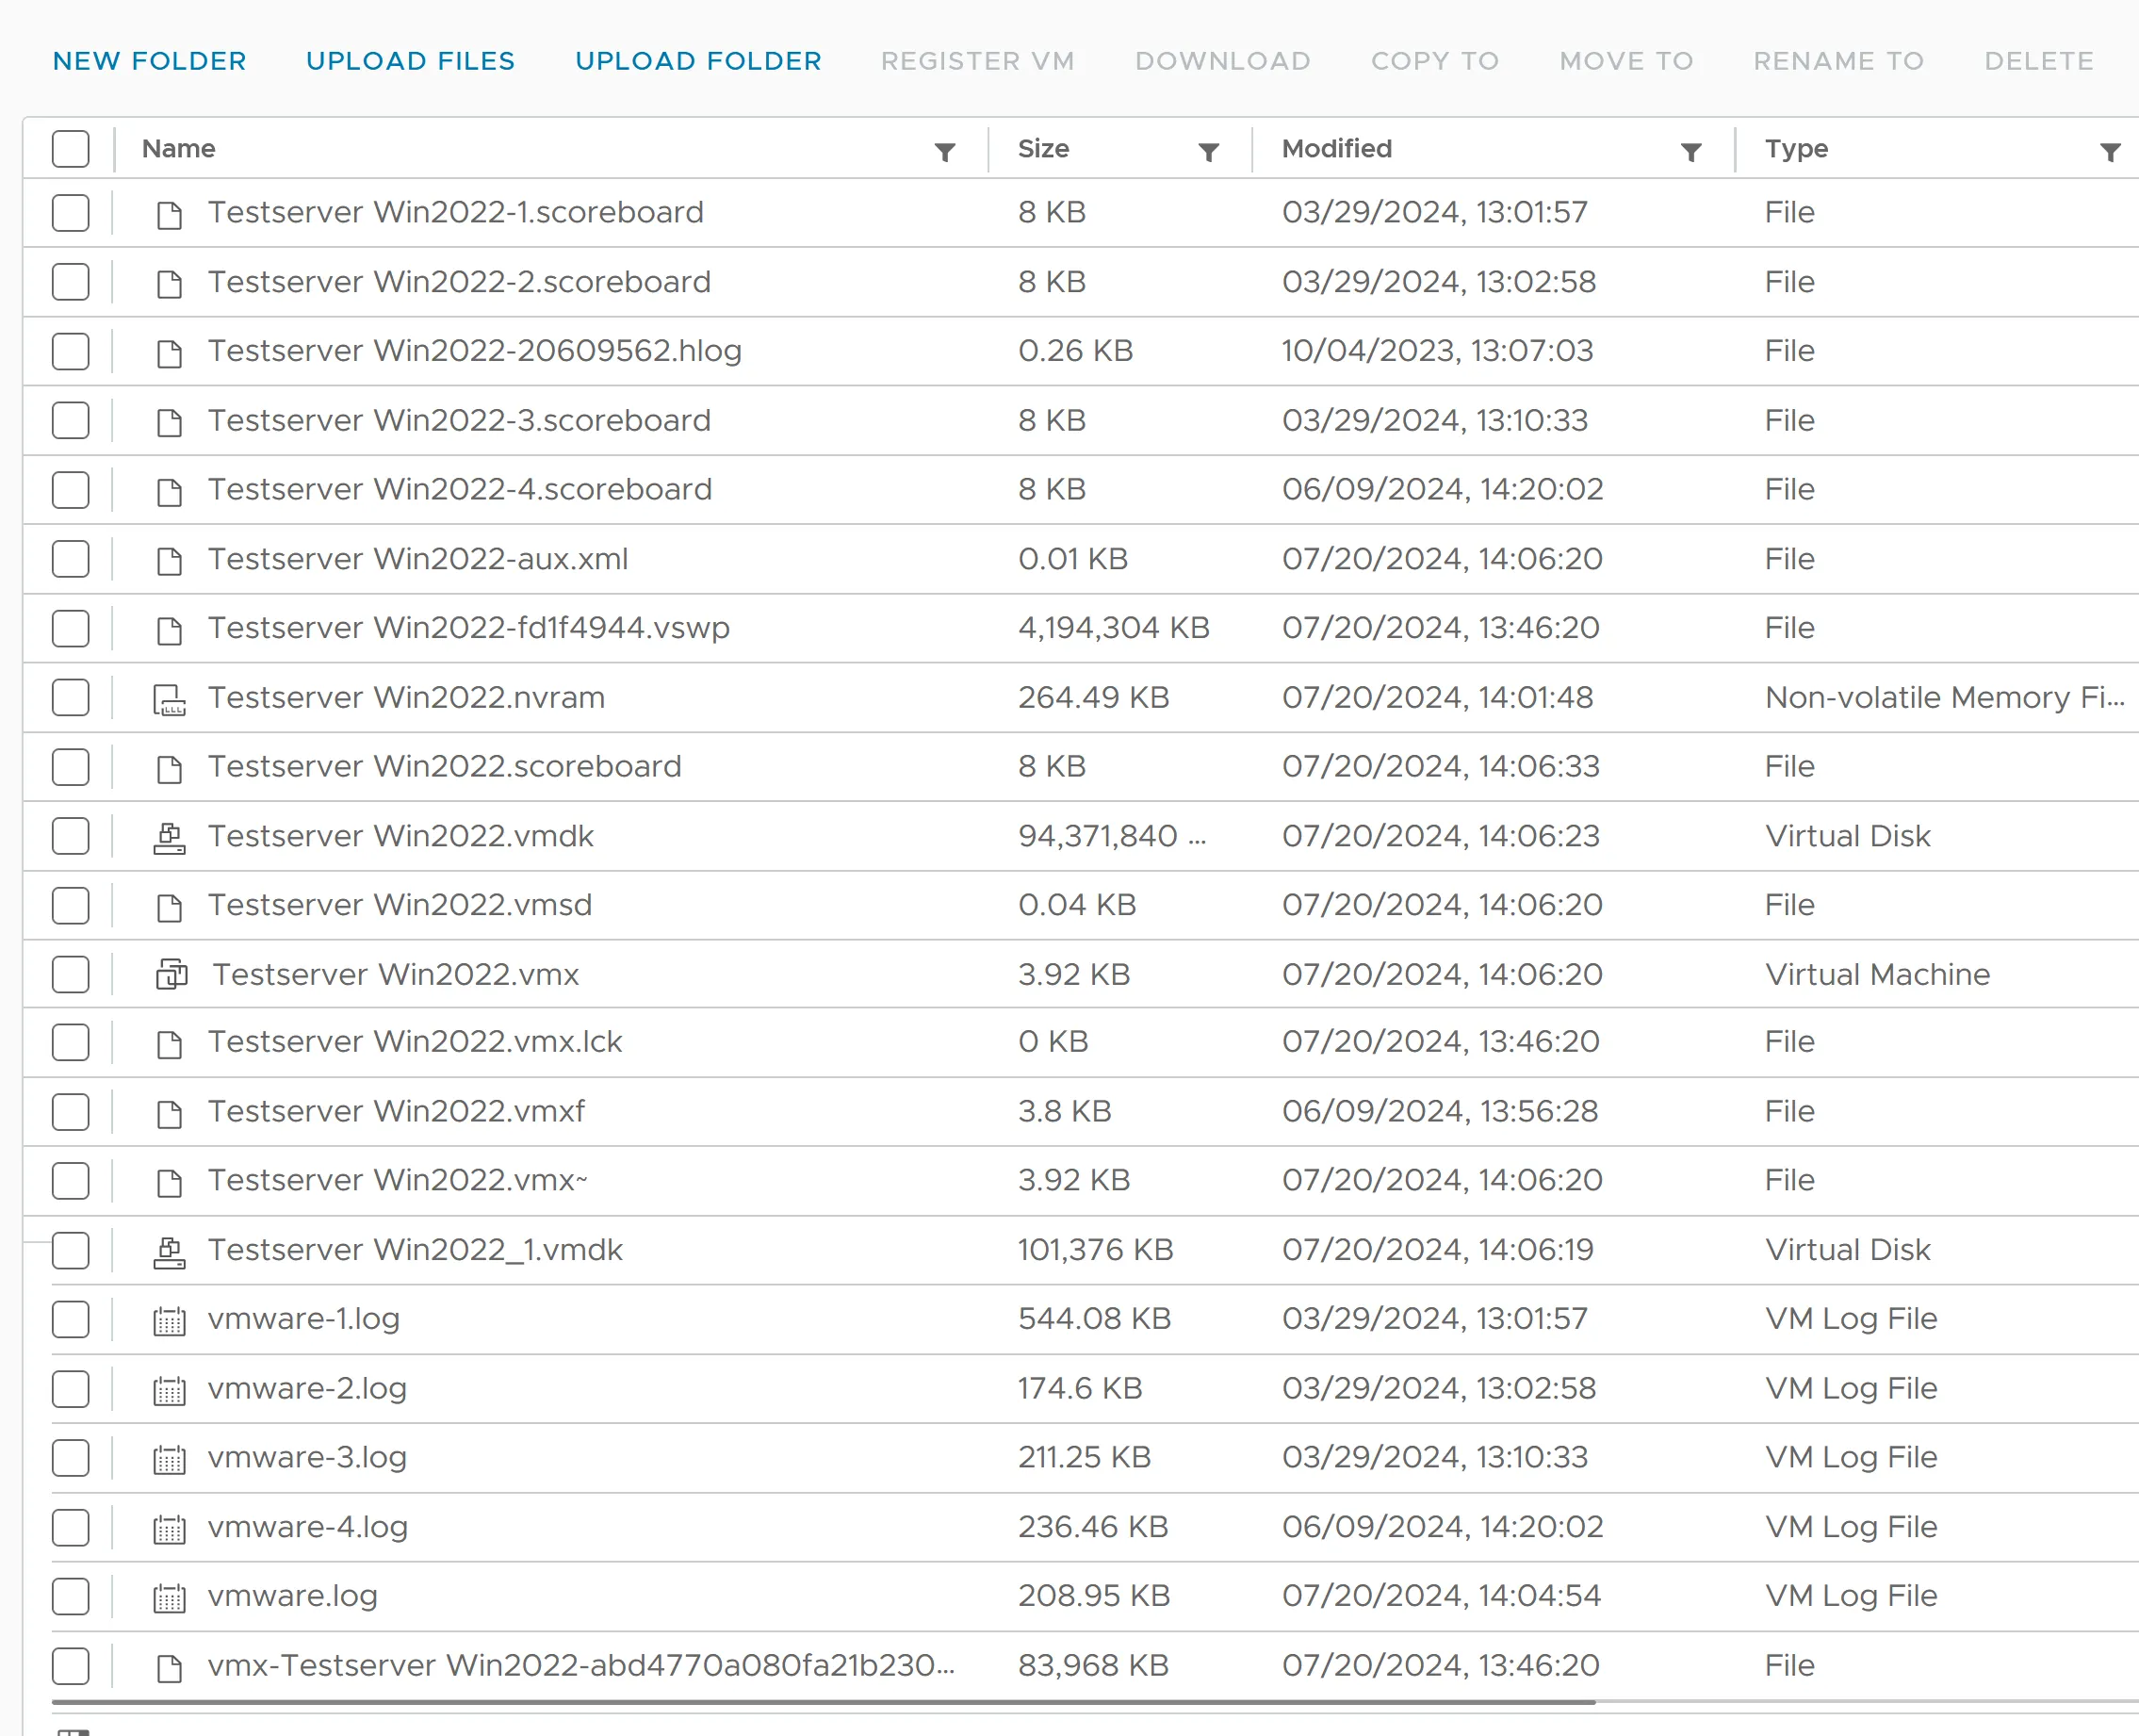
When you create a VMware snapshot, several new files are generated:
The original VMDK file becomes read-only, and all new writes are directed to the delta VMDK file. This structure allows VMware to efficiently manage changes and provide the ability to revert to previous states.
Understanding these files is crucial for effective snapshot management and troubleshooting. Monitor their growth, especially in production environments, to prevent unexpected storage issues.
Snapshots can slow down disk I/O operations for several reasons:
These factors can lead to increased latency, reduced IOPS (Input/Output Operations Per Second), and an overall decline in VM responsiveness.
The performance impact compounds as you create multiple snapshots:
In my experience, VMs with more than 2-3 snapshots often show noticeable performance degradation. To maintain optimal performance, regularly reviewing and removing unnecessary snapshots is crucial.
VMware recommends 2-3 Snapshots max per VM and keeping it no longer than 72 hours.
Enhance your virtualization experience with these budget-friendly and high-performing renewed servers.
| Brand | Model | Buy in US | Buy in UK | Kaufe in Deutschland |
|---|---|---|---|---|
| Dell | Poweredge R710 | View on Amazon | View on Amazon | Gehe zu Amazon |
| Dell | Poweredge R630 | View on Amazon | View on Amazon | Gehe zu Amazon |
| HPE | ProLiant DL360 Gen10 | View on Amazon | View on Amazon | Gehe zu Amazon |
| HPE | Proliant DL380 Gen 9 | View on Amazon | View on Amazon | Gehe zu Amazon |
| HPE | Proliant ML350 Gen10 | View on Amazon | View on Amazon | Gehe zu Amazon |
| Supermicro | E300 | View on Amazon | View on Amazon | Gehe zu Amazon |
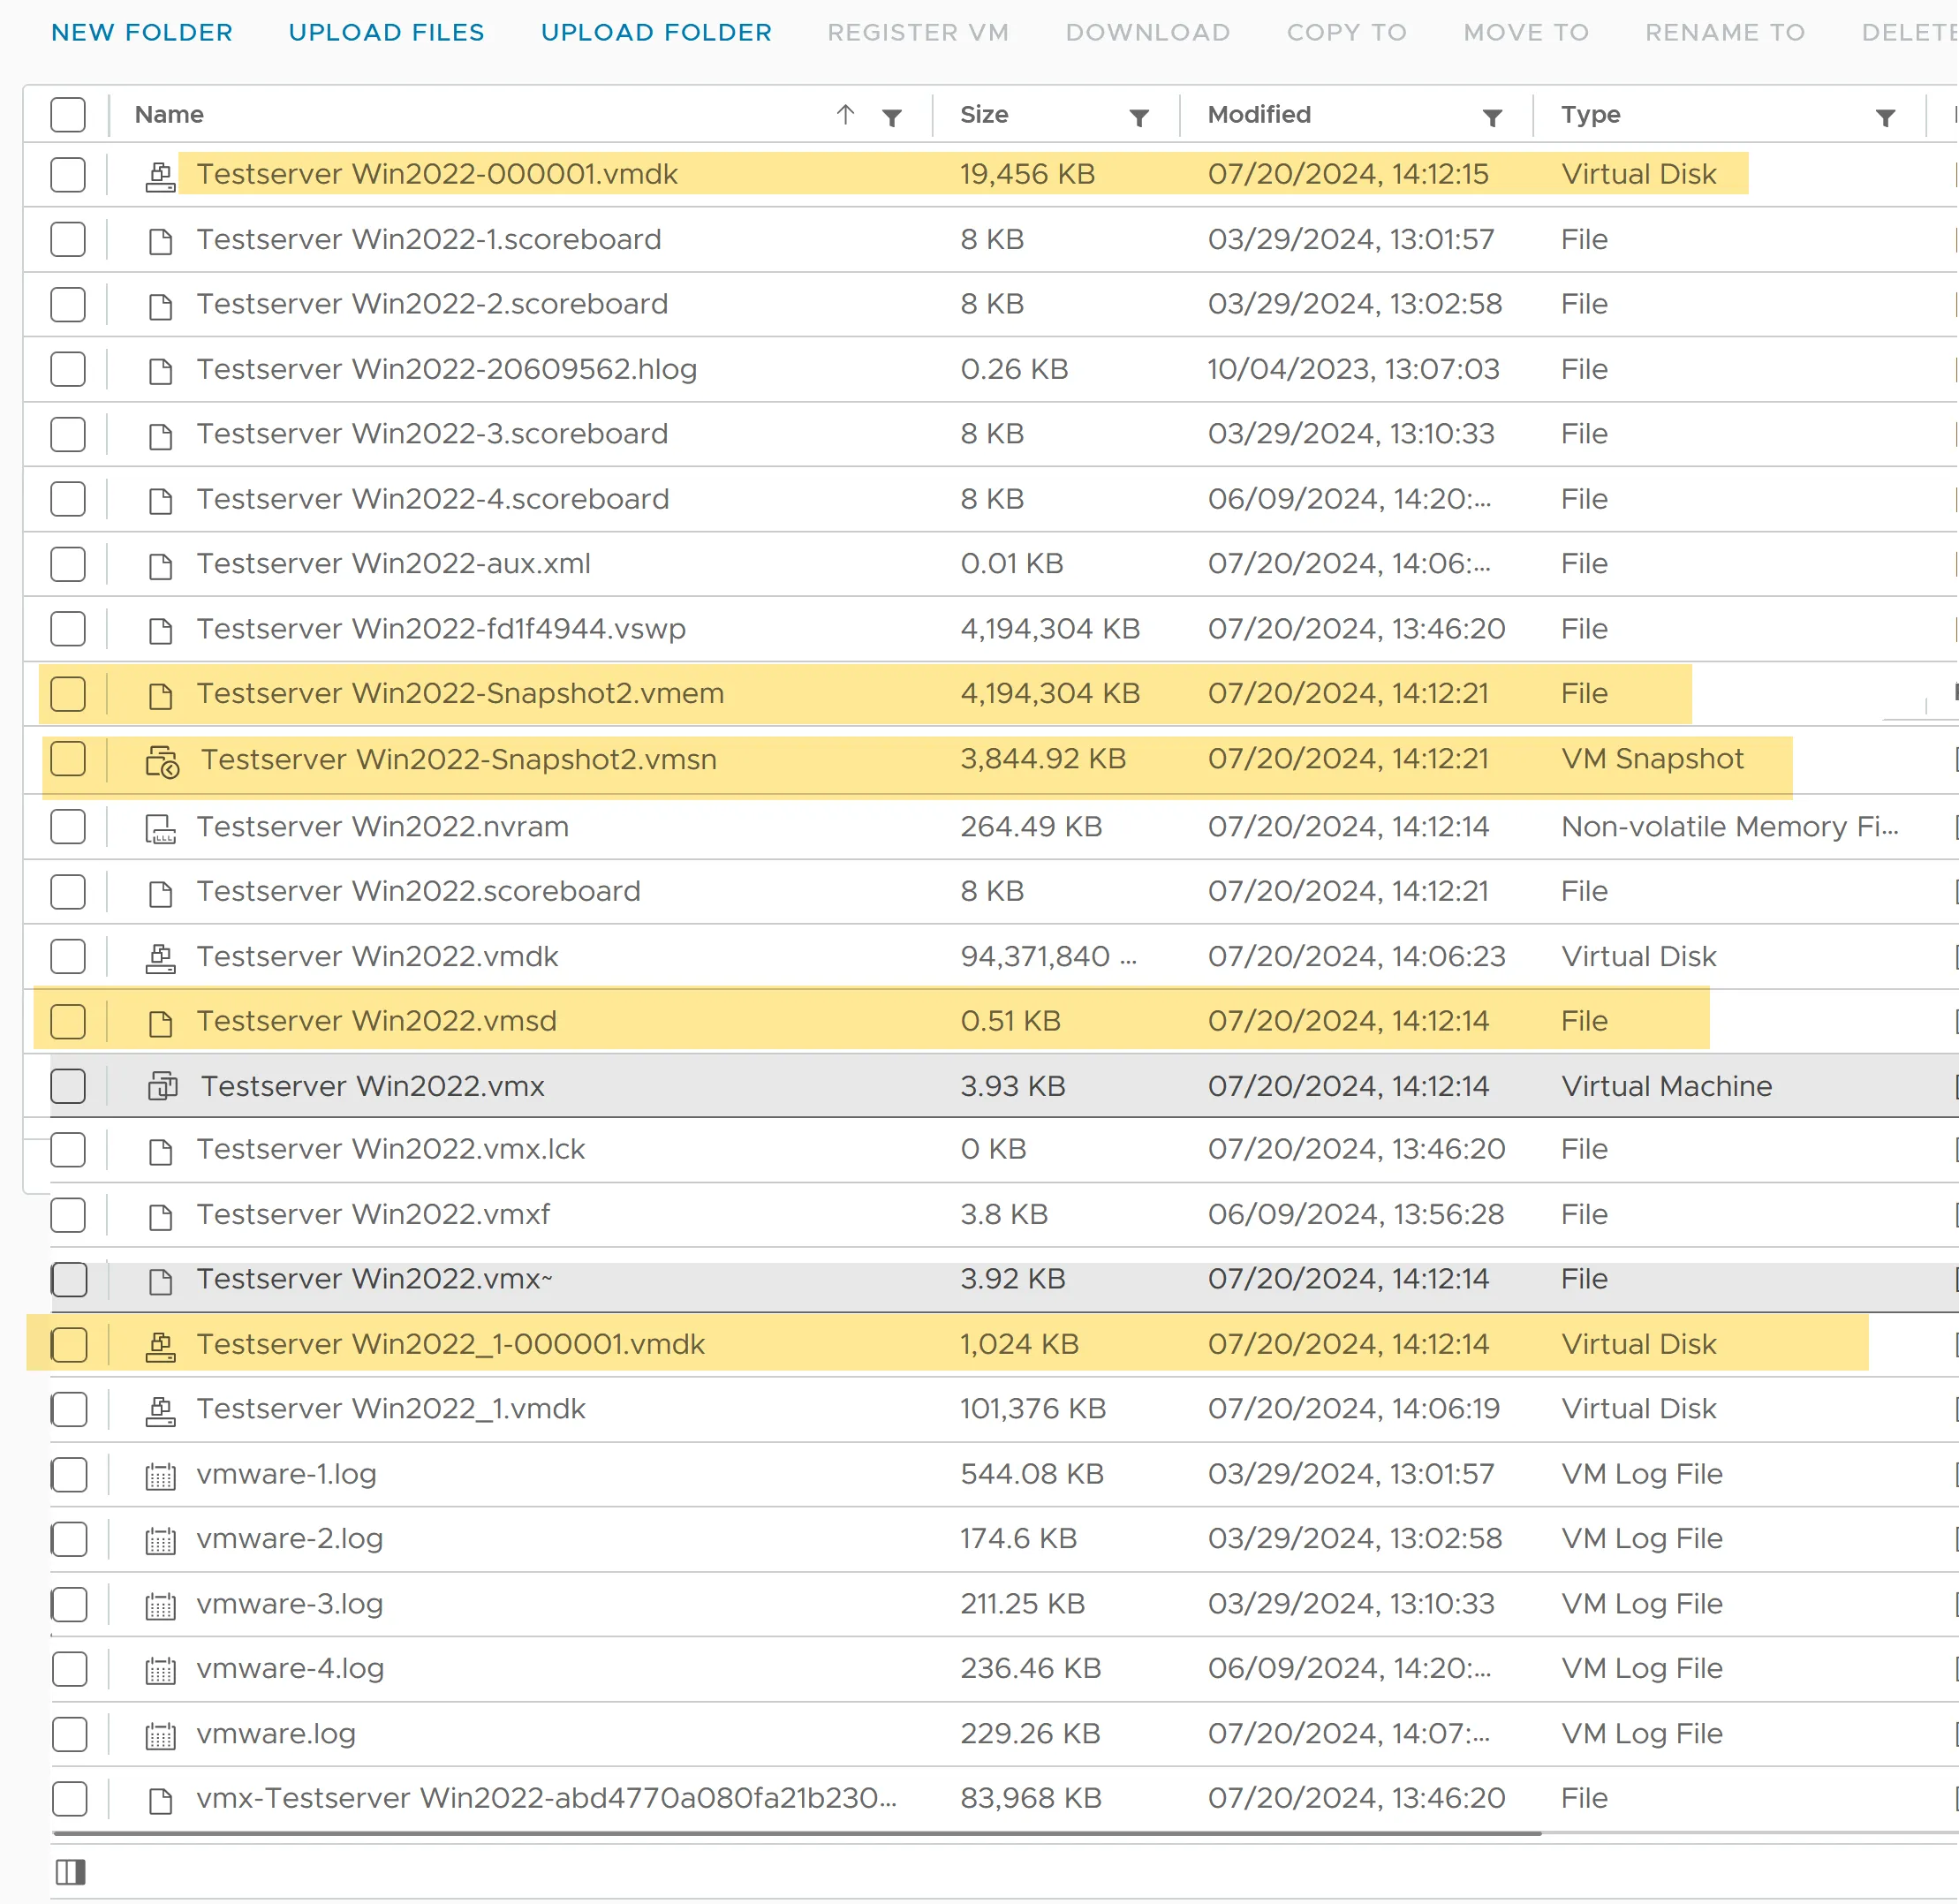
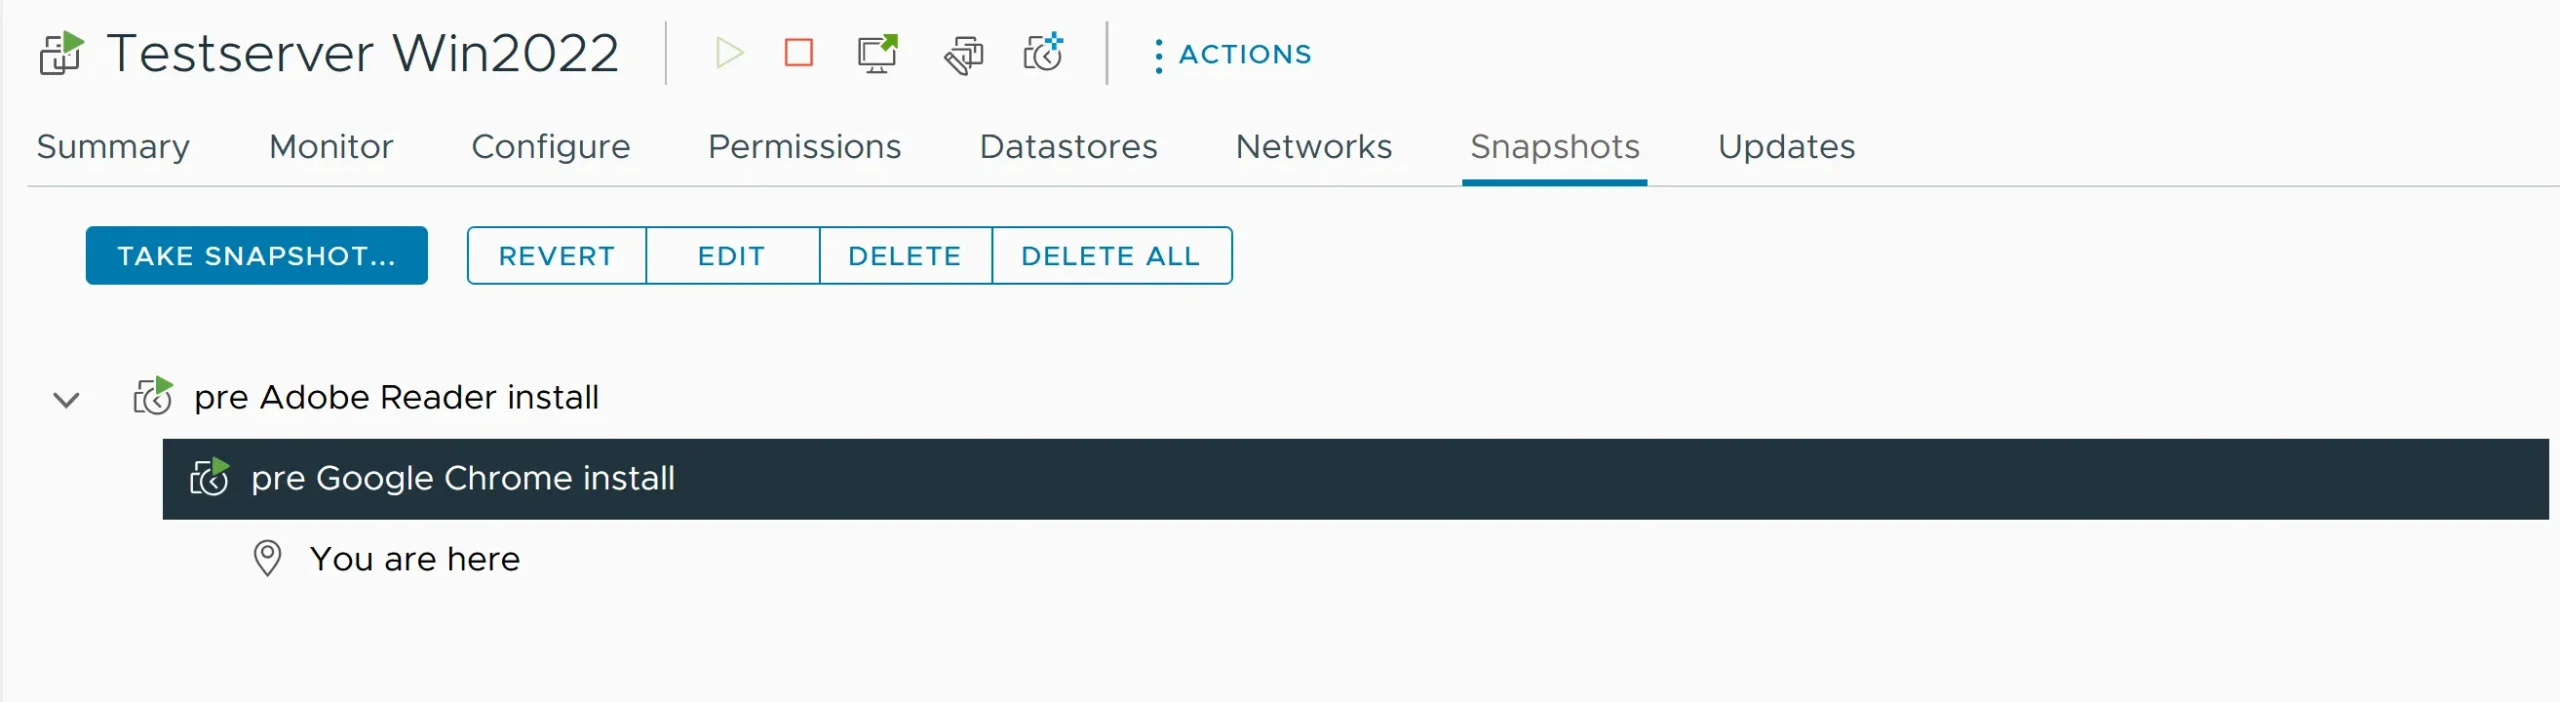
I like to give the snapshot a meaningful name.
Choose based on your specific needs. Memory snapshots are helpful for troubleshooting, while disk-only snapshots are typically sufficient for most scenarios.
Monitor the deletion process, especially for large snapshots, as it can temporarily impact VM performance.
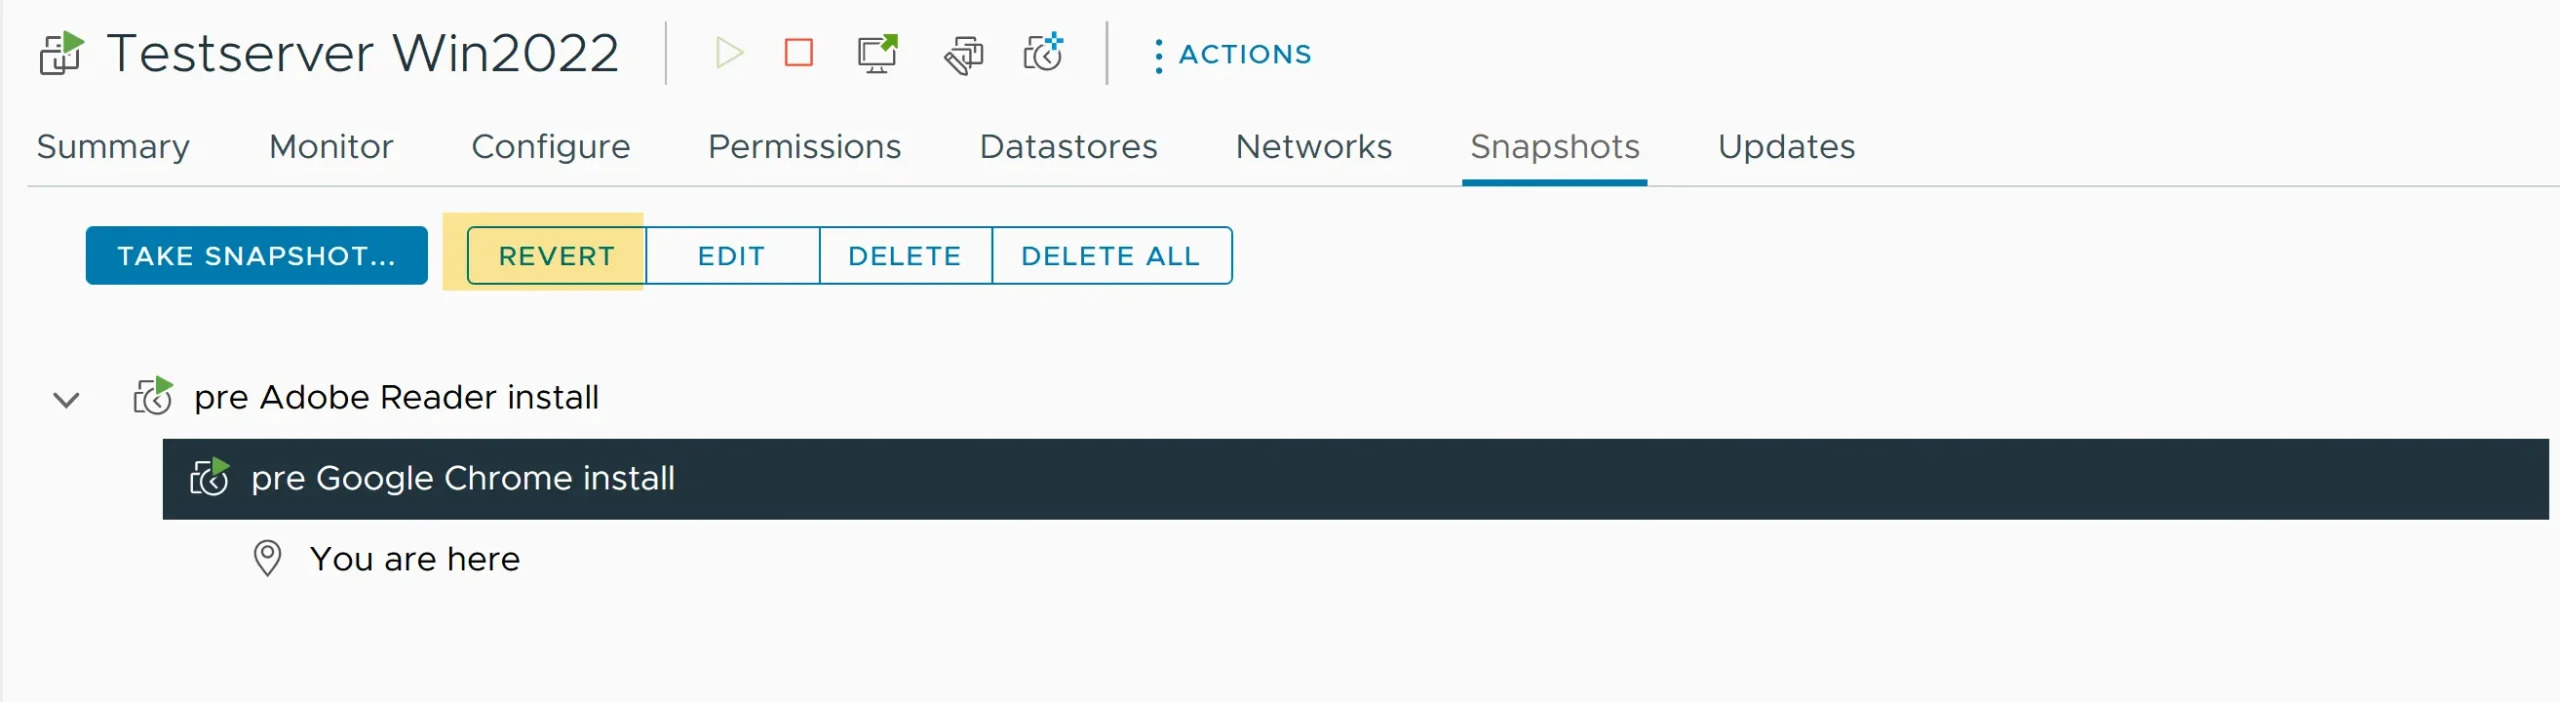
Remember, reverting discards all changes made after the snapshot was taken.
Initiating Consolidation:
vSphere Check:
Regularly performing these basic management tasks ensures effective snapshot management in vSphere, significantly improving VM performance and reducing the risk of snapshot-related issues.
Best Mini-PC to run Proxmox or VMWARE
Managing snapshots effectively is crucial for maintaining your virtual machines’ optimal performance and reliability (VMs). Here, I’ll share best practices for using VMware snapshots with VMware vSphere to help you keep your VMs running smoothly.
When it comes to the duration of keeping a snapshot, less is more. Snapshots are not designed for long-term storage but are best used for short-term testing, updates, or backups. Generally, I recommend keeping snapshots for a few days to a week. Prolonged use of snapshots can lead to increased storage consumption and degraded VM performance.
Managing the number and duration of snapshots is essential to avoid potential performance issues. Here are my recommendations:
One common myth in VM management is the belief that snapshots can be used as backups. This misunderstanding can lead to severe issues. Let’s clarify the differences and proper use cases for snapshots and backups.
Myth: Snapshots are a reliable backup solution.
Reality: Snapshots are designed for short-term, temporary captures of a VM’s state for tasks like testing, updates, or troubleshooting. They:
Myth: Backups are the same as snapshots.
Reality: Backups involve copying data to a separate location, ensuring long-term retention and disaster recovery. They:
Snapshots are for short-term use, while backups are for long-term protection. Using snapshots as backups can lead to data loss and performance issues. Ensure you use each tool for its intended purpose of maintaining a reliable and efficient VM environment.
VMware snapshots are versatile tools that enhance VM management in various scenarios. Below, I’ll outline some common use cases where snapshots prove invaluable.
Snapshots are handy when dealing with software updates and patch management. Here’s how I leverage them in these scenarios:
Utilizing VMware snapshots in these ways can enhance your VM management strategy, ensuring both flexibility and security during critical operations.
Many backup providers leverage VMware Snapshot technology as part of their backup processes. Here’s how they typically use snapshots:
However, there are some considerations to keep in mind:
Certain technical operations and functionalities are restricted when snapshots are present in a VMware environment. Here are the primary limitations to be aware of:
In this section, I’ll provide a PowerShell script that you can use to monitor VMware snapshots and receive daily email notifications about existing snapshots. This script helps ensure you stay informed about snapshot statuses, including those created by backup applications that may not have been deleted automatically.
I developed this script together with ChatGPT. Please let me know if you have any improvements to the script.
Before using the script, you need to install the VMware PowerCLI module. This module provides a set of PowerShell cmdlets for managing VMware environments.
Install-Module -Name VMware.PowerCLI -Scope CurrentUser -AllowClobberImport-Module VMware.PowerCLI
Get-Module VMware.PowerCLI -ListAvailable
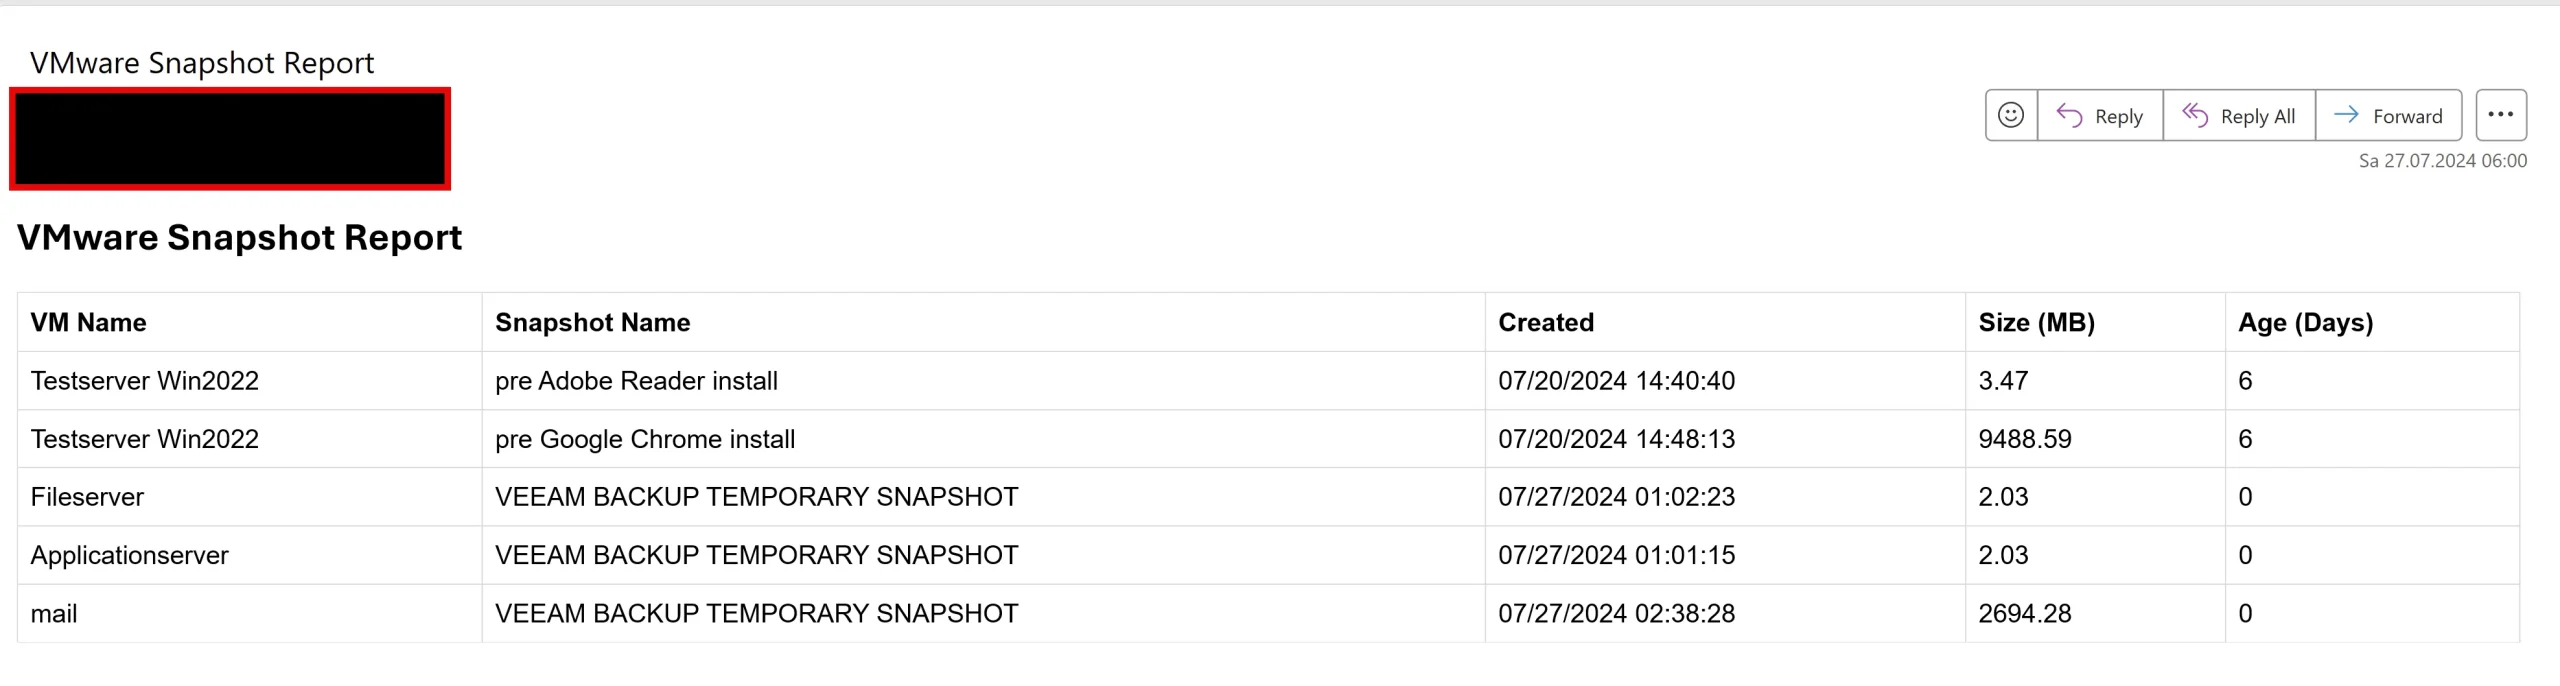
The script connects to your vCenter server, retrieves information about existing snapshots for all VMs, and sends a daily email report. This report includes details such as the VM name, snapshot name, creation date, size, and age of each snapshot.
This helps you keep track of snapshots and take necessary actions to manage them, especially those created by backup applications that may not have been deleted automatically.
Here’s the PowerShell script to monitor snapshots and send an email report:
# Configure PowerCLI to ignore invalid SSL certificates
Set-PowerCLIConfiguration -Scope User -InvalidCertificateAction Ignore -Confirm:$false
# Connect to the vCenter Server
Connect-VIServer -Server <vCenter_Server_IP> -User <username> -Password <password>
# Get all VMs
$allVMs = Get-VM
# Create a custom object to store snapshot details
$snapshotDetails = @()
# Loop through each VM to check for snapshots
foreach ($vm in $allVMs) {
    $snapshots = Get-Snapshot -VM $vm -ErrorAction SilentlyContinue
    if ($snapshots) {
        foreach ($snapshot in $snapshots) {
            $snapshotDetails += New-Object PSObject -Property @{
                VMName        = $vm.Name
                SnapshotName  = $snapshot.Name
                Created       = $snapshot.Created
                SizeMB        = [math]::round($snapshot.SizeMB, 2)
                AgeDays       = ((Get-Date) - $snapshot.Created).Days
            }
        }
    }
}
# Disconnect from the vCenter Server
Disconnect-VIServer -Server <vCenter_Server_IP> -Confirm:$false
# Format the snapshot details as an HTML table for the email body
$emailBody = @"
<html>
<head>
<style>
    table { font-family: Arial, sans-serif; border-collapse: collapse; width: 100%; }
    th, td { border: 1px solid #dddddd; text-align: left; padding: 8px; }
    tr:nth-child(even) { background-color: #f2f2f2; }
</style>
</head>
<body>
<h2>VMware Snapshot Report</h2>
<table>
    <tr>
        <th>VM Name</th>
        <th>Snapshot Name</th>
        <th>Created</th>
        <th>Size (MB)</th>
        <th>Age (Days)</th>
    </tr>
"@
$snapshotDetails | Sort-Object AgeDays -Descending | ForEach-Object {
    $emailBody += @"
    <tr>
        <td>$($_.VMName)</td>
        <td>$($_.SnapshotName)</td>
        <td>$($_.Created)</td>
        <td>$($_.SizeMB)</td>
        <td>$($_.AgeDays)</td>
    </tr>
"@
}
$emailBody += @"
</table>
</body>
</html>
"@
# Email parameters
$smtpServer = "<SMTP_Server>"
$smtpFrom = "<your_email@example.com>"
$smtpTo = "<recipient_email@example.com>"
$subject = "VMware Snapshot Report"
$body = $emailBody
# Send email with HTML body
Send-MailMessage -From $smtpFrom -To $smtpTo -Subject $subject -Body $body -SmtpServer $smtpServer -BodyAsHtml -Encoding UTF8
Write-Host "Email sent with snapshot details."<vCenter_Server_IP>: Your vCenter server IP address.<username>: Your vCenter username.<password>: Your vCenter password.<SMTP_Server>: Your SMTP server address.<your_email@example.com>: The email address from which the report will be sent.<recipient_email@example.com>: The email address of the recipient..ps1 extension, for example, MonitorSnapshots.ps1.Following these steps, you can set up an automated system to monitor VMware snapshots and receive regular email reports. This will ensure efficient snapshot management and keep you informed about snapshots, especially those created by backup applications that may not have been deleted automatically.
Below you see two screenshots how email notification looks. In the second screesnhot you see snapshot not deleted by Veeam backup. However the next days they were gone.

I’d love to hear from you. Was this article helpful? Share your thoughts in the comments below. If you prefer, you can also reach me by email or connect with me on Reddit at Navigatetech.
Before you go, if you’re looking to expand your VMware expertise, take a look at VMware ESXi Barebone Homelab. This article provides a step-by-step guide on setting up a barebone homelab with ESXi, perfect for hands-on practice and experimentation. It’s a great resource for anyone wanting to deepen their practical knowledge and skills in a home environment. This could be a valuable next read to enhance your virtualization setup.
Hi, I’m Edy Werder. I write hands-on guides about Proxmox, homelab servers, NAS, and WordPress, based on real setups I run and document.
No sponsors, no fluff—just real configs and results.
Enjoying the content?

