By Edy Werder — IT Consultant & Tech Blogger
For years, Fail2ban was the first thing I installed on any server I put online. It is light, it is simple, and it just works. I never had a reason to look further. Then CrowdSec kept coming up in homelab circles, and I wanted to know if it was hype or a real upgrade over the tool I already trusted. So I ran the Fail2ban vs CrowdSec comparison myself on the same hardware, with the same attacks, in the same time window.
Quick answer: Fail2ban or CrowdSec, what should you use?
If you only need basic SSH protection on one small server, use Fail2ban first. It is simple, light, and easy to configure, with working SSH protection right out of the box.
If you run a homelab with several public-facing services, CrowdSec is the stronger choice. It combines local log analysis with global threat intelligence, and the firewall bouncer blocks malicious IPs before they reach your services.
Once CrowdSec is running and verified, remove Fail2ban. Two tools writing to the same firewall chains creates more problems than it solves.
Both tools read log files from services like SSH, Nginx, or a reverse proxy. They watch for bad patterns and automatically block the offending IPs via iptables or nftables.
That’s where the similarity ends. Fail2ban works locally: it sees only what hits your server. CrowdSec shares threat intelligence across its entire user network, so it can block IPs before they ever reach your logs.
Everything in this comparison comes from servers that were actually exposed to the internet. The detections and bans you see below are real traffic, not a simulation.
I ran both tools simultaneously on two identical machines, so they saw the exact same attacks in the same window. I built one Proxmox VM, hardened it, then cloned it so the two boxes were identical. CrowdSec went on one, Fail2ban on the other. I opened both to the internet at the same moment.
Each VM is:
Both sit on a public VLAN behind my FortiGate, which I picked as my homelab firewall, each VM with its own IPv4 and IPv6 address, fully separated from my home LAN. A compromise could never reach my Proxmox cluster or my Synology NAS. SSH is open on port 22 with key-only login, and the WordPress site is exposed on 80 and 443, so the attackers get a real login page and real endpoints to go after.
Running the tools in parallel matters. Attack traffic changes hour to hour, so testing one after the other would compare different conditions. Side by side on identical boxes, every attack that hit one tool also hit the other at the same time.
The boxes drew real attack traffic within minutes of going live. Over two days, CrowdSec logged 30 alerts and Fail2ban recorded 42 total bans. Both tools had plenty to work with.
If you want to test Proxmox without spending a lot, a mini PC is the easiest starting point. The ones below are what I would recommend for a home lab or a small IT department.

I earn a commission if you make a purchase, at no additional cost to you.
Fail2ban has been protecting servers since 2004. It is the reliable veteran of this comparison.
It scans local log files for suspicious patterns using regex filters. Paths like /var/log/auth.log and /var/log/nginx/access.log are typical sources. A jail ties together a log source, a filter, and an action. When an IP crosses the threshold you set, Fail2ban fires a firewall rule via iptables or nftables to block it.
The default ban time is 10 minutes. You can change that, and I’ll show you what I configured for this test later.
Fail2ban sees only what hits your own server. No external data, no community intelligence. That is a deliberate tradeoff that makes it attractive in privacy-sensitive setups.
Fail2ban is lightweight and self-contained. It uses minimal CPU and RAM, which makes it a natural fit for small KVM guests, old mini PCs, or low-end VPS boxes. The SSH jail works out of the box and is the fastest way I know to get basic protection running. The config is predictable: jail.local and filter.d are easy to version in git, and there are mature filters for SSH, Nginx, Apache, and Postfix.
Fail2ban also supports email notifications out of the box. If you run a local mail server, you can get a ban alert sent by email with a few lines in jail.local. I covered the full setup in my Fail2ban email notification guide.
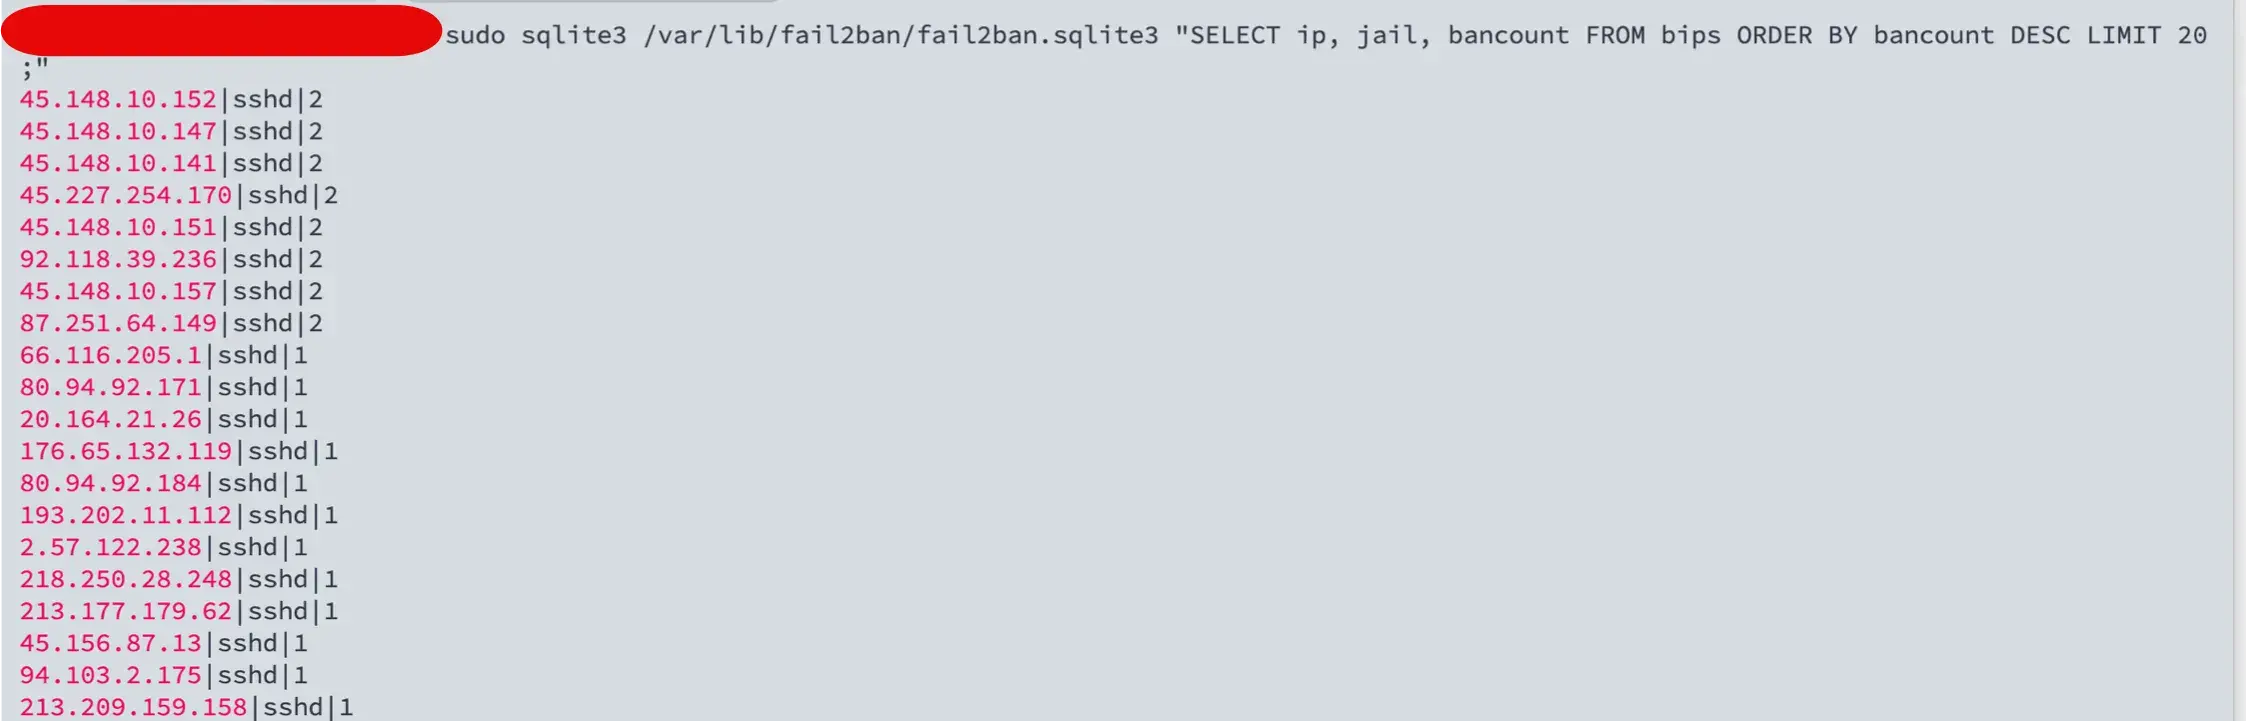
Fail2ban only reacts after an attack hits your logs. It cannot block a known bad actor before the first request lands. If a botnet spreads its attempts across hundreds of IPs, each one staying below your threshold, Fail2ban never fires. There is no dashboard. To check what is banned, you run
fail2ban-client status sshdor query the SQLite database directly. Each server also learns in isolation, the same IP address can hit every machine you own before any of them shares what they know.
CrowdSec launched in 2020 as an open-source, Go-based rethinking of the Fail2ban model. It parses logs locally the same way Fail2ban does, but detection runs on YAML scenarios instead of plain regex filters. That lets it catch more complex attack patterns and multiple attack types at once.
The bigger difference is the community layer. Your agent sends anonymized signals about attacking IPs to the CrowdSec Central API. In return, you pull curated blocklists built from detections across the entire network. An IP that attacked someone else’s server yesterday can be blocked on yours before it even makes a first request.
CrowdSec splits into three parts:
This split matters. Detection and enforcement are separate, so one machine can detect while another enforces.
CrowdSec runs on Linux, Windows, Synology, and OPNSense.
CrowdSec needs to know which log sources to watch. If the parser reads the wrong file, nothing useful happens. Collections bundle the parsers and scenarios for a specific service. For this test I installed three: crowdsecurity/ssh, crowdsecurity/nginx, and crowdsecurity/wordpress.
The firewall bouncer blocks traffic at the nftables or iptables level before it reaches any service. That is what I used. The Nginx bouncer works at the application level and can return a 403 or a reCAPTCHA challenge to potentially suspicious IPs instead of a hard block.
Fail2ban uses regex filters inside jails. It matches a pattern in a log line, counts hits, and fires a firewall rule. It is fast, predictable, and entirely local. It only reacts to attacks after they hit your server’s logs.
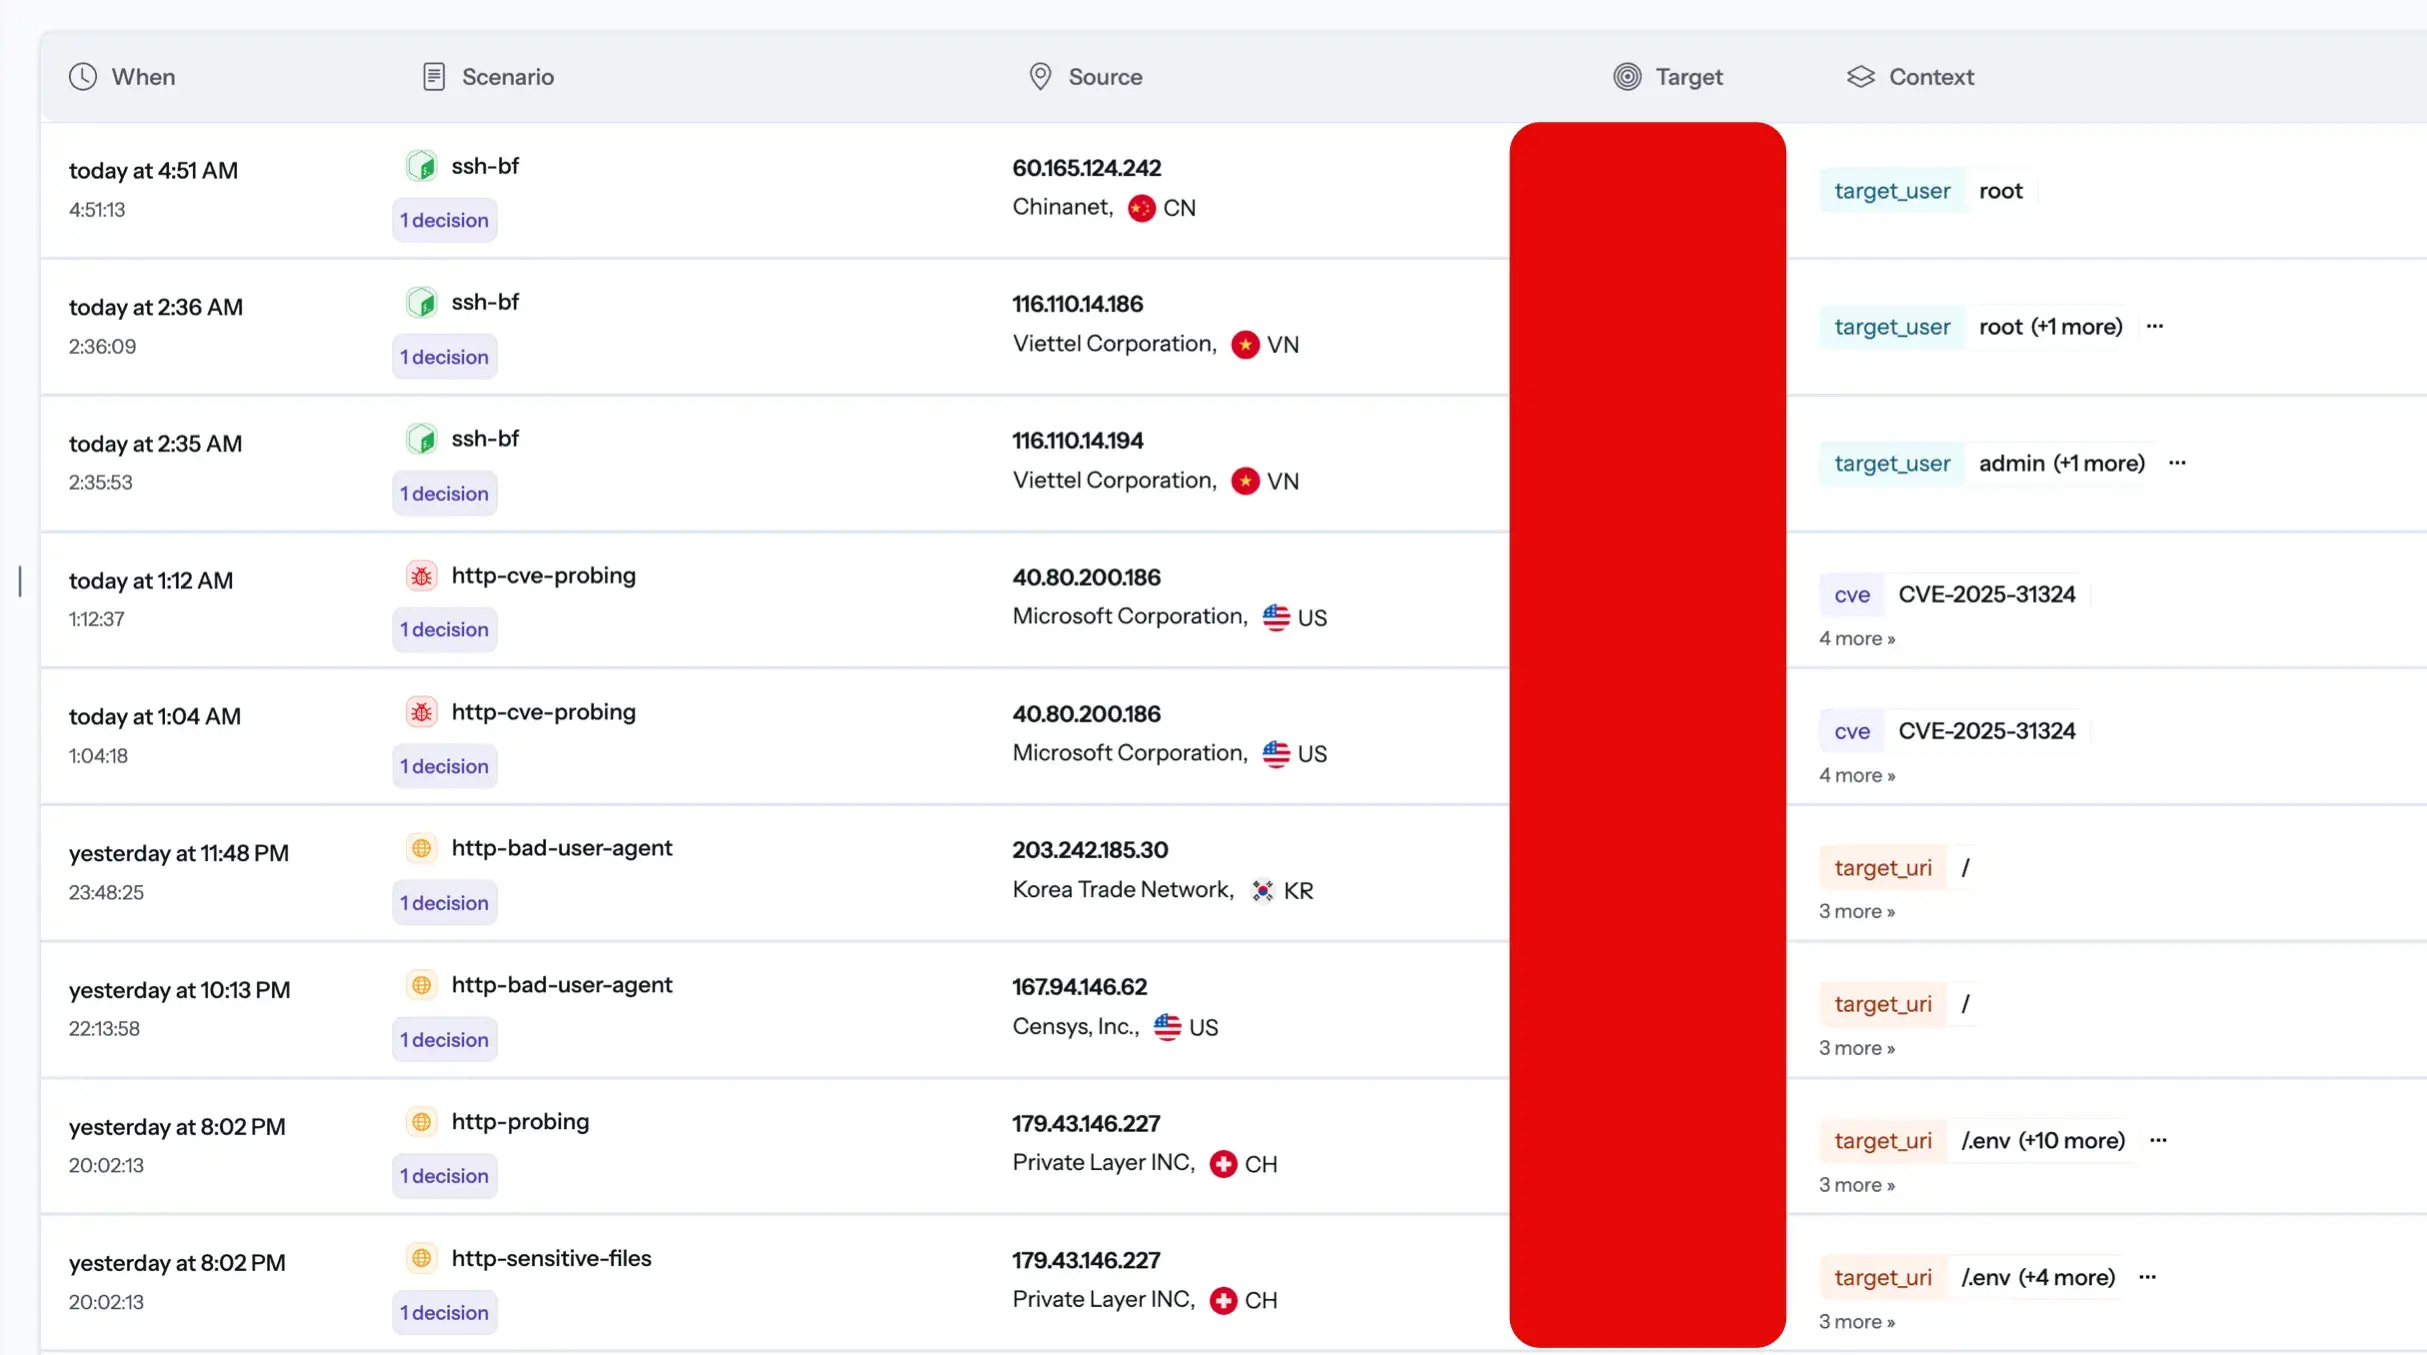
CrowdSec uses YAML scenarios that parse structured fields such as IP addresses, paths, status codes, and usernames. It tracks behavior over time and across multiple log sources at once. That is how it caught CVE-2025-31324 exploitation attempts on my server. No regex filter would catch that pattern without being written specifically for that CVE. Fail2ban cannot detect these attack types without custom filters.
Blocking works differently, too. Fail2ban writes firewall rules directly and keeps local bans only. CrowdSec delegates to bouncers, so you can enforce decisions at the firewall, at Nginx, or at the Cloudflare level from the same detection engine.
The biggest practical difference is intelligence. Fail2ban knows only what hit your server. CrowdSec shares anonymized signals across its entire network and pulls a community blocklist in return. Bad actors who targeted other servers are already identified before they reach yours. Malicious bots, brute-force attacks, and IPs flagged by the community are blocked before the first request lands.
Fail2ban only knows what shows up in your own logs. Every new attacking IP is a stranger until it tries something on your box. That includes brute force attacks, malicious bots, and DDoS attacks that other servers have already seen and reported.
CrowdSec changes that. Agents share anonymized signals about confirmed bad IPs, and those feed a community blocklist that every participant can pull from. An IP that hit someone else’s server an hour ago can already be blocked on yours before it ever knocks. Bad guys do not get a free first attempt.
CrowdSec users across more than 190 countries share around 10 million signals on aggressive IPs per day. That scale is what makes the blocklist useful in near real time. On my test server, the community blocklist had nearly 30,000 malicious IPs pre-blocked before a single local ban was recorded.
If you would rather not share anything, you can run CrowdSec in local-only mode. You keep the detection engine, but you lose the community blocklist, which is the main reason to run it.
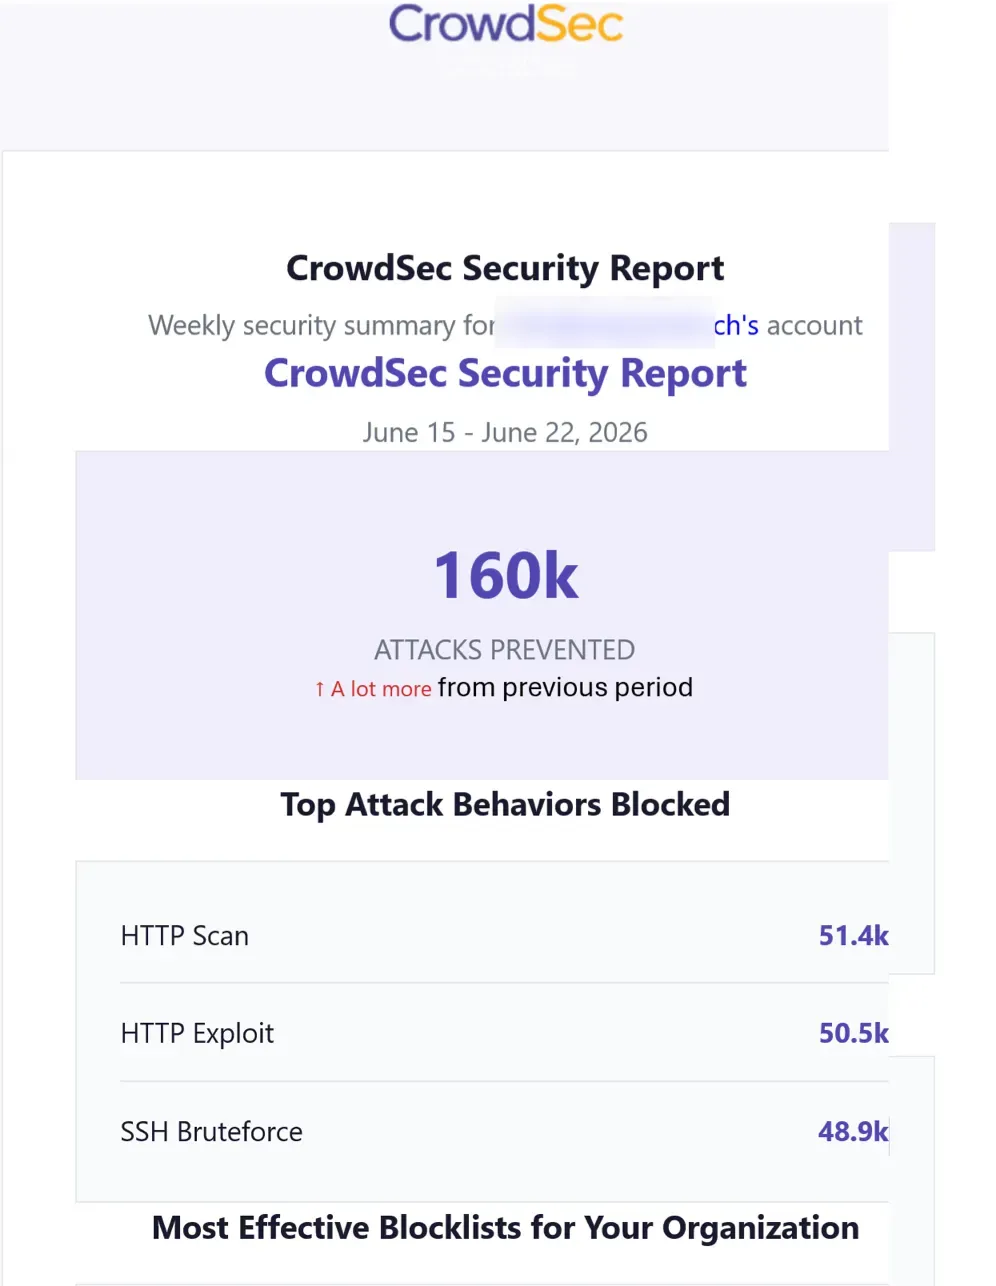
A week after the test, CrowdSec sent its weekly security report. 160,000 attacks were prevented in seven days across HTTP scans, exploits, and SSH brute force. That number speaks for itself.
The free Community plan caps console alerts at 500 per month. I hit that limit within days. Detection and blocking keep running, but you lose visibility in the dashboard until the quota renews. Premium raises it to 10,000 alerts per security engine per month.

Fail2ban works with standard paths out of the box. CrowdSec can auto-detect some sources, but I always verify syslog, journald, reverse proxy logs, and container logs manually.
I had to create the Nginx acquisition file by hand. Without it, CrowdSec parsed zero Nginx lines and none of the HTTP scenarios ever fired. For non-standard log formats, parsers may also need adjustments. You only find out something is wrong when attacks hit the box and nothing triggers.
Fail2ban is easier on day one. CrowdSec pays off when several machines are involved.”
For Fail2ban, I install the package, enable the sshd jail, tune maxretry, and add jail.local for specific services. Two commands cover most day-to-day needs:
fail2ban-client status sshd and
fail2ban-client set sshd unbanip cover most day-to-day needs. There is no web UI and no central dashboard, but for SSH protection on one server, that is rarely a problem.
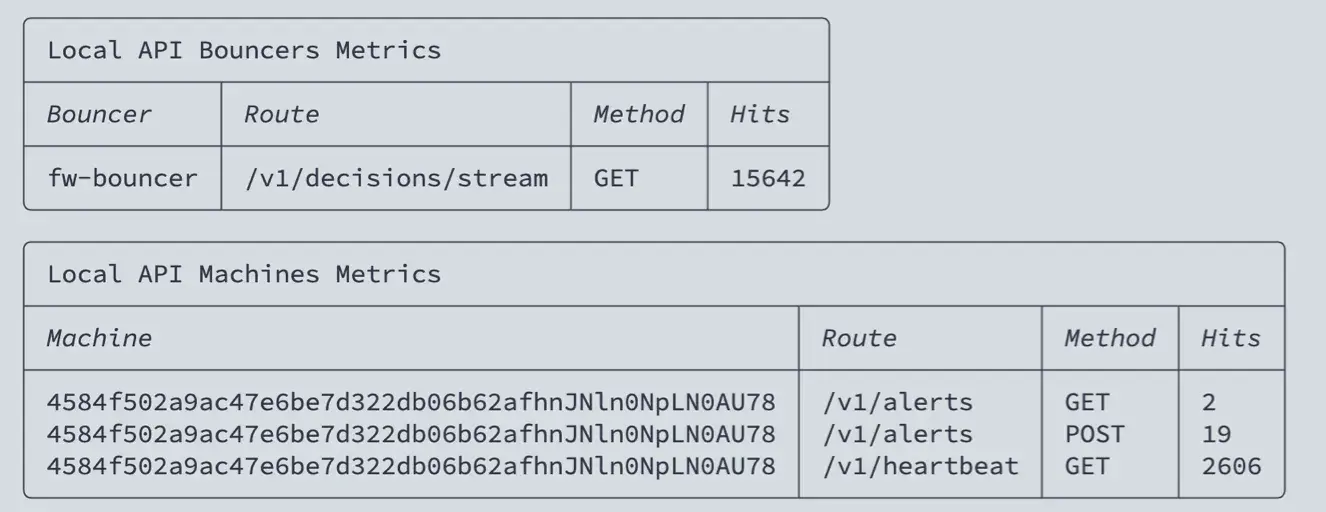
For CrowdSec, I install the agent with LAPI, add collections, configure log sources, then install the CrowdSec firewall bouncer and optionally the Nginx bouncer. The CrowdSec console at app.crowdsec.net gives a web dashboard where the agent connects and reports decisions, alerts, and enrolled engines in real time. The architecture has more moving parts than Fail2ban and the upgrade path is not always straightforward. I check the docs before every larger upgrade.
Fail2ban is nearly invisible. On my test VM it used around 38 MB of RAM and 0.1% CPU at idle.

CrowdSec uses more. The agent sat at around 163 MB RAM and 0.5% CPU, with the firewall bouncer adding another 19 MB. That is roughly 182 MB combined — still fine on a 2GB VM, but worth knowing if your box is tight.

If your hardware is very limited, start with Fail2ban. Then test CrowdSec on one node before rolling it out everywhere.
For one server running a blog, SSH, or a simple reverse proxy, I pick Fail2ban first. It is simple, private, and hard to misconfigure.
For a homelab with Proxmox nodes, LXC containers, Docker hosts, and public-facing apps, CrowdSec makes more sense. One detection engine covers multiple machines, and shared decisions mean you are not configuring the same jails everywhere.
For a small business with mail, VPN, web apps, and public-facing APIs, CrowdSec is the stronger choice. The community blocklist and multi-layer bouncer support are hard to replicate with Fail2ban alone.
A gradual migration also works. Run Fail2ban on your existing servers first, then add CrowdSec on new nodes as you expand. You do not have to choose on day one.
For SSH only, Fail2ban is my pick. The sshd jail is quick, reliable, and needs almost no configuration. Over two days, it logged 163 login attempts and banned 42 IPs without me touching anything after setup.
CrowdSec protects SSH too, and it adds scenario variants like ssh-slow-bf and ssh-time-based-bf_user-enum that Fail2ban needs custom filters for. But for a single server where SSH is the only concern, the extra setup is hard to justify.
Use SSH keys, disable password login, and disable root login regardless of which tool you run, and strongly consider adding two-factor authentication to SSH for Linux and Proxmox hosts
Security is only one part of running a home lab well. My homelab planning guide covers the hardware, network, and storage decisions that come before it.
My homelab runs Proxmox on three nodes, a Fortinet firewall, two Synology NAS units, and several public-facing services behind an Nginx reverse proxy. Not everything needs the same level of protection.
I keep Fail2ban on small edge systems where SSH protection is all I need. I use CrowdSec where I want visibility, shared intelligence, and better handling of HTTP threats — anything with a web surface gets CrowdSec and the Nginx bouncer.
The log sources I monitor with CrowdSec: /var/log/auth.log, /var/log/nginx/access.log, and the WordPress application logs via the Nginx reverse proxy.
Do you want to browse all my gear in one place?
I created an Amazon storefront with all the gear I use and recommend.
Yes. The host needs to see the log files, either through mounted volumes, syslog, or the Docker socket. CrowdSec supports container monitoring via labels, but you still need to install the relevant collections manually. Fail2ban just needs the correct log path.
No. A perimeter firewall does not see application login failures or HTTP error patterns. You need both layers.
CrowdSec shares only the attacking IP and the scenario that triggered the detection — nothing about your server, your users, or your traffic. You can also run it in local-only mode without enrolling in the console. You lose the community blocklist, but the detection engine still works.
Whitelist your management IPs and VPN ranges before you go live. Fail2ban unban: fail2ban-client set sshd unbanip <IP>. CrowdSec unban: cscli decisions delete –ip <IP>.
Yes. These tools reduce noise and block known bad actors, but they do not replace good authentication. Use SSH keys, disable password login, and keep services patched.
CrowdSec is the better tool for my homelab. It catches attack patterns that Fail2ban structurally cannot, the community blocklist pre-blocked nearly 30,000 IPs on my test server, and the console gives me visibility I never had with Fail2ban.
But I did not throw Fail2ban away. On any server where SSH is the only concern and simplicity matters more than intelligence, Fail2ban is still my first install. It takes five minutes, needs no bouncer, no LAPI, and no enrollment.
The honest answer is that they serve different needs. If you run one public server and want something that just works, use Fail2ban. If you run a homelab with multiple nodes, public-facing web apps, and services worth protecting properly, CrowdSec is worth the extra setup time.
The CVE-2025-31324 detection on my test server made the decision easy. Fail2ban would have let that through without a custom filter written specifically for it. CrowdSec caught it automatically.
I’d love to hear from you. Was this article helpful? Share your thoughts in the comments below. If you prefer, you can also reach me by email or connect with me on Reddit at Navigatetech.

Hi, I’m Edy Werder. I write hands-on guides about Proxmox, homelab servers, NAS, and WordPress, based on real setups I run and document.
No sponsors, no fluff—just real configs and results.
Enjoying the content?