

By Edy Werder, a tech blogger with 20 years of experience in IT infrastructure
In this guide, I show you how to install NUT on Proxmox and protect your servers during a power failure. Network UPS Tools (NUT) can monitor an uninterruptible power supply and shut down the Proxmox host before the battery runs out.
This guide is for Proxmox administrators, homelab users, and small businesses that want a reliable UPS shutdown setup without running the monitoring software inside a virtual machine.
I configured NUT at a client site with two separate racks in the same building. Each rack has its own Proxmox server and APC UPS. One UPS connects directly through a USB cable. The second uses an APC Network Management Card and SNMP.
I will show you both setups, explain the configuration files, test the connection safely, and create a backup that you can restore after rebuilding a Proxmox server.

Quick Answer:
To install NUT on Proxmox, install the NUT server and client packages directly on the Proxmox host. Use the usbhid-ups driver for a UPS connected by USB or the snmp-ups driver for a UPS with a network management card. Configure upsmon to shut down the Proxmox host when the UPS reports an OB LB status, meaning it is running on battery and has reached the low-battery threshold.
Network UPS Tools is an open-source project for monitoring and controlling uninterruptible power supplies and other power devices.
The Network UPS Tools project provides a consistent interface for a vast range of UPS models. It hides many vendor-specific protocols behind a common protocol that administrators can use across different operating systems.
Network UPS Tools, or NUT, is not limited to traditional UPS hardware.
The software can also provide support for power distribution units, automatic transfer switches, power supply units, and some solar controllers.
This makes the Network UPS Tools project useful in homelabs, business server rooms, and larger environments with multiple power devices.
NUT uses several separate components. The UPS driver communicates with the physical UPS hardware. It collects data points such as battery charge, runtime, input voltage, output voltage, and load. The NUT server process, called upsd, makes those UPS statistics available to local or remote clients.
The NUT client process, called upsmon, watches the UPS status. It initiates the operating system’s shutdown when the UPS reports an emergency condition.
The upsc command lets end users read the current UPS values.
The upscmd command sends supported instant commands, such as starting a quick battery self-test.
This architecture also allows one UPS to protect multiple computers. A primary NUT server can monitor the UPS while additional NUT client systems connect through the network.
My two racks use separate UPS devices, so each Proxmox node runs its own complete local NUT setup.
The client has two server racks in the same building. Each rack contains one Proxmox server and one APC UPS. The racks are independent. A failure in one rack should not affect the shutdown protection in the other rack.
The first Proxmox server connects directly to its UPS through a USB cable.
Linux detects the UPS as a USB HID power device. Network UPS Tools uses the usbhid-ups driver to communicate with it.
I configured the low-battery level at 30%.
When line power fails, the UPS status changes from OL to OB. When the battery reaches the low-battery threshold, it changes to OB LB. NUT then starts the Proxmox shutdown.
The second Proxmox server monitors another APC UPS through an AP9640 Network Management Card.
The network card exposes the UPS data through SNMP. NUT uses the snmp-ups driver and the APC PowerNet MIB.
The SNMP community is read-only and restricted to the Proxmox server’s IP address. This setup does not require a USB cable between the UPS and Proxmox.
A UPS shutdown setup can cause production systems to shut down. Plan the work carefully.
Check that you have console or physical access before testing any forced shutdown.
Proxmox stops its virtual machines and LXC containers as part of a normal host shutdown. For virtual machines, make sure the guest operating systems can respond to ACPI shutdown requests. I also recommend installing and enabling the QEMU Guest Agent where supported.
Review the shutdown order and timeout for important guests. Storage servers, databases, and infrastructure services may need more time than small utility VMs.
The Proxmox server should shut down after its guests. This reduces the risk of filesystem corruption or an interrupted database transaction.
The main Network UPS Tools configuration files are stored in:
/etc/nutBack up this directory before making changes:
cp -a /etc/nut /root/nut-before-setupThis makes it easy to return to the previous settings if something goes wrong.
Do not copy a random percentage or runtime from another guide.
The correct threshold depends on:
For the USB-connected unit, I set the battery threshold to 30%.
For the network-connected unit, I configured a low-battery runtime in the APC graphical user interface.
I installed NUT directly on both Proxmox nodes.
The exact packages differ slightly between the USB and SNMP methods.
Run:
apt update
apt install nut-server nut-client usbutils
The nut-server package provides the NUT drivers and server components.
The nut-client package provides tools such as upsc and the monitoring process.
The usbutils package provides lsusb, which helps identify USB power devices.
For the SNMP setup, run:
apt update
apt install nut-server nut-client nut-snmp snmp
The nut-snmp package provides the snmp-ups driver.
The snmp package provides testing tools such as snmpget and snmpwalk.
Both Proxmox nodes use the same basic NUT server and shutdown configuration.
The main difference is the driver section in /etc/nut/ups.conf.
Open the file:
nano /etc/nut/nut.confSet:
MODE=netserverI use netserver because the Proxmox host runs the driver, NUT server, and local NUT client.
It also leaves the option to add remote monitoring systems later.
Open:
nano /etc/nut/upsd.confFor local monitoring only, use:
LISTEN 127.0.0.1 3493NUT uses TCP port 3493 for its network protocol. This port is registered in the IANA Port Number Registry for NUT services.
You only need a LAN listener when another computer will connect as an NUT client.
For example:
LISTEN 127.0.0.1 3493
LISTEN 192.168.10.10 3493
Replace the example address with the Proxmox server’s IP address.
Create a dedicated local monitoring account:
nano /etc/nut/upsd.usersAdd:
[localmon]
    password = REPLACE_WITH_A_STRONG_PASSWORD
    upsmon primary

[remotemon]
    password = REPLACE_WITH_A_DIFFERENT_PASSWORD
    upsmon secondary

[upstest]
    password = REPLACE_WITH_A_TEST_PASSWORD
    instcmds = test.battery.start.quick
    instcmds = test.battery.stop
The localmon account is used by the local Proxmox host. It allows upsmon to initiate the coordinated shutdown when the UPS reaches a critical state.
The remotemon account is only necessary when another computer monitors this NUT server as a secondary client. A primary NUT system runs the driver, upsd, and upsmon, while secondary systems connect over the network and run their own upsmon process.
The upstest account is restricted to starting and stopping a quick battery self-test. It cannot turn off the UPS load or issue other instant commands.
Open:
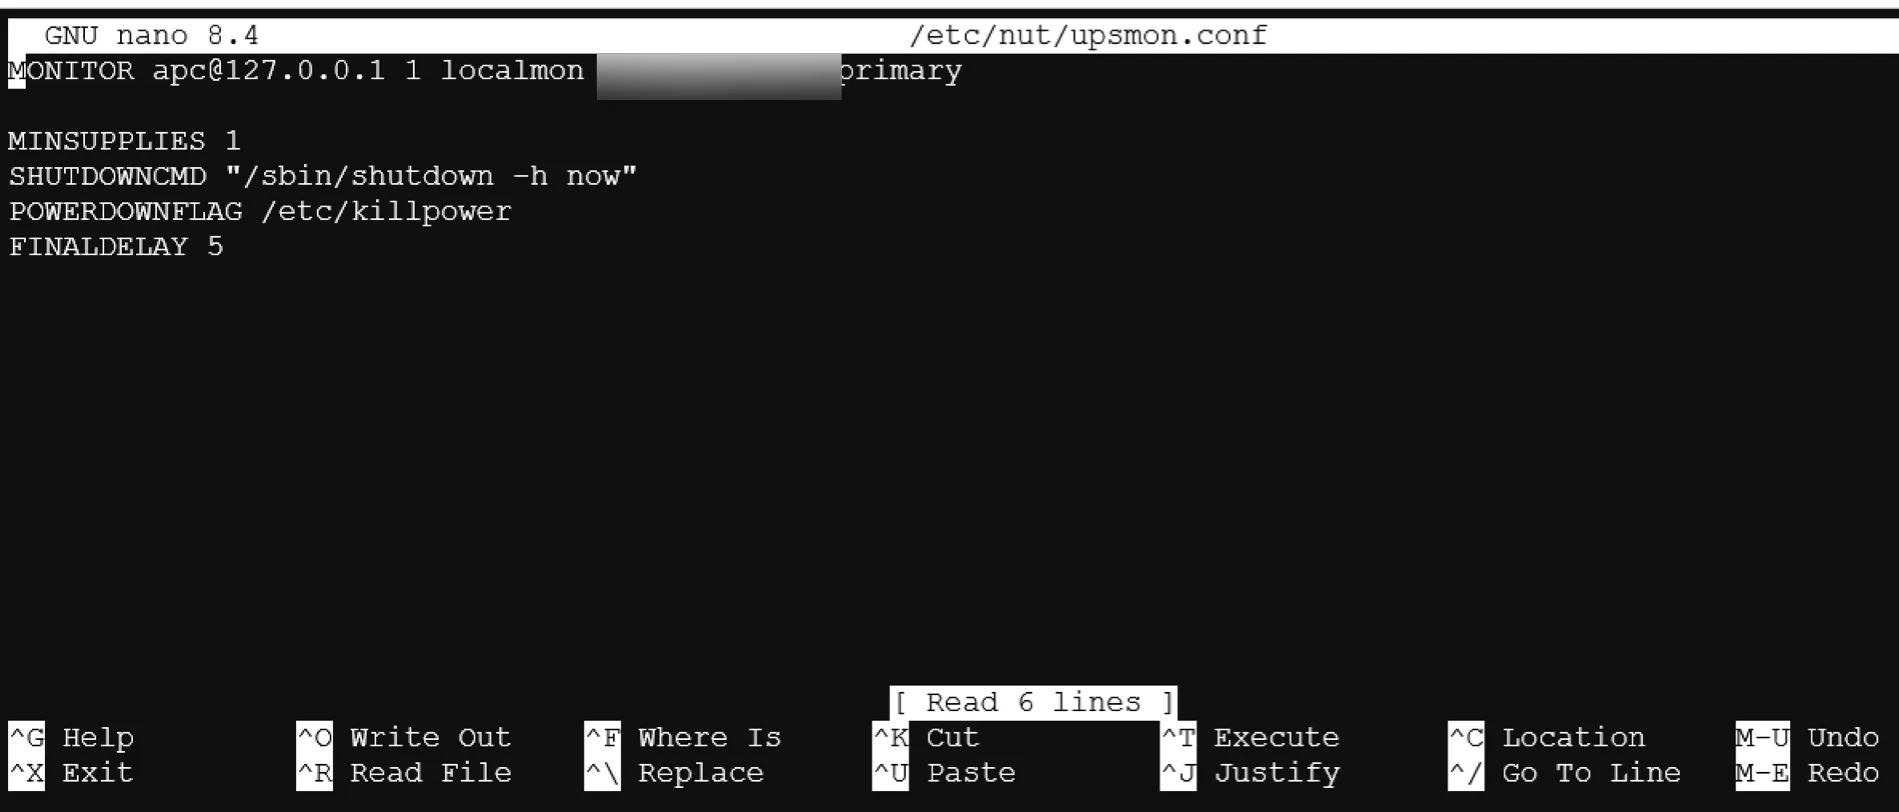
nano /etc/nut/upsmon.confAdd or update these lines:
MONITOR apc@127.0.0.1 1 localmon REPLACE_WITH_A_STRONG_PASSWORD primary

MINSUPPLIES 1
SHUTDOWNCMD "/sbin/shutdown -h now"
POWERDOWNFLAG /etc/killpower
FINALDELAY 5
The password must match the one in /etc/nut/upsd.users.
The SHUTDOWNCMD performs a normal Linux shutdown. Proxmox then starts stopping its guests.
The FINALDELAY value is not the battery threshold. It is the short delay before NUT executes the local shutdown command after declaring a forced shutdown.
I used group-readable permissions because the NUT services need access to the files:
chown root:nut
  /etc/nut/ups.conf
  /etc/nut/upsd.conf
  /etc/nut/upsd.users
  /etc/nut/upsmon.conf

chmod 640
  /etc/nut/ups.conf
  /etc/nut/upsd.users
  /etc/nut/upsmon.conf
Some generic instructions recommend chmod 600.
That can prevent a NUT process running under the nut group from reading the file. The root:nut ownership and 640 permissions worked correctly in my setup.
The first UPS connects directly to the Proxmox USB port.
Connect the USB cable and run:
lsusbMy UPS appeared as:
ID 051d:0002 American Power Conversion Uninterruptible Power Supply
You can also run the NUT scanner:
nut-scanner -UThe NUT scanner searches for compatible USB devices and suggests a driver configuration.
If lsusb does not show the UPS, reconnect the cable and check another USB port.
Open:
nano /etc/nut/ups.confAdd:
[apc]
    driver = usbhid-ups
    port = auto
    vendorid = 051d
    productid = 0002
    lowbatt = 30
    desc = "APC Smart-UPS 1500 RM via USB"
The usbhid-ups driver supports many USB HID UPS models.
The vendorid and productid values limit the driver to the detected APC device.
The lowbatt = 30 setting makes NUT report a low-battery condition at approximately 30% charge.
Run:
upsdrvsvcctl resync
systemctl reset-failed nut-driver@apc.service
systemctl restart nut-driver@apc.service
systemctl restart nut-server.service
systemctl restart nut-monitor.service
Older guides may use:
upsdrvctl startOn my current Proxmox installation, the systemd driver service and upsdrvsvcctl resync worked better.
Run:
upsc apc@127.0.0.1Look for values similar to:
driver.name: usbhid-ups
ups.model: Smart-UPS 1500 RM
ups.status: OL
battery.charge: 100
battery.charge.low: 30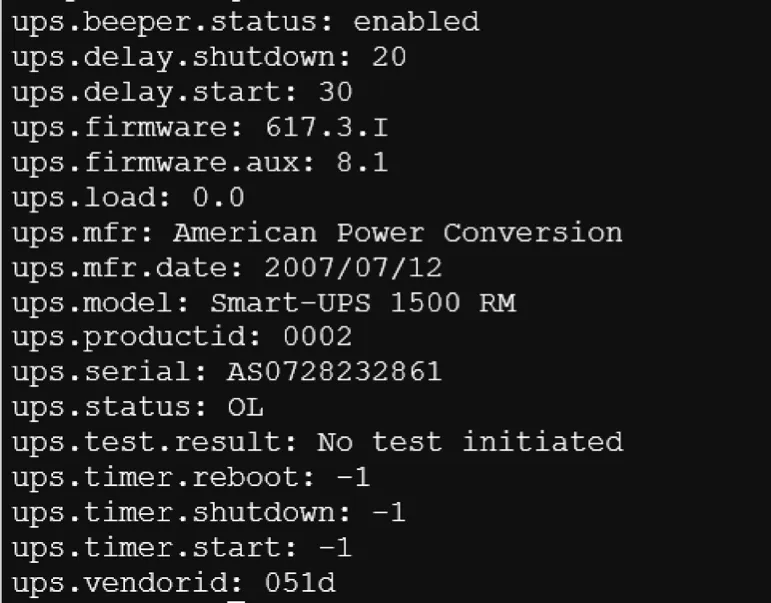
OL (On Line) means the UPS is running from normal line power.
If the battery is charging, the status may show:
OL CHRGRun:
upsc apc@127.0.0.1 battery.runtimeNUT reports runtime in seconds.
To display minutes and seconds, run:
upsc apc@127.0.0.1 battery.runtime |
awk '{printf "%d minutes %d secondsn", $1/60, $1%60}'
Treat the result as an estimate.
The calculation depends on the UPS load, battery health, and the information reported by the UPS hardware.
First list the supported instant commands:
upscmd -l apc@127.0.0.1My UPS supported:
test.battery.start.quick
test.battery.stop
Add a restricted test account to /etc/nut/upsd.users:
[upstest]
    password = REPLACE_WITH_A_TEST_PASSWORD
    instcmds = test.battery.start.quick
    instcmds = test.battery.stop
Restart the NUT server:
systemctl restart nut-server.serviceStart the quick test:
upscmd -u upstest -p 'REPLACE_WITH_A_TEST_PASSWORD'
  apc@127.0.0.1 test.battery.start.quick
Check the result:
upsc apc@127.0.0.1 ups.test.resultA quick battery self-test does not cause Proxmox to shut down.
Avoid load control or shutdown instant commands on a production system.
The client’s Rack 1 runs on this model, a rack-mount Smart-UPS well-suited to direct USB monitoring with NUT.

The second UPS uses an APC Network Management Card.
The Proxmox server communicates with the card over the network rather than via a USB cable.
Enable SNMP on the card and create a read-only community.
Use a unique community value such as:
YOUR_SNMP_COMMUNITYRestrict the NMS address to the Proxmox server’s IP address.
Do not allow requests from every network address unless there is a specific reason.
Configuration, Network, SNMPv1, Access Control
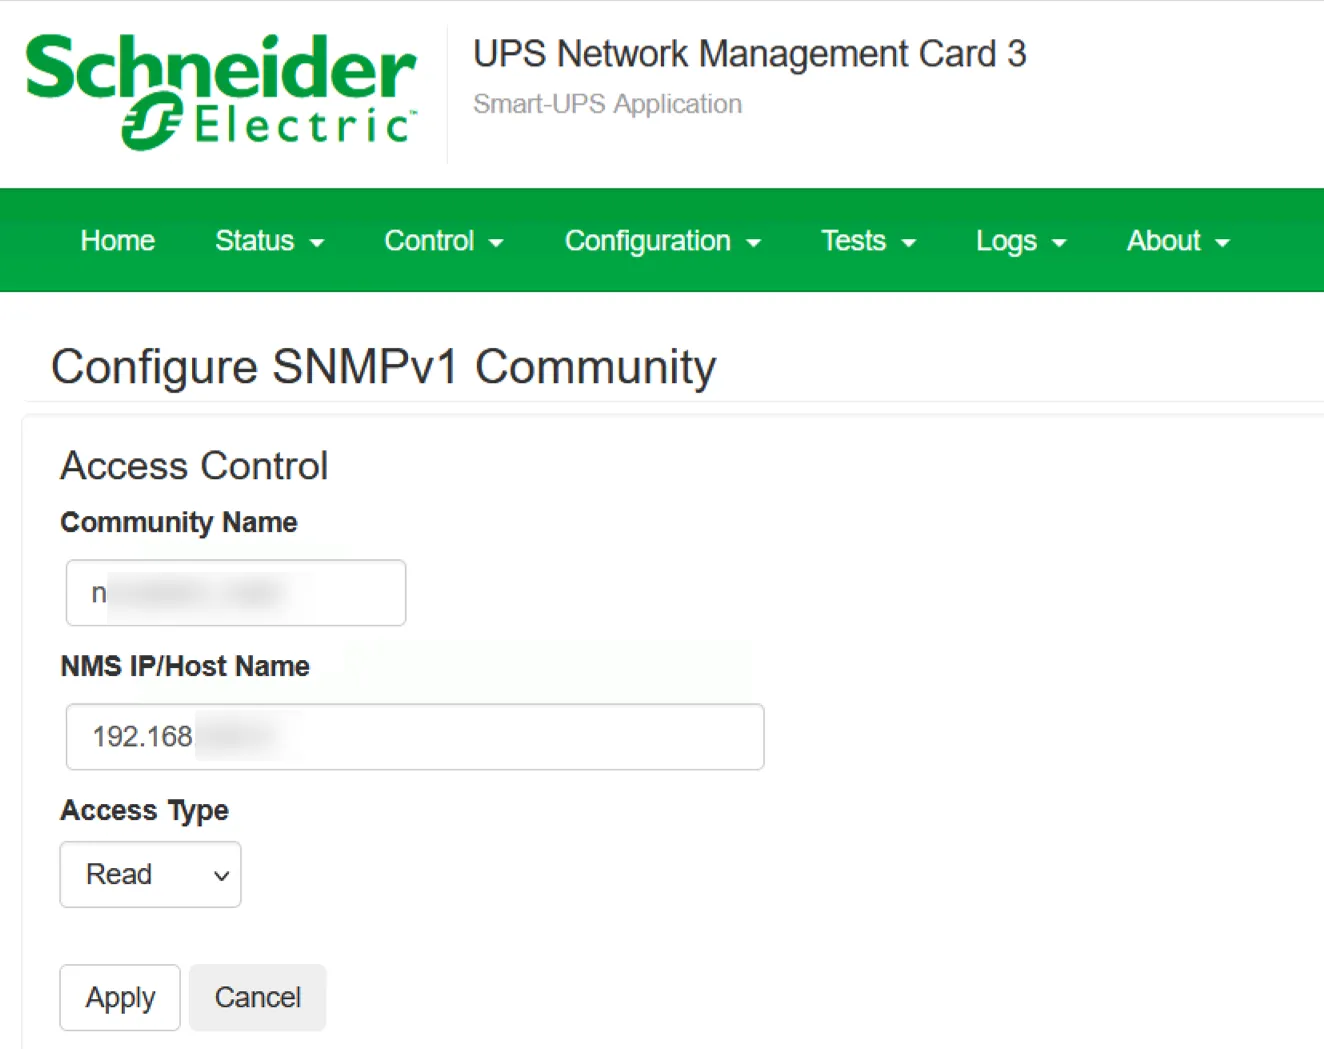
SNMPv1 sends the community string in the clear. Network restrictions are therefore important.
Run:
snmpget -v1 -c 'YOUR_SNMP_COMMUNITY'UPS_NMC_IP 1.3.6.1.2.1.1.1.0Replace UPS_NMC_IP with the real network card address.
This command should return the APC card description.
Check which source IP Proxmox uses:
ip route get UPS_NMC_IPThe src address must match the NMS address allowed on the APC card.

Run:
snmpget -v1 -c 'YOUR_SNMP_COMMUNITY' UPS_NMC_IP 1.3.6.1.4.1.318.1.1.1.1.1.1.0This should return the UPS model.

If the general SNMP request works but the APC UPS OID fails, the network card may not be communicating correctly with the UPS.
Open:
nano /etc/nut/ups.confAdd:
[apc]
    driver = snmp-ups
    port = UPS_NMC_IP
    snmp_version = v1
    community = YOUR_SNMP_COMMUNITY
    mibs = apcc
    pollfreq = 15
    desc = "APC Smart-UPS via NMC3"
The apcc mapping tells the NUT UPS driver to use the APC PowerNet MIB.
This provides a uniform interface even though APC uses vendor-specific protocols and data points.
Run:
upsdrvsvcctl resync
systemctl reset-failed nut-driver@apc.service
systemctl restart nut-driver@apc.service
systemctl restart nut-server.service
systemctl restart nut-monitor.service
Verify the result:
upsc apc@127.0.0.1A working output should include:
driver.name: snmp-ups
ups.model: Smart-UPS 1500
ups.status: OL
ups.load: 25.10
ups.realpower: 251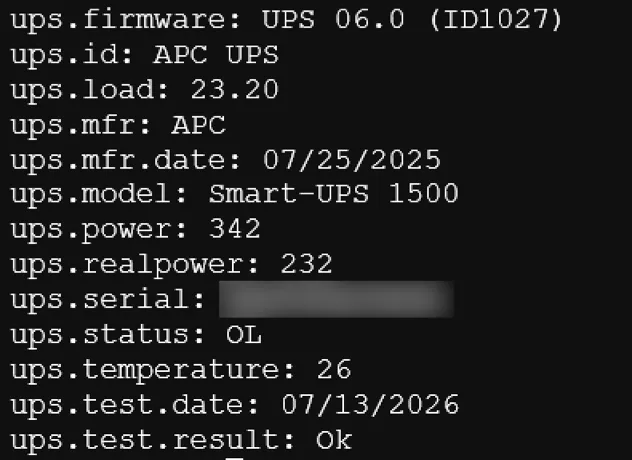
The actual values will depend on the connected equipment.
For the NMC-connected UPS, I configured the low-battery duration in the APC web interface.
The APC graphical user interface shows the value in minutes.
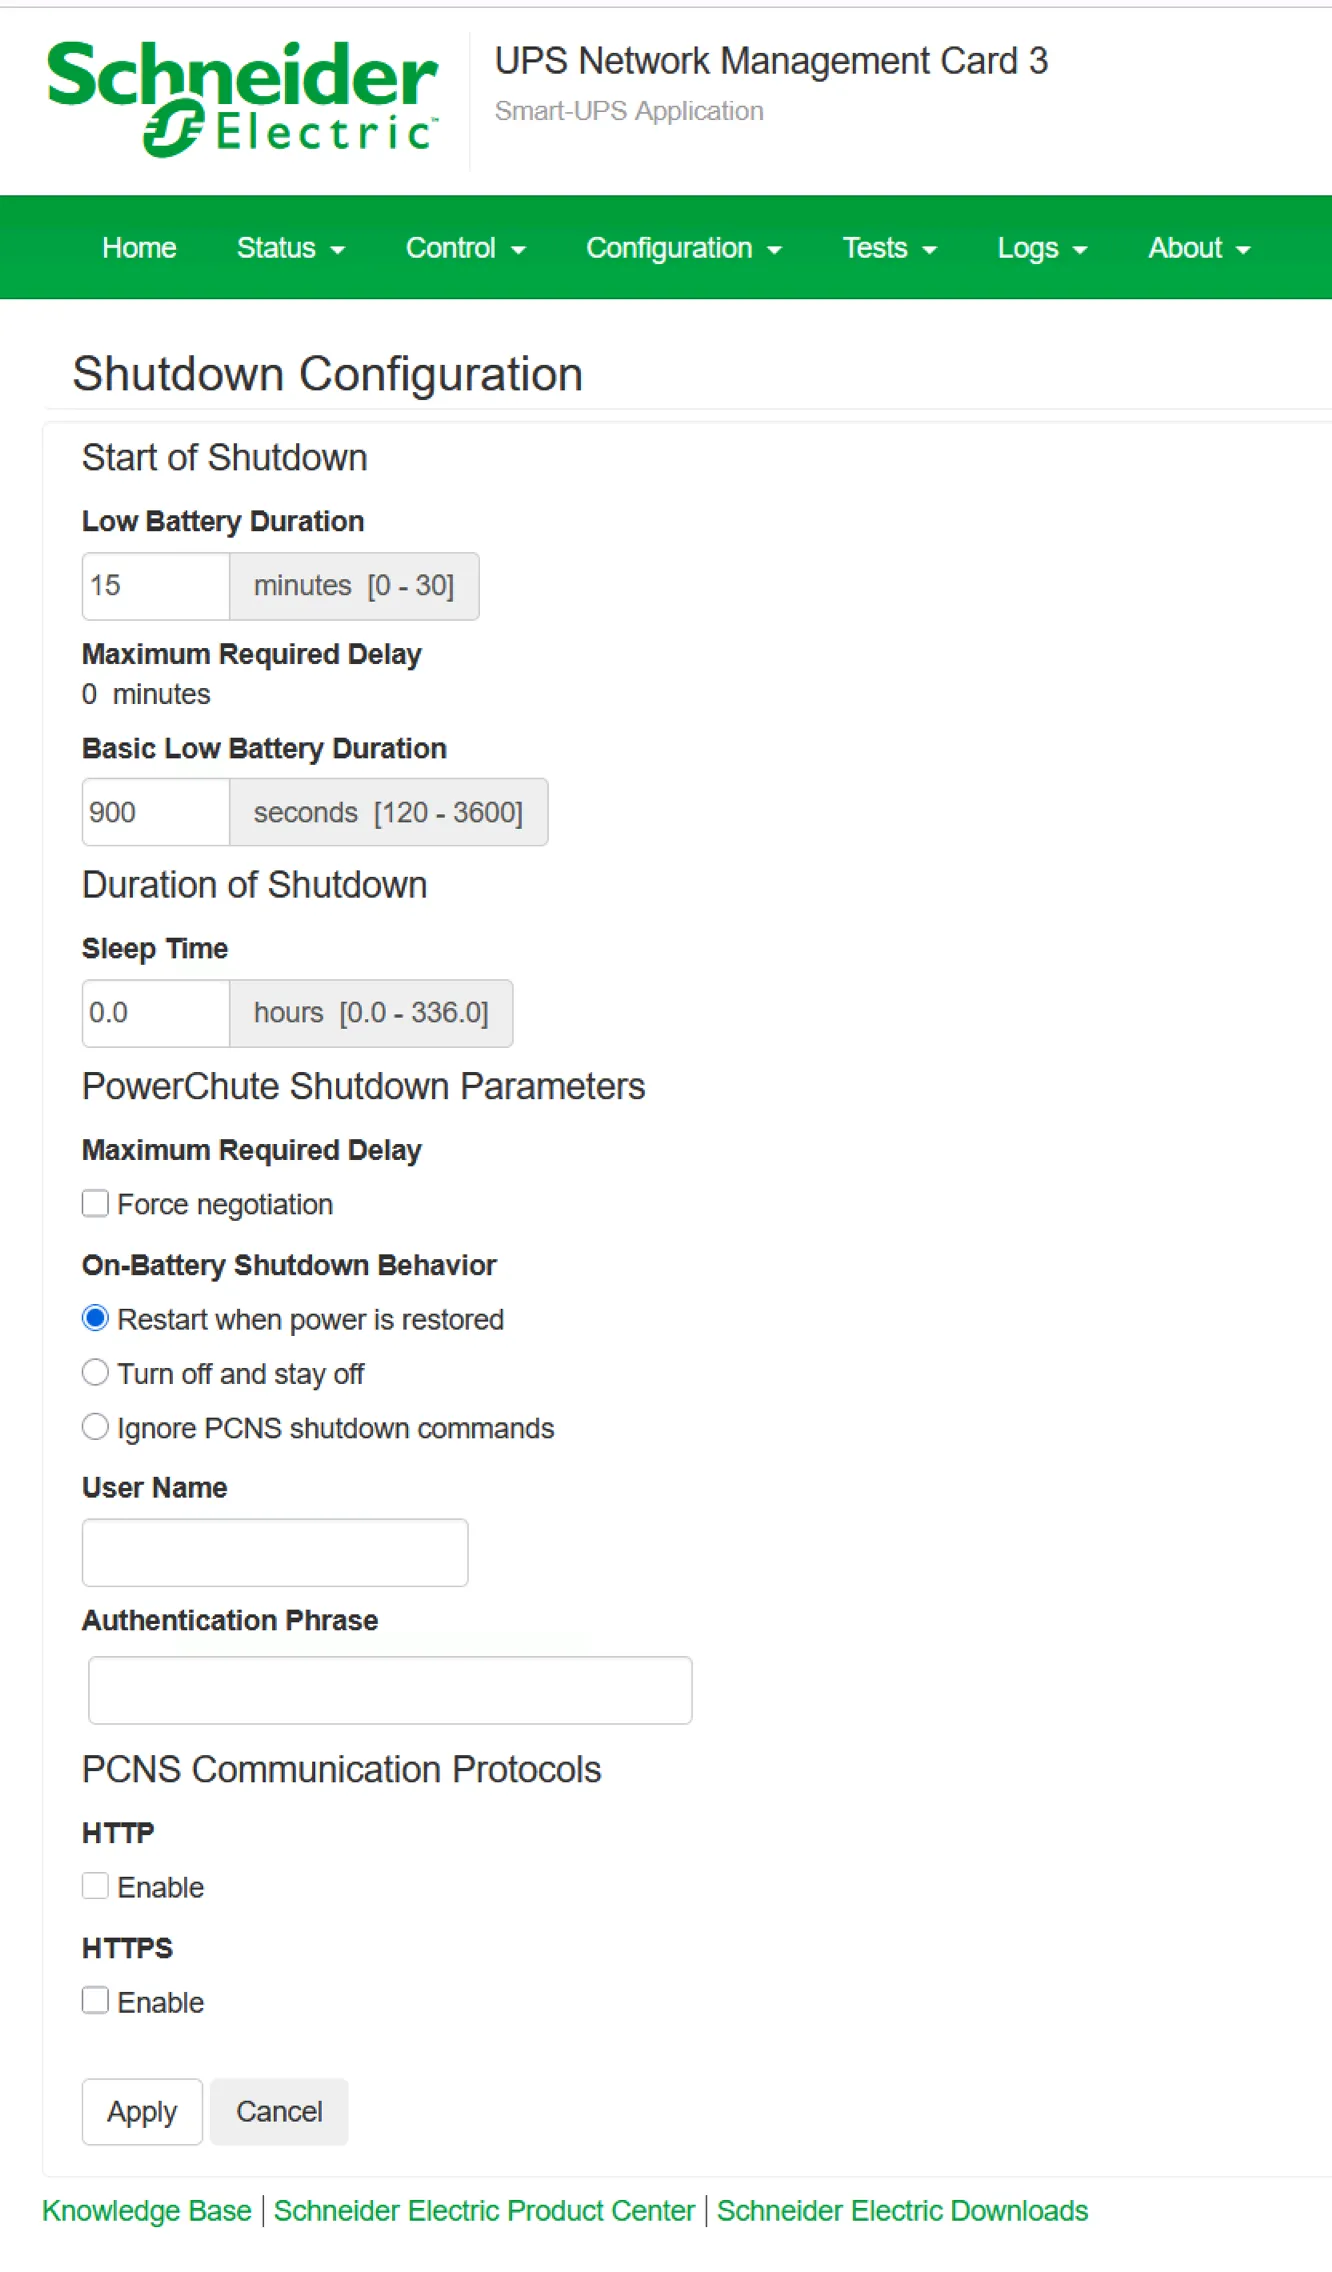
I set Basic Low Battery Duration to 900 seconds. NUT displays this setting as battery.runtime.low: 900. When the estimated UPS runtime falls to approximately 15 minutes, the UPS reports a low-battery state. NUT then starts the Proxmox shutdown when the status changes to OB LB.
The Low Battery Duration setting is mainly used for PowerChute Network Shutdown clients. For a NUT setup, the important value is Basic Low Battery Duration, because that is the threshold the UPS reports to NUT as the low-battery condition.
NUT reports the same value in seconds:
upsc apc@127.0.0.1 battery.runtime.lowExamples:
120 seconds = 2 minutes
900 seconds = 15 minutes
This value does not mean the UPS turns off after ten minutes.
It means the UPS declares a low-battery state when the estimated remaining runtime reaches that value.
The threshold must leave enough time for the virtual machines, LXC containers, and Proxmox host to stop cleanly.
You can check the current status with:
upsc apc@127.0.0.1 ups.statusThe most important status codes are:
OL       Normal utility power is available
OB       The UPS is running on battery
LB       The UPS battery is low
OB LB    The UPS is on battery and low
CHRG     The battery is charging
During normal operation, OL is the expected UPS status.
During a power failure, the status changes to OB.
When the configured low-battery condition is reached, it changes to OB LB.
The UPS does not normally shut down each virtual machine itself.
NUT detects the low-battery state and runs:
/sbin/shutdown -h nowProxmox then stops its guests according to its configured shutdown order and timeouts. The shutdown process proceeds correctly only if the guests respond to ACPI or guest-agent requests. After the virtual machines and containers stop, the Proxmox host powers down. This is safer than allowing the UPS battery to reach zero and cutting power immediately.
NUT provides a forced shutdown command:
upsmon -c fsdThis command performs a real shutdown. It does not simulate the event or display a preview. Only use it during a planned maintenance window when all users are informed and console access is available. I did not run a forced shutdown on the live production node.
The USB battery self-test and the live UPS data confirmed that the monitoring connection worked without interrupting production.
I created one backup archive on each Proxmox server.
The archive includes the configuration files, installed package versions, service status, network addresses, USB information, and current NUT UPS data.
I published the tested backup script in my Proxmox Scripts repository on GitHub. The script creates one archive containing the complete NUT configuration and useful diagnostic information.
wget -O /root/nut-backup.sh https://raw.githubusercontent.com/EdyWerder/proxmox-scripts/main/nut-backup/nut-backup.sh \
  && chmod 700 /root/nut-backup.sh
Paste the complete block into the Proxmox shell as root:
cat >/root/create-nut-backup.sh <<'EOF'
#!/bin/bash

set -Eeuo pipefail

BACKUP_NAME="nut-backup-$(hostname)-$(date +%F-%H%M%S)"
WORK_DIR="/root/${BACKUP_NAME}"
ARCHIVE="/root/${BACKUP_NAME}.tar.gz"

cleanup_on_error() {
    echo "Backup failed."
    rm -rf "$WORK_DIR"
}
trap cleanup_on_error ERR

mkdir -p "$WORK_DIR"

cp -a /etc/nut "$WORK_DIR/"

dpkg-query -W -f='${binary:Package}\t${Version}\n' |
    grep -E '^(nut|snmp|usbutils)' \
    > "$WORK_DIR/packages.txt" || true

systemctl is-enabled \
    nut-driver@apc.service \
    nut-server.service \
    nut-monitor.service \
    > "$WORK_DIR/service-enable-state.txt" 2>&1 || true

systemctl --no-pager --full status \
    nut-driver@apc.service \
    nut-server.service \
    nut-monitor.service \
    > "$WORK_DIR/service-status.txt" 2>&1 || true

ip -br addr > "$WORK_DIR/ip-addresses.txt"
lsusb > "$WORK_DIR/lsusb.txt" 2>&1 || true
upsc apc@127.0.0.1 > "$WORK_DIR/ups-data.txt" 2>&1 || true

tar -czf "$ARCHIVE" -C /root "$BACKUP_NAME"

test -s "$ARCHIVE"
tar -tzf "$ARCHIVE" >/dev/null

rm -rf "$WORK_DIR"
trap - ERR

echo
echo "Backup created successfully:"
ls -lh "$ARCHIVE"
EOF

chmod 700 /root/create-nut-backup.sh
/root/create-nut-backup.sh
The result looks similar to:
/root/nut-backup-pve1-2026-07-15-1030.tar.gzThe archive contains passwords and SNMP community strings. Store it in a secure backup location.
From another Linux system, copy the file with:
scp root@PROXMOX_IP:/root/nut-backup-pve1-2026-07-15-1030.tar.gz .Use the actual hostname, IP address, and filename. You can inspect the archive without extracting it:
tar -tzf nut-backup-pve1-2026-07-15-1030.tar.gzThis confirms that /etc/nut and the supporting information are present.
First reinstall the required packages.
For USB:
apt update
apt install nut-server nut-client snmp usbutils
For SNMP:
apt update
apt install nut-server nut-client nut-snmp snmp
Extract the backup:
mkdir -p /root/nut-restore

tar -xzf /root/nut-backup-HOST-DATE.tar.gz
  -C /root/nut-restore
Locate the restored directory:
find /root/nut-restore -maxdepth 3 -type d -name nutCopy it back:
cp -a
  /root/nut-restore/nut-backup-HOST-DATE/nut/.
  /etc/nut/
Apply the permissions:
chown root:nut
  /etc/nut/ups.conf
  /etc/nut/upsd.conf
  /etc/nut/upsd.users
  /etc/nut/upsmon.conf

chmod 640
  /etc/nut/ups.conf
  /etc/nut/upsd.users
  /etc/nut/upsmon.conf
Restart NUT:
upsdrvsvcctl resync
systemctl reset-failed nut-driver@apc.service
systemctl restart nut-driver@apc.service
systemctl restart nut-server.service
systemctl restart nut-monitor.service
Verify:
upsc apc@127.0.0.1For a moved network UPS, update the NMC IP, SNMP community, and allowed NMS address before starting the driver.
Check the driver service:
systemctl status nut-driver@apc.service --no-pager -lThen review the log:
journalctl -u nut-driver@apc.service -n 80 --no-pagerThe detailed driver error is usually more useful than the general NUT server warning.
Confirm basic connectivity:
ping -c 4 UPS_NMC_IPCheck the source address:
ip route get UPS_NMC_IPVerify the community, allowed NMS address, SNMP version, and read-only access on the card.
Test the APC model OID directly:
snmpget -v1 -c 'YOUR_SNMP_COMMUNITY'
  UPS_NMC_IP
  1.3.6.1.4.1.318.1.1.1.1.1.1.0
If the card responds to general SNMP but not this OID, check the card-to-UPS communication and application firmware.
Confirm that lsusb shows the UPS.
Reload the device rules:
udevadm control --reload-rules
udevadm trigger
Reconnect the USB cable and restart the driver.
Check the current load:
upsc apc@127.0.0.1 ups.loadA UPS running with zero or very low reported load may return an unrealistic runtime.
Compare the NUT data with the UPS display or the network card interface.
Curious what hardware I run Proxmox on?
I created an Amazon storefront with all the gear I use and recommend.
It is technically possible to pass USB hardware into an LXC container. I prefer installing Network UPS Tools directly on the Proxmox host. A separate LXC container adds another dependency to the shutdown process. The container may stop before it can complete the host shutdown. Direct installation is simpler and more reliable for this use case.
Yes. One NUT server can monitor the physical UPS. Multiple computers can run a NUT client and connect to that server over TCP port 3493. The secondary systems shut down first. The primary system connected to the UPS should shut down last. This is useful when several Proxmox nodes, storage servers, or network devices share the same UPS.
Yes. Network UPS Tools can manage multiple UPSs simultaneously. Each UPS receives its own section in /etc/nut/ups.conf. This is useful in larger environments with several racks, power distribution units, or different UPS models. My client setup uses one local UPS per Proxmox node, so each host only needs one driver section.
Yes, but email alerts require additional notification configuration. NUT can call a script through NOTIFYCMD when events occur. The NOTIFYMSG SHUTDOWN setting defines the shutdown notification text. You can then connect the script to a local mail system, monitoring platform, or another alerting service. I focused first on reliable automatic shutdown. Alerts can be added after the core protection has been tested.
Yes. Re-test the UPS connection after significant Proxmox, Debian, kernel, or NUT releases. For USB, confirm that lsusb, the driver, and upsc still work. For a network UPS, repeat the SNMP tests and verify the UPS status. You can also check the Network UPS Tools repository and NUT website for driver notes that affect certain UPS models. A short verification after upgrades can prevent surprises during the next outage.
Network UPS Tools now monitors two APC UPS devices at my client’s site. The first Proxmox node connects through USB and uses the usbhid-ups driver. The second uses an APC Network Management Card with the snmp-ups driver.
Both systems can detect when the UPS switches to battery power and when it reaches the configured low-battery threshold. NUT can then shut down the virtual machines, containers, and Proxmox host before the battery is exhausted.
The USB and SNMP setups both work reliably. I also created a one-file backup for each NUT server. The archive contains the configuration, package details, service status, and diagnostic information needed to restore the setup after rebuilding a Proxmox node.
I’d love to hear from you. Was this article helpful? Share your thoughts in the comments below. If you prefer, you can also reach me by email or connect with me on Reddit at Navigatetech.
Hi, I'm Edy Werder. I write hands-on guides about servers, virtualization, NAS and WordPress, based on setups I run in my own homelab. Real configs and real results, no fluff.
Enjoying the content?



Thanks. Read someone else’s write up on configuring NUT and don’t know why but it wouldn’t work (I suspect I simply limited my config [as per nut-scanner’s output] to USB bus & device then changed where it plugged in before starting the daemons, so I’ve removed those limitations), now I have one Eaton via USB and one APC via NMC, both working now, very happy.