By Edy Werder, a tech blogger with 20 years of experience in IT infrastructure
Installing Ubuntu as a virtual machine on Proxmox VE provides a powerful combination of enterprise-grade virtualization with one of the most popular Linux distributions. This guide covers the complete process of creating Ubuntu VMs within the Proxmox virtual environment, from initial preparation through post-installation optimization.
This guide includes uploading ISO images to Proxmox VE, creating virtual machines through the web interface and shell, completing the Ubuntu installation process, and configuring essential post-installation settings. We focus specifically on Ubuntu Server deployments.
This guide does not cover installing Proxmox VE itself on bare metal hardware, installing Proxmox on existing Debian systems, or running Proxmox VE on Ubuntu host systems. For initial Proxmox VE installation, refer to my dedicated Proxmox installation guide.
This guide is designed for system administrators, homelab enthusiasts, and IT professionals working with virtualization platforms.
Ubuntu VMs or Debian VM are probably the most installed guests operating systems on Proxmox VE. It enables cost-effective server configuration with various services like Samba file server, Web server, database server and various other Linux tools.
Proxmox VE is an open-source virtualization platform built on Debian that combines KVM hypervisor technology with LXC containers in a unified web-based management interface.
The Proxmox virtual environment leverages the same code base as enterprise virtualization solutions while maintaining open-source accessibility. The platform uses KVM (Kernel-based Virtual Machine) technology to run full virtual machines, including Ubuntu operating systems, with near-native performance on physical servers.
The proxmox ve web interface provides comprehensive tools to manage virtual machines, configure network settings, handle storage allocation, and monitor system performance without requiring command-line interface access for basic operations.
Ubuntu LTS (Long Term Support) releases offer five years of security updates and stability, making them ideal candidates for virtual machine deployments. The Ubuntu operating system provides excellent hardware detection, extensive package repositories, and strong community support that translates well to virtualized environments.
Resource efficiency compared to bare-metal installations allows multiple Ubuntu VMs to run on a single Proxmox host, maximizing hardware utilization. Additionally, Proxmox VE’s snapshot and backup capabilities provide robust data protection for Ubuntu systems during development and testing phases.
Before creating Ubuntu virtual machines, ensure your Proxmox VE environment meets the necessary requirements and gather the required installation materials.
Proxmox VE version 7.0 or newer provides optimal compatibility with modern Ubuntu releases. The Proxmox host system should have sufficient resources to allocate to virtual machines while maintaining host system stability.
For Ubuntu Server installations, allocate at least 2GB RAM and 20GB storage space. Ubuntu Desktop requires 4GB RAM minimum and 25GB storage space for adequate performance. These requirements scale based on intended workload and the number of concurrent virtual machines.
Ubuntu 24.04 LTS Server offers a minimal installation ideal for server workloads, while Ubuntu Desktop provides a complete graphical environment suitable for development and testing scenarios. Download the appropriate ISO image file from the official ubuntu.com website to ensure authenticity and latest security patches.
Server editions typically require 1.5GB download size, while Desktop editions approach 3-4GB. Both versions provide the same underlying Linux kernel and package management capabilities, differing primarily in pre-installed software packages and default configurations.
Transition: With prerequisites confirmed and materials prepared, we can proceed to the step-by-step Ubuntu VM installation process.
Creating Ubuntu virtual machines on Proxmox VE involves uploading the installation medium, configuring virtual hardware, and completing the Ubuntu installation process through the VM console.
When to use this: Before creating any Ubuntu virtual machine on Proxmox VE.
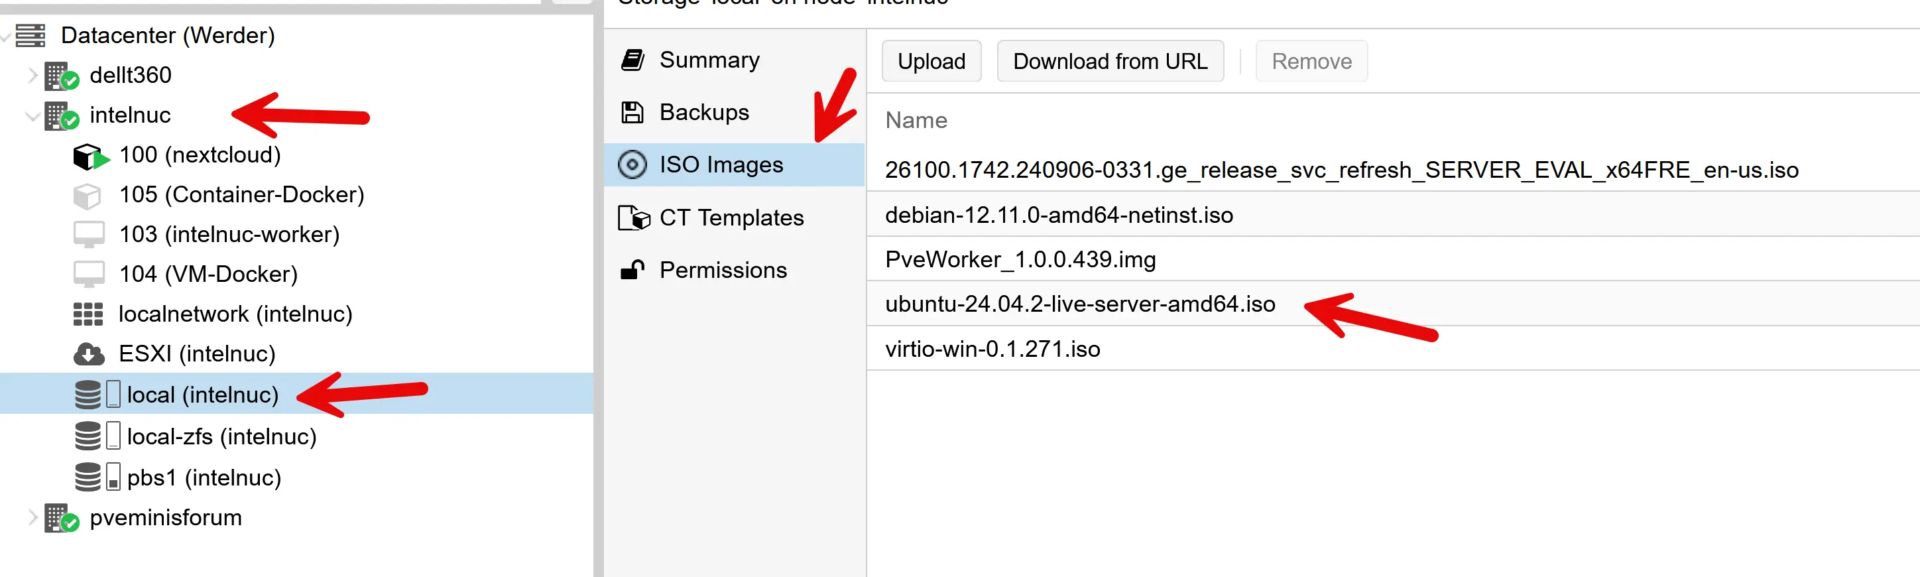
I have written a separate article detailing the steps to upload an ISO image in Proxmox.
To install Ubuntu in Proxmox, create a VM with a Linux OS type, a VirtIO SCSI controller, and enable the QEMU guest agent.
Navigate to the “Create VM” button in the top-right corner of the Proxmox interface to launch the virtual machine creation wizard. The wizard guides you through essential configuration steps for optimal Ubuntu performance.
General: Assign a unique VM ID (typically starting from 100) and provide a descriptive name like “ubuntu-server-01” or “ubuntu-desktop-test” for easy identification in the VM list.
OS Tab: Select “Linux” as the operating system type and choose your uploaded Ubuntu ISO image as the installation medium. Enable “QEMU Guest Agent” option for enhanced VM management capabilities.
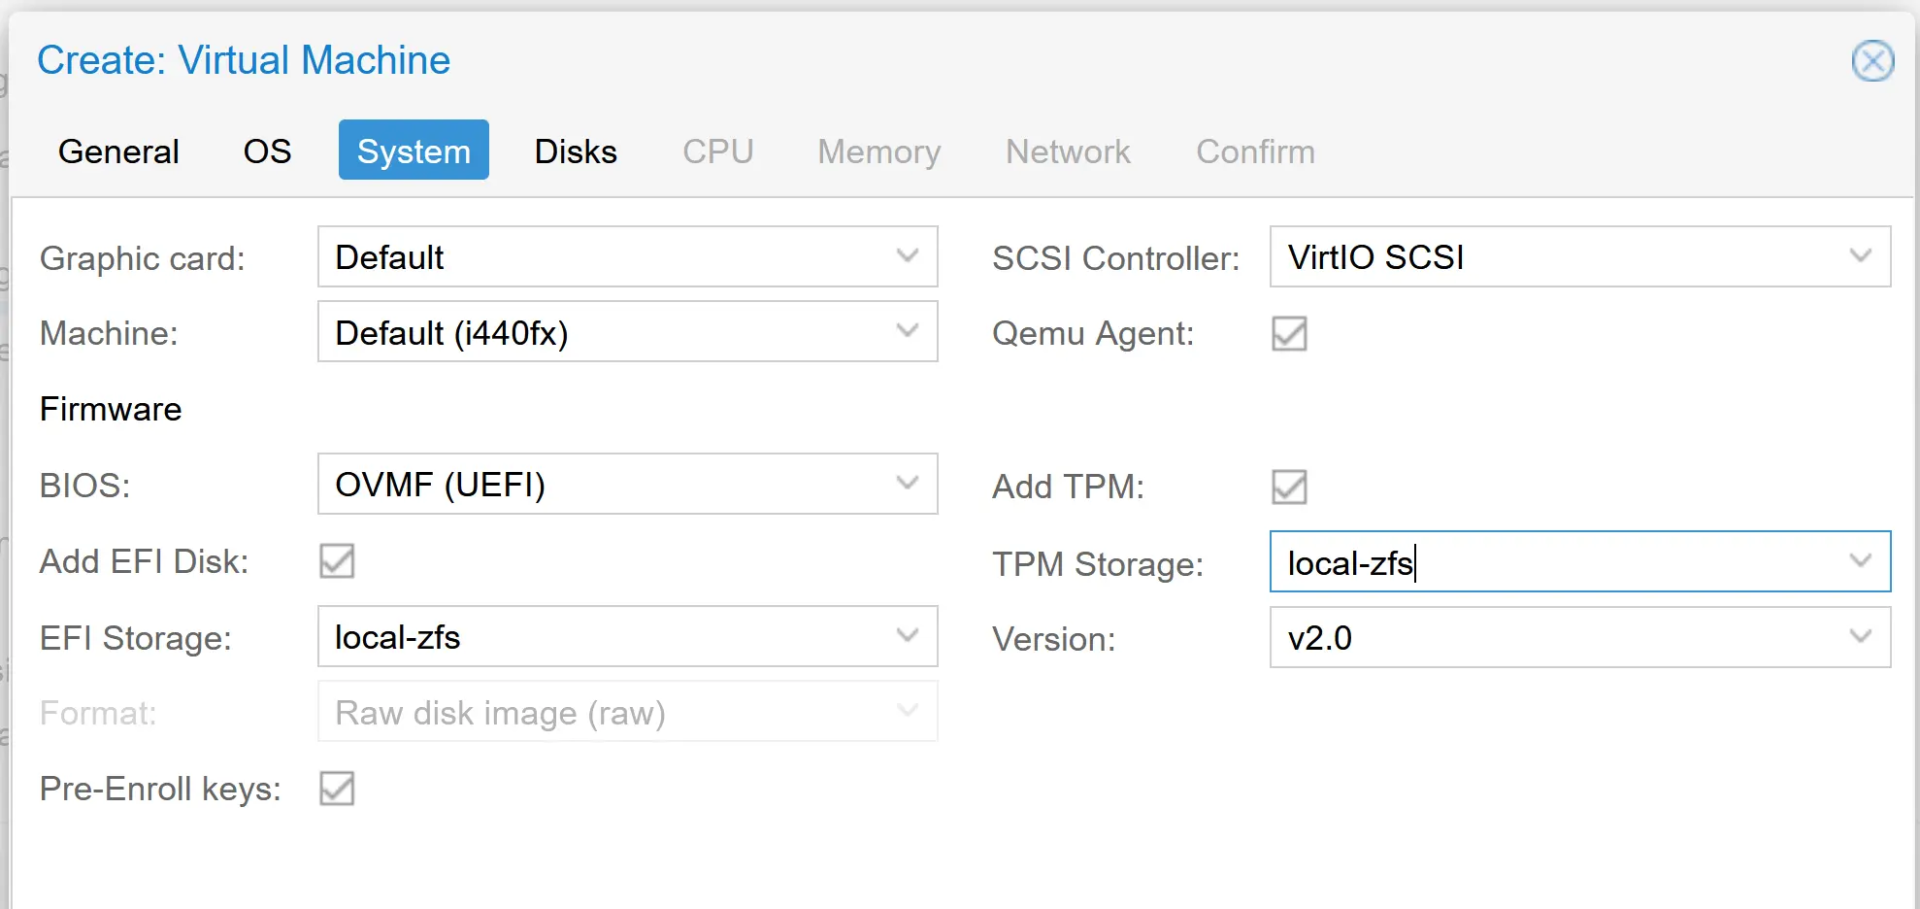
System Options: Keep default settings for most configurations, ensuring SCSI controller type remains “VirtIO SCSI” for optimal performance with Ubuntu’s VirtIO drivers. Enable “QEMU Guest Agent” option for enhanced VM management capabilities. I also recommend to use the UEFI BIOS
Hard Disk: Allocate 25GB storage space for Ubuntu Desktop or 20GB for Ubuntu Server. Select “VirtIO Block” as the bus type and choose an appropriate storage location based on your Proxmox VE configuration. For cache, I recommend “write back”
There is also an option to set a backup for these virtual machines.
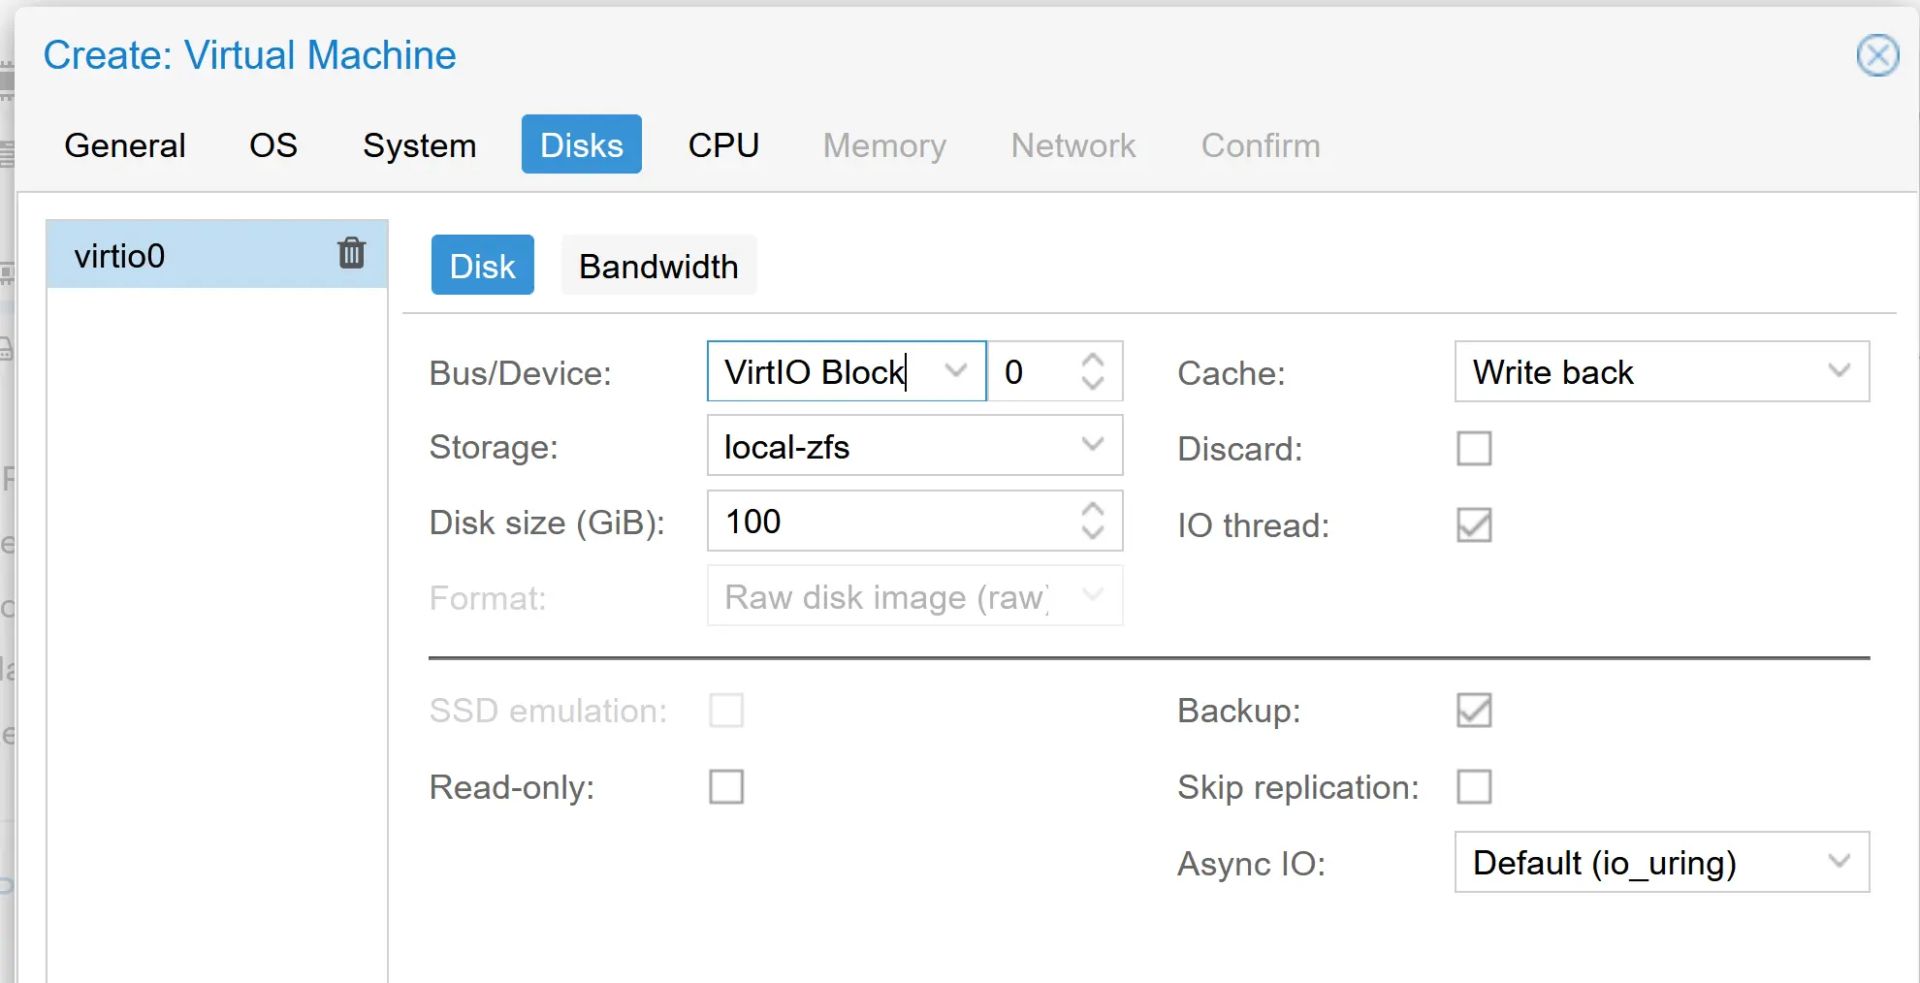
CPU Configuration: Assign 2 CPU cores for basic Ubuntu installations, adjusting as needed based on the intended workload requirements. I usually don’t change the settings except the cores.
Memory Allocation: Configure 4GB RAM for Ubuntu Desktop or 2GB for Ubuntu Server installations. Enable ballooning if available to allow dynamic memory adjustment. Memory is in MB, so 4GB is 4096MB
Network Settings: Use the default vmbr0 bridge with VirtIO network adapter for optimal network performance and compatibility with Ubuntu’s built-in VirtIO drivers. Additionally, employing the VirtIO paravirtualized network device ensures efficient and high-performance networking within your Proxmox virtual machines.
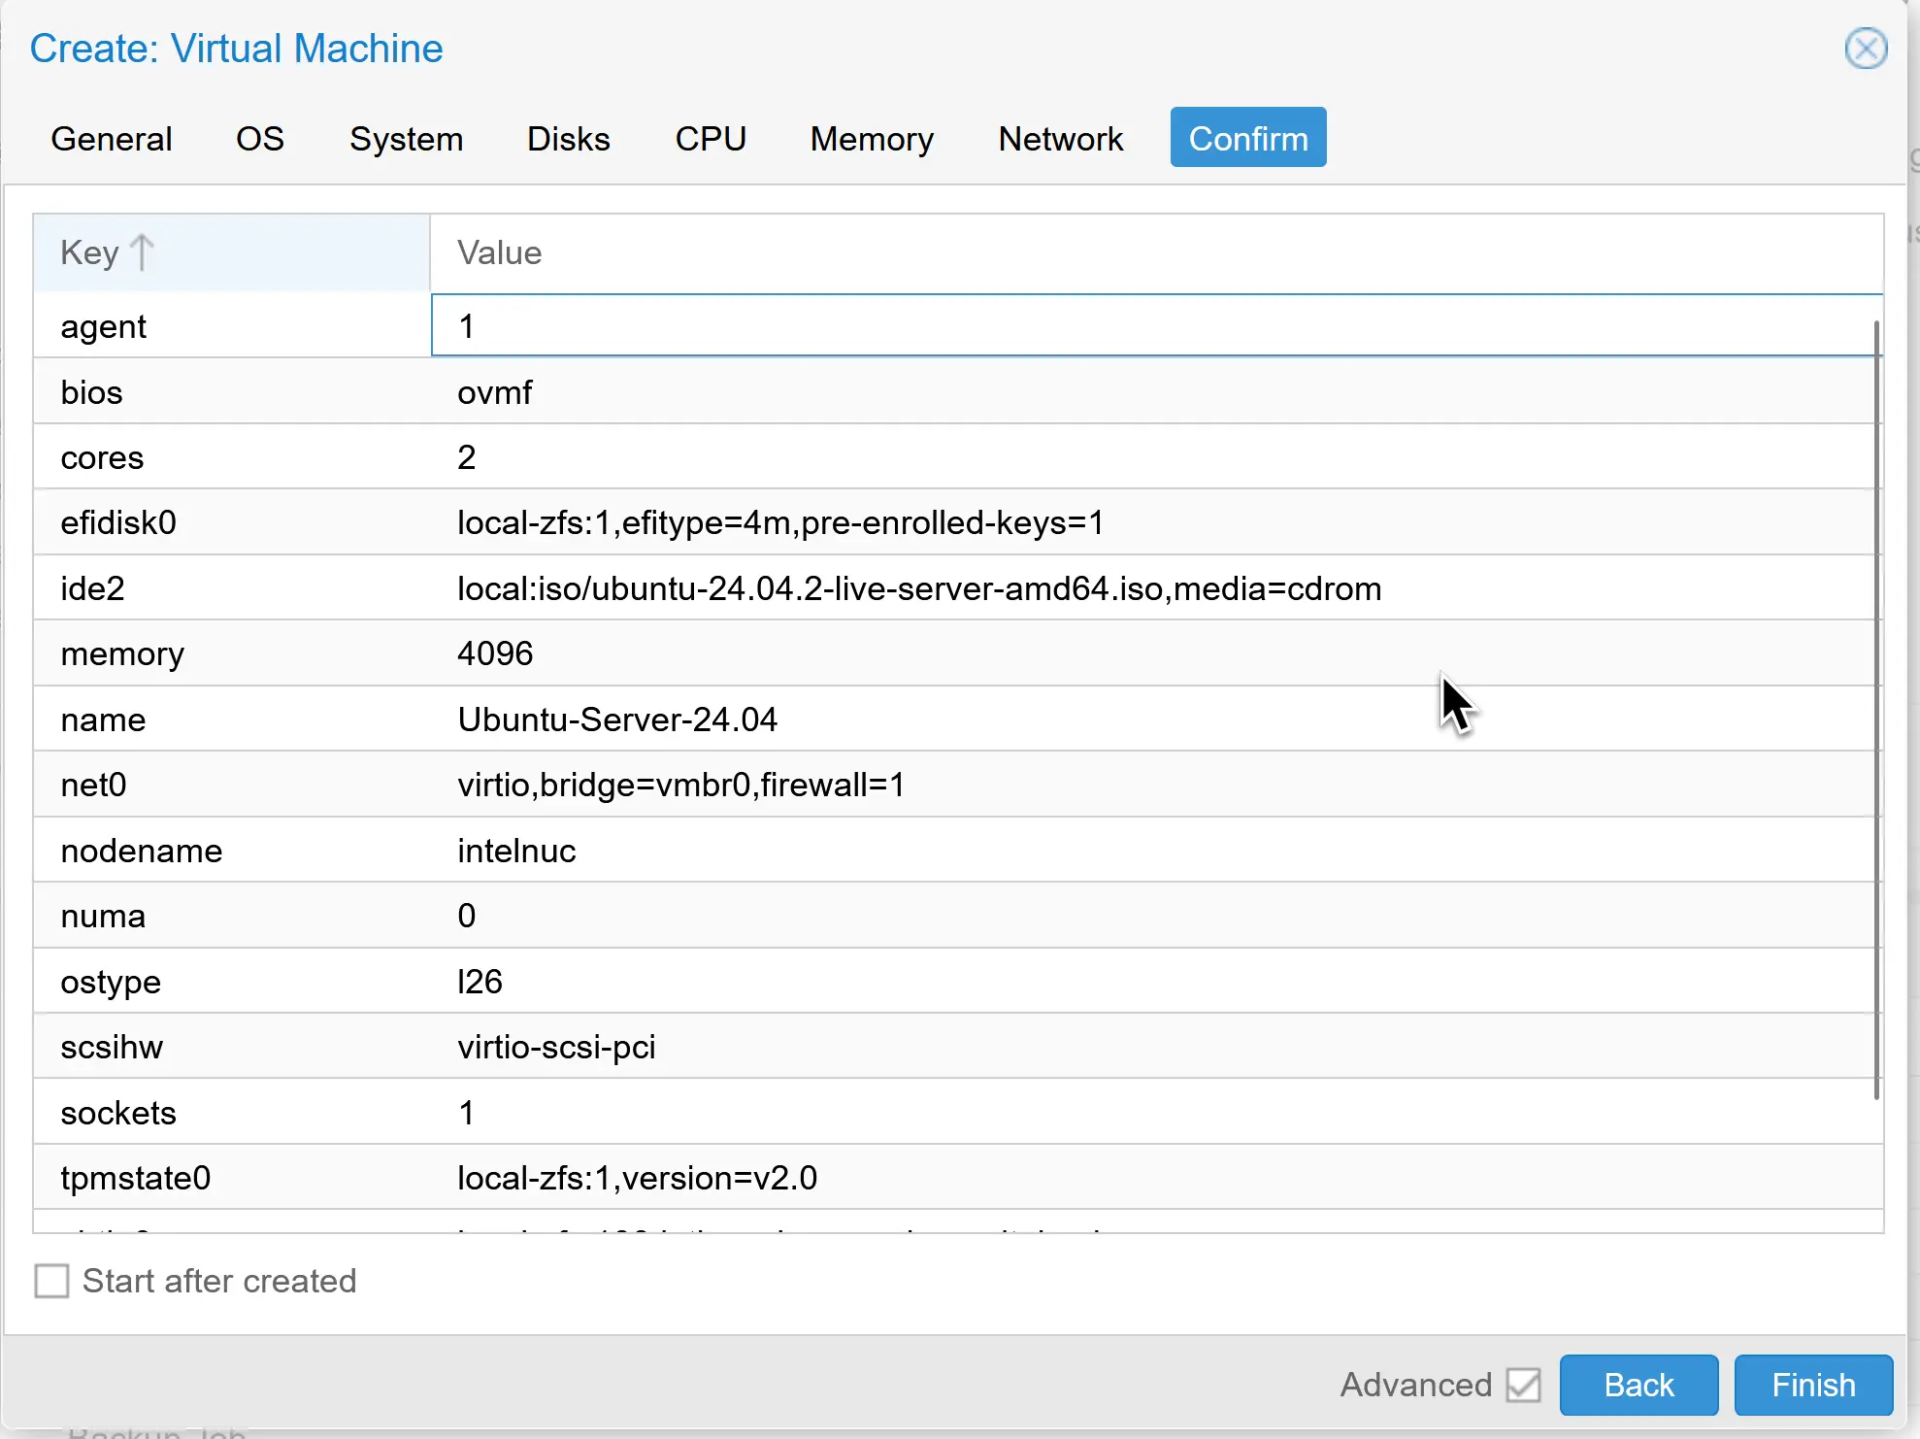
Creating a Proxmox VM without the GUI – just copy and paste the below scripted code in the node shell and Proxmox will create a virtual machine. Adjust the first section for a different VM name or disk size.
# --- adjust these ---
VMID=120
NAME="Ubuntu-Server-24.04"
STORAGE="local-zfs"                                 # e.g., local-lvm, tank, etc.
ISO="local:iso/ubuntu-24.04.2-live-server-amd64.iso"
DISK_GB=25
BRIDGE="vmbr0"
# --- create VM skeleton ---
qm create $VMID --name "$NAME" --ostype l26
  --memory 4096 --cores 2 --sockets 1 --cpu host
  --machine q35 --bios ovmf --scsihw virtio-scsi-pci
  --agent enabled=1
  --net0 virtio,bridge=$BRIDGE,firewall=1
# EFI vars disk + TPM 2.0 (matches your GUI summary)
qm set $VMID --efidisk0 ${STORAGE}:1,efitype=4m,pre-enrolled-keys=1
qm set $VMID --tpmstate0 ${STORAGE}:1,version=v2.0
# System disk on SCSI (SSD flag + discard)
qm set $VMID --scsi0 ${STORAGE}:$DISK_GB,ssd=1,discard=on
# Attach the Ubuntu ISO as a CD-ROM on SATA (most reliable with OVMF)
qm set $VMID --sata0 $ISO,media=cdrom
# Make the VM boot from the ISO first, then the system disk
qm set $VMID --boot order=sata0;scsi0
# OPTIONAL: start on host boot
qm set $VMID --onboot 1
# Start the VM and run the Ubuntu installer
qm start $VMIDIf you want to test Proxmox without spending a lot, a mini PC is the easiest starting point. The ones below are what I would recommend for a home lab or a small IT department.

I earn a commission if you make a purchase, at no additional cost to you.
Pick your path
Scenario | Cloud-Init Template (recommended) | Normal GUI Install (ISO) |
|---|---|---|
Deploying multiple Ubuntu servers fast | ✅ Best choice | |
One-off Desktop or interactive server | ✅ Use the installer | |
Standardized, repeatable builds | ✅ | |
Click-through wizard preferred | ✅ | |
No installer; boots ready with SSH user/key | ✅ |
Start the newly created VM and access the console through the proxmox web interface to begin Ubuntu installation. The console displays the Ubuntu boot menu with installation options.
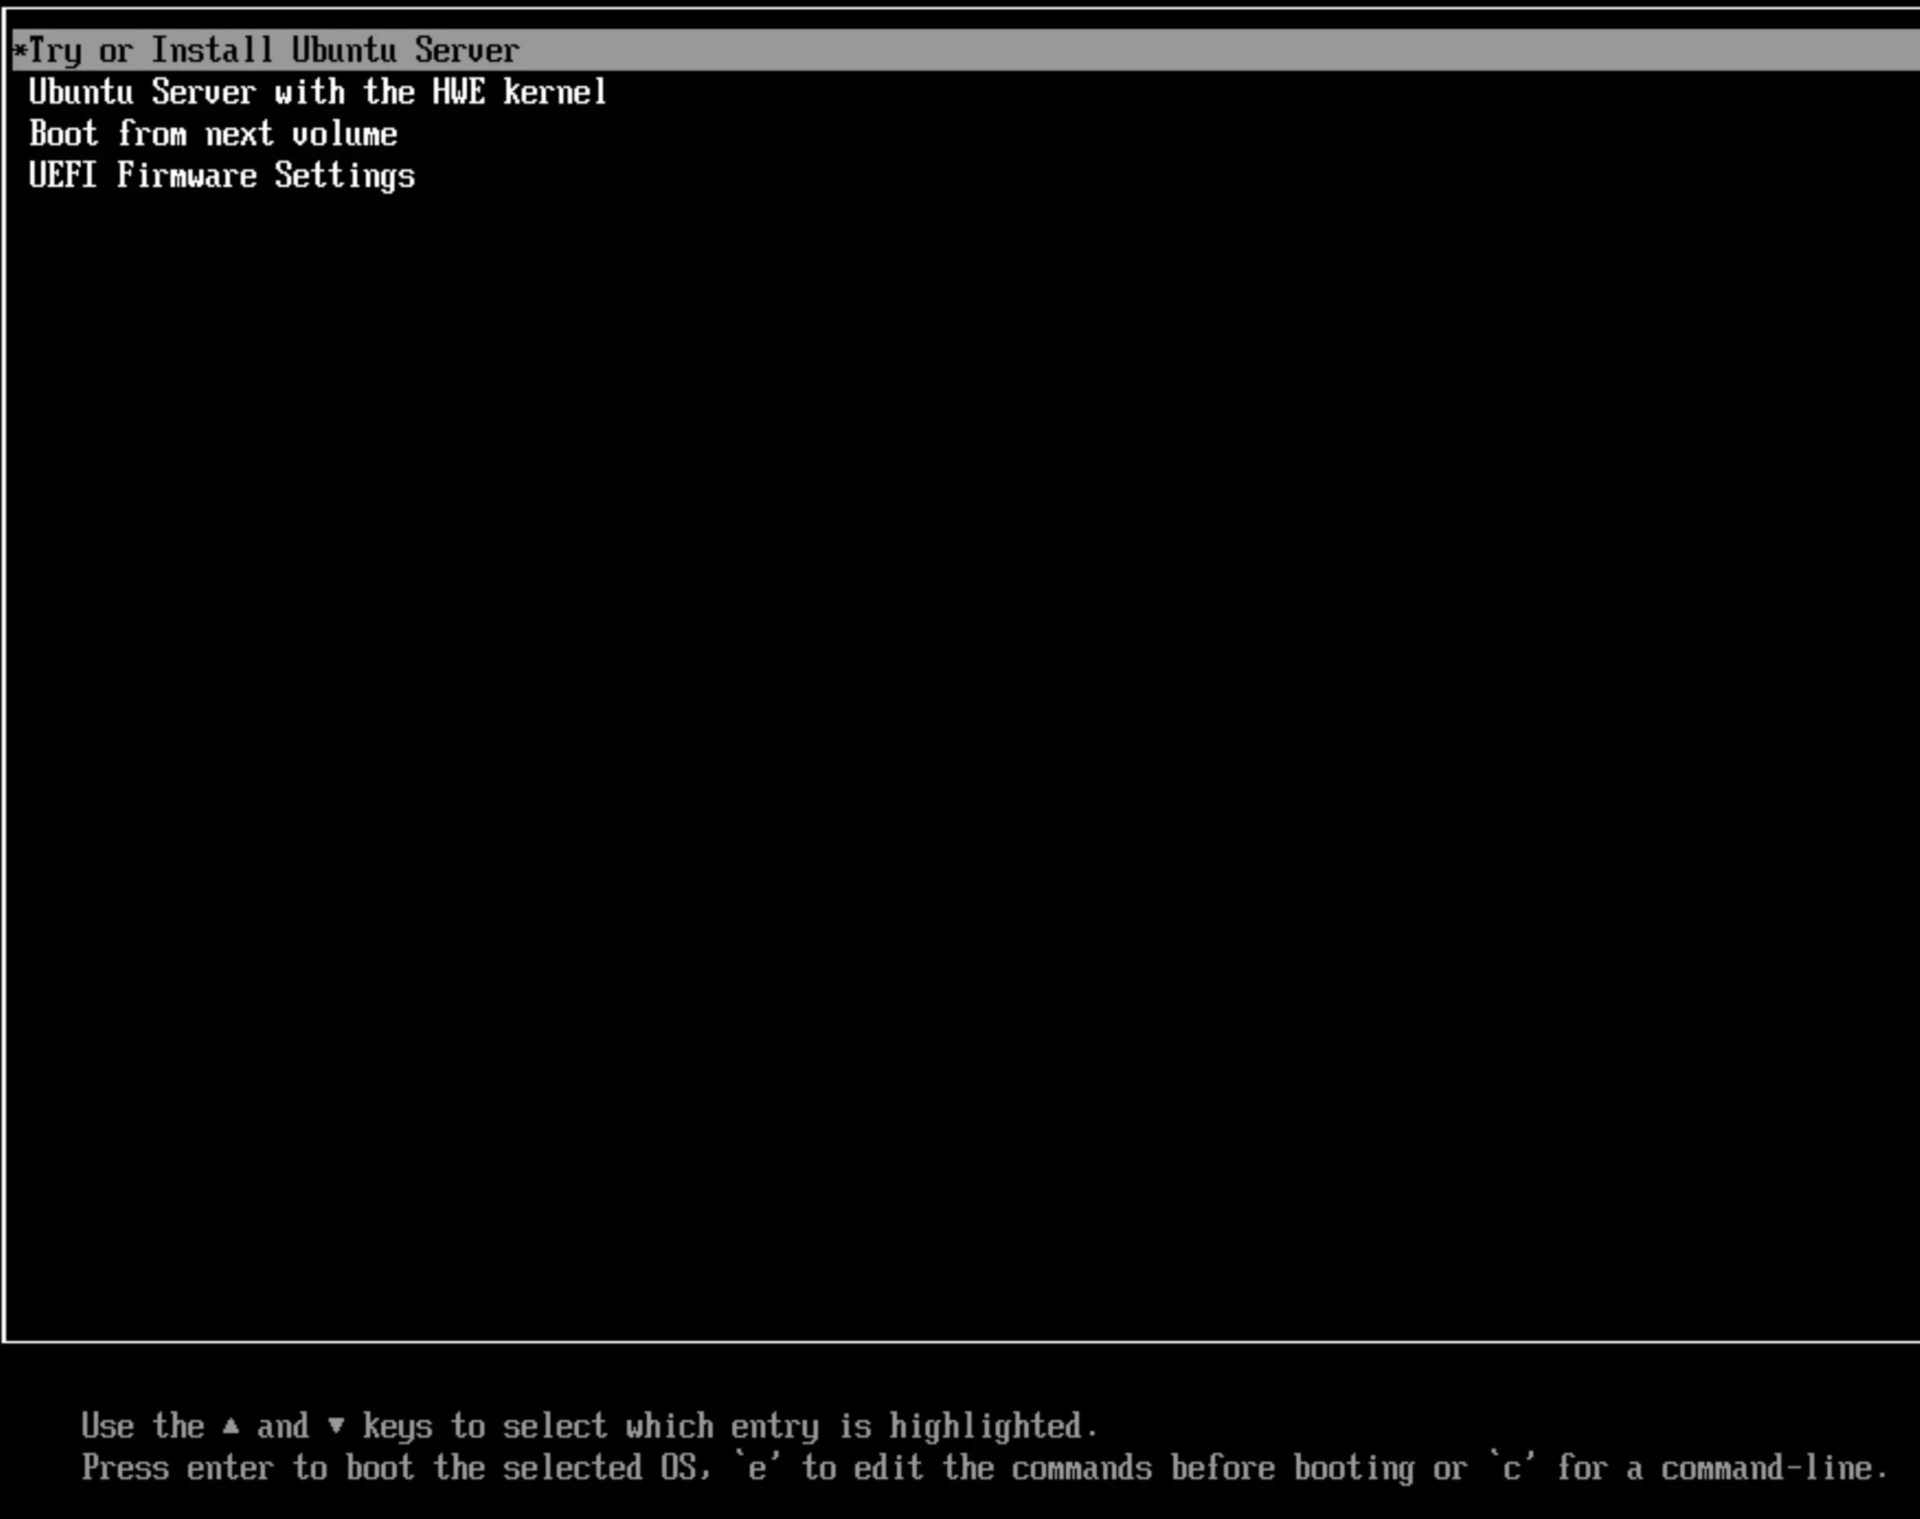
Select “Try or Install Ubuntu Server” and proceed.
Configure language preferences, keyboard layout, and regional settings according to your requirements.
Type of Installation: Leave Ubuntu Server (already select install option
Network Configuration: Ubuntu installer typically detects the VM network automatically through DHCP. For static IP address assignment, manually configure network settings during installation or modify configuration post-installation.
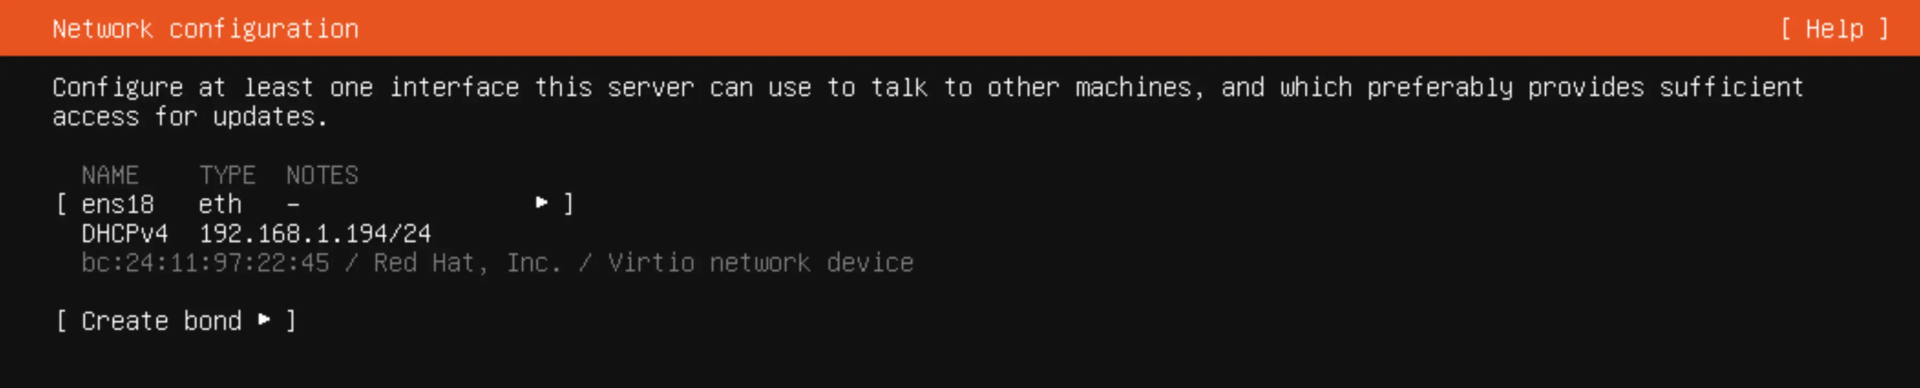
Proxy configuration: in most cases not needed.
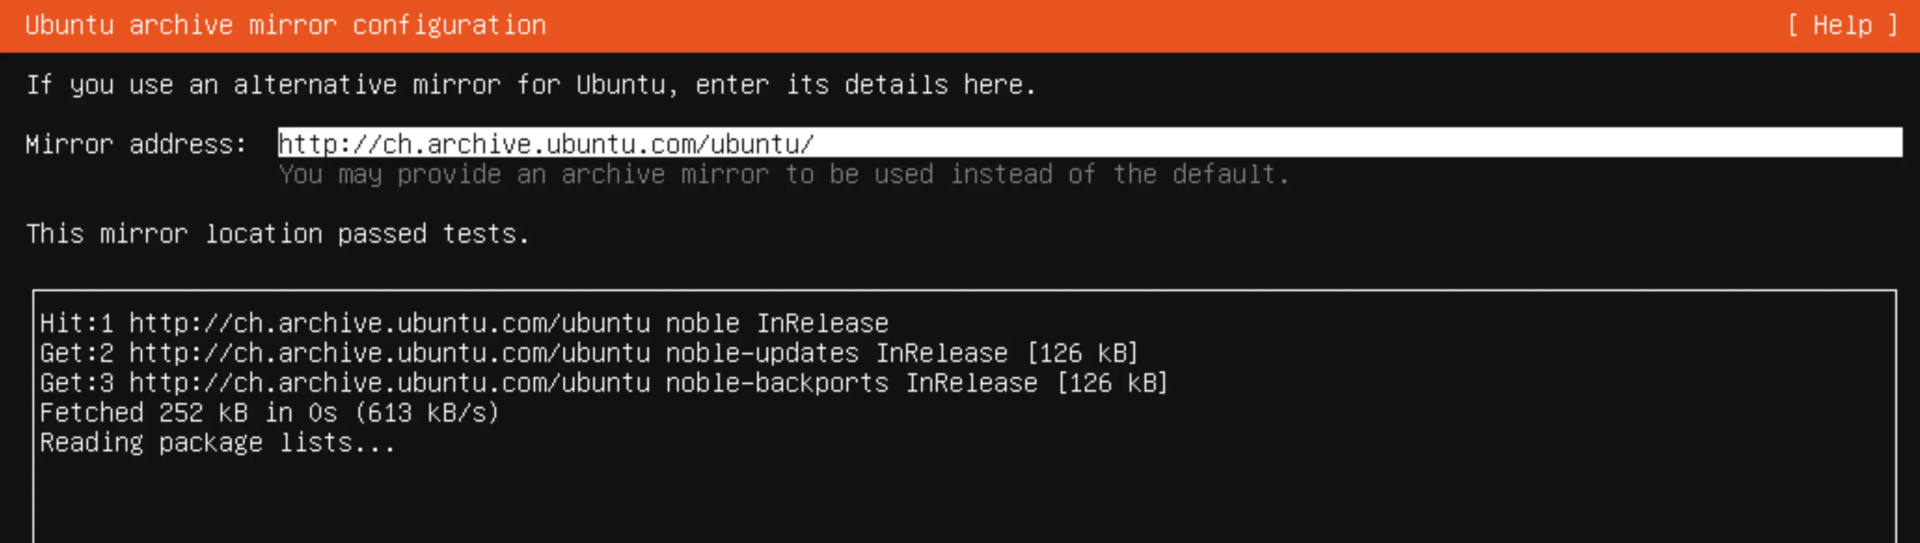
Archive mirror configuration: The mirror address should be according to your regional settings. In my case it is Switzerland (CH)
Disk Partitioning: Choose “Use entire disk” for guided partitioning in test environments, or select manual partitioning for custom layouts. The installer automatically recognizes VirtIO disks in properly configured VMs. I would not select “Set up this disk LVM group”
What’s an LVM group (in plain English)?
An LVM group (Volume Group) is a storage pool that merges one or more disks/partitions into a single “big bucket.” From that bucket you carve out Logical Volumes (LVs) that act like flexible partitions for VM disks. It’s fast and simple, and with LVM-thin you can even thin-provision space.
Why you might skip it in Proxmox’s guided setup:
LVM doesn’t provide data integrity checksums, built-in compression, or ZFS-style snapshots/rollbacks. Expanding or moving volumes can be trickier than with ZFS, and you’ll often end up with two storages anyway (e.g., local for ISOs/templates and local-lvm for VM disks). If you want snapshots, integrity, and easy growth, many homelab users prefer ZFS; if you want maximum simplicity and don’t need those features, LVM (or LVM-thin) is fine.
Profile configuration Create an administrative user account with sudo privileges. Set the hostname for the server
Upgrade to Ubuntu Pro

Here’s the quick value prop for Ubuntu Pro:
Bottom line: For homelab/SMB VMs, enabling Ubuntu Pro provides broader security updates and live patching at no additional cost (within the free tier), which is ideal for long-lived Proxmox guests.
SSH configuration: I recommend selecting “Install OpenSSH server” and, optionally, import your SSH public key.
The feature server snaps are the last screen before the installation starts.
Installation timing varies from 10 to 30 minutes, depending on selected packages, VM storage performance, and network connectivity for package downloads.
Using a cloud-init image is the most efficient method for deploying new Ubuntu VMs.
This path uses the Ubuntu cloud image (not the installer ISO). I create a template once, then clone it in seconds. Proxmox injects per-VM settings (user, SSH key, hostname, IP) via a tiny cloudinit drive.
Below you see a ready script to paste in the Proxmox node shell. Change the variable and set a disk size – in my example, it is 300GB. There are also ways to define default settings in the script cloud-init.
After you run the script, you’ll see the newly created VM in the Web-GUI. Don’t start the VM yet,
Why should you not start the VM?
On first boot, Ubuntu generates host-unique secrets and IDs. If you boot the base and then template it, every clone inherits those settings, which is undesirable.
# variables you can adapt
VMID=9000
STOR=local-zfs
NAME="Edy-ubuntu-cloud2"
DISK_SIZE=300G                     # <-- desired virtual disk size
#download from URL current image - in this example Ubuntu noble 24.04 LTS
wget https://cloud-images.ubuntu.com/noble/current/noble-server-cloudimg-amd64.img
# Create VM (SeaBIOS default, no UEFI)
qm create $VMID --memory 2048 --cores 2 --name "$NAME" --net0 virtio,bridge=vmbr0
# Import the Ubuntu cloud image as the OS disk
qm disk import $VMID noble-server-cloudimg-amd64.img $STOR
# Attach it as scsi0 (virtio-scsi)
qm set $VMID --scsihw virtio-scsi-pci --scsi0 $STOR:vm-$VMID-disk-0
# Resize the disk to your desired size
qm resize $VMID scsi0 $DISK_SIZE
# Add Cloud-Init drive and minimal defaults
qm set $VMID --ide2 local:cloudinit
# (optional) add user naem and dhcp
# qm set $VMID --ciuser edy --ipconfig0 ip=dhcp
# (optional) add your SSH key:
# qm set $VMID --sshkey ~/.ssh/id_rsa.pub
# Legacy boot from scsi0 (SeaBIOS)
qm set $VMID --bootdisk scsi0 --boot order=scsi0
qm set $VMID --serial0 socket --vga serial0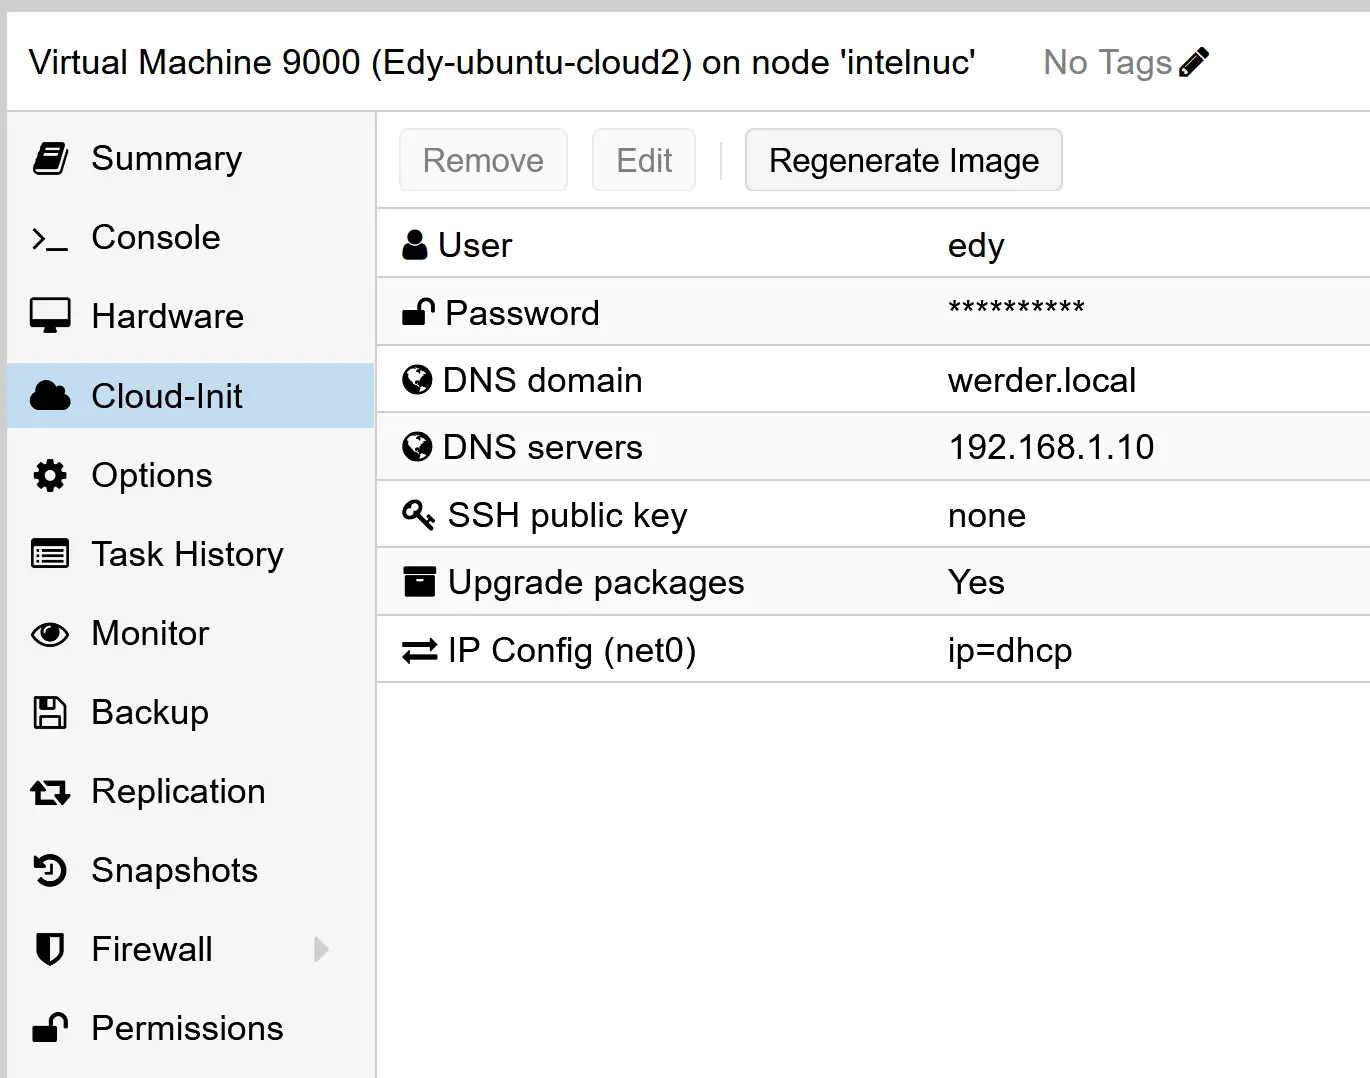
Above you see my Cloud-Init settings. I set the DNS server and IP Config to DHCP.
To convert the Cloud-Image to a Proxmox template just right-click the VM and choose “convert to template”
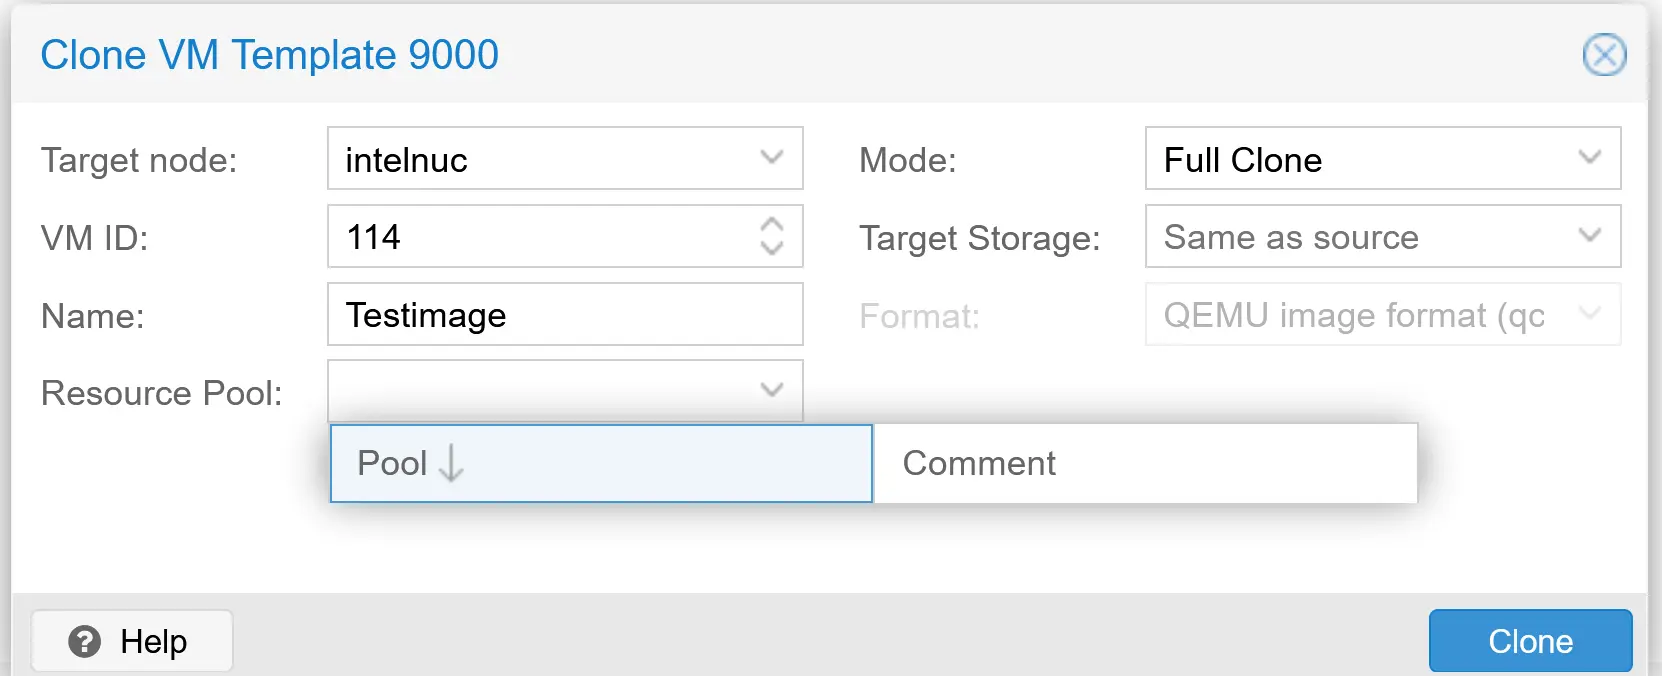
After that you can use the template to clone it to a new VM.
Proper post-install steps ensure great performance and smooth management in Proxmox VE.
sudo apt update && sudo apt install -y qemu-guest-agent
sudo systemctl enable --now qemu-guest-agentIn Proxmox: open the VM → Options → QEMU Guest Agent → Enabled (if it was Off).
(Tip: after first enabling, reboot once so Proxmox reads the agent state.)
ip -br a             # concise IP overview
hostname -I          # primary IP(s)
ping -c 3 1.1.1.1    # basic connectivity
ping -c 3 google.com # DNS + routing
curl -I https://ubuntu.comSet a static IPs: edit Netplan (network configuration file) in /etc/netplan/*.yaml,
sudo netplan try     # safe apply with rollback
# or
sudo netplan applyMost Ubuntu cloud images auto-grow on first boot. If not:
sudo apt install -y cloud-guest-utils
sudo growpart /dev/sda 1
sudo resize2fs /dev/sda1 # use xfs_growfs if root is XFSWhen using cloud-init, don’t boot the base VM before templating—each clone should be the first boot. This guarantees unique machine-id, SSH host keys, and fresh cloud-init runs.
I’d love to hear from you. Was this article helpful? Share your thoughts in the comments below. If you prefer, you can also reach me by email or connect with me on Reddit at Navigatetech.
Before you go, if you’re setting up Proxmox on Ubuntu, chances are you’re also thinking about the right hardware to run your home lab efficiently. Choosing the right system can make a huge difference in performance, energy usage, and scalability. I recently explored some top compact options that balance power and price exceptionally well. If you’re considering a small but capable machine for virtualization or container workloads, take a look at The Best Mini PC for Home Server. It might just help you find the perfect hardware match for your Proxmox setup.
Hi, I'm Edy Werder. I write hands-on guides about servers, virtualization, NAS and WordPress, based on setups I run in my own homelab. Real configs and real results, no fluff.
Enjoying the content?