
By Edy Werder — IT Consultant & Tech Blogger
I’m primarily a Windows administrator, but occasionally I manage Linux systems too—specifically Ubuntu Server. In this article, I’m working with Ubuntu 20.04 LTS. Since I don’t use Linux every day, I often need a quick refresher when it comes to user and permission management.
That’s why I decided to write down the essential commands for creating users and groups, assigning permissions, and explaining the difference between the root user and users in the Ubuntu admin group (also known as the sudo group). If you’re like me and want a practical, no-frills guide to managing users and groups in Ubuntu, this one’s for you.
Managing users and permissions can be a pain. Administrators, by default, allow one user to manage the entire system. When you install Ubuntu Server 20.04 you will be asked to create a user. This user will automatically be added to the group sudo, which means the user obtains the highest rights in short sudo. Sudo access is crucial for managing user permissions effectively, as it allows users to execute commands with elevated privileges. In addition, Ubuntu creates another user which is called root user.
Managing permissions in Linux involves understanding usernames, groups, and permissions. This article explains how these elements work together to control access. The superuser, or root user, has the highest system access. Managing these privileges is key for security.
Understanding users is crucial for access control. Each user needs a unique username, which identifies them on the system. Users need their own account and home directory. A sudo user can perform administrative tasks with limited access, adhering to the principle of least privilege.
Groups provide flexibility in managing users. While each user has a unique username, multiple users can belong to the same group, simplifying management while maintaining control over server tasks. Use command-line tools to verify a user’s group memberships and privileges.
Permissions are the final piece of access control. Linux uses a hierarchical permission system to determine user actions on files, directories, or applications.
In this article, you’ll learn to add a user to a sudo group and existing groups. A future article will cover permissions.
Ubuntu servers add the first created user to the sudo group, which means this user can use the sudo command to add other users and add/edit/delete system files. All of these operations require great privileges like adding a new user or adding a new group to add future users, adding them to the administrative groups(admin), and configuring permissions for each Linux file or folder. With sudo, users can perform various administrative tasks such as installing software, updating the system, and managing user accounts.
A user should only be added to the sudoers file when a user needs sudo permissions. The sudoers file is like the Administration group in Windows. All major tasks like adding users and adding groups can be done with root privileges by default or install/updated programs.
Best Mini-PC to run Proxmox or VMWARE
There are two commands to add a user ‘useradd’ or ‘adduser’. At first, this can be a little confusing since both commands accomplish the same thing (in different ways) and are named similarly. I prefer the command ‘adduser’ since it creates the password for the user and the home folder with additional questions. ‘useradd” only adds the user to the system, and you would need to assign a password later.
When creating a new user, you can also provide additional information such as
Full Name,
Room Number,
Work Phone, and
Home Phone
to ensure comprehensive user details in the system.
The adduser command also creates a home directory for the user and a group with the same name as the user.
audo adduser edyBefore removing an account, you should ask yourself one fundamental question: Is it still necessary for you to access the user’s files?
By default, this command won’t delete the user home directory or any files in it.
sudo userdel edyRemove the user’s home directory with all its contents. It is not automatically deleted when you remove a user account. Also, remember that you may keep the folder for retention or move it elsewhere for archiving purposes.
sudo rm -r /home/edysudo groupadd adminsOn the Ubuntu Server platform, you’ll likely see that each of your user accounts is a member of a group with the same name as your username. The moment you create a user account, you are also creating a group with the same name.
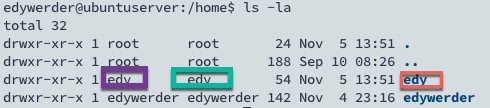
In this picture you see the home folder ‘edy’ (red), user permission (violet) and the automated created group ‘edy’ (green)
To add a user to a group, you can use the usermod command as shown below:
sudo usermod -aG admins edyThe option -‘a’ means to append the user edy to the group. If you would not use ‘a’, all other existing memberships in the group would be removed. ‘G’ means to add the user to the secondary group. It adds the user to an additional group and won’t replace the primary group. To replace the user’s primary group, you would use ‘g’ lowercase instead of uppercase ‘G’.
To verify the user’s group membership, you can use the groups command:
groups edygpasswd -d edy adminsThis command will remove user ‘edy’ from the group ‘admins
The Primary Group is a group that is automatically created while creating a user. Similarly, a group with the same ID as the user is created and the user is added to the group as the only member. This group is referred to as the primary group.
When a user is added to the ‘sudo’ group, they will belong to their primary group and the sudo group.
We can create a secondary group independently using commands and add users to it by changing their group IDs.
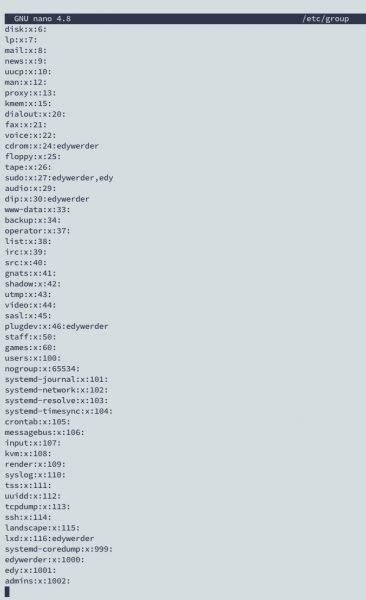
sudo groupdel adminsHow to check all groups in the system? There is a group file in /etc
nano /etc/groupIn the file you see all groups. You also notice that groups are named after user name.
Check out the table below for great deals on servers available on Amazon.
| Product Name | View on Amazon |
|---|---|
| Dell PowerEdge Dell R630 Server | 2X E5-2690 v4 = 28 Cores | 128GB RAM | 2X 1TB SSD (Renewed) | View on Amazon |
| Dell PowerEdge R730 Server 2X E5-2680v4 2.40Ghz 28-Core 128GB 8X 4TB 12G H730P (Renewed) | View on Amazon |
| ProLiant MicroServer Gen11 Tower Server w/one Intel Xeon E-2434, 3.4GHz 4-core 1P 32GB-U VROC 4LFF‑NHP 4TB HDD iLO KIT 180W External PS (HPE Smart Choice P74440-005) | View on Amazon |
| HPE ProLiant DL20 Gen11 Rack Server w/one Intel Xeon E-2436 Processor, 2.9GHz 6‑core 1P 32GB‑DR MR408i‑o 4SFF 2x500W RPS | View on Amazon |
| Dell PowerEdge R830 Server 2.20Ghz 56-Core 128GB 16x 300GB 15K H730P Rails (Renewed) | View on Amazon |
| Dell PowerEdge R440 Server 2X Gold 6126 2.60Ghz 24-Core 96GB 960GB SSD + 3.6TB (Renewed) | View on Amazon |
| HPE ProLiant DL380 Gen9 2U RackMount 64-bit Server + 2×8-Core E5-2640v3 Xeon 2.6GHz CPUs + 64GB PC4-2133P RAM + 8×600GB 10K SAS SFF HDD, P440ar RAID, 4×GigaBit NIC, 2×Power Supplies, NO OS | View on Amazon |
| HPE Proliant DL380 Gen10 8B SFF 2U Server, 2X Intel Xeon Gold 6126 2.6Ghz (24-cores Total), 192GB DDR4 RAM, 8X 1.2TB 2.5” 10K SAS 12Gbps, P408i-a SR 2GB RAID, No Operating System | View on Amazon |
su -edyThis command will change current user account to ‘edy’
If you only enter
su -This will switch the user to ‘root’.
Since Ubuntu 20.04, Ubuntu installer won’t create the user ‘root’.
First, you must create a password for the user ‘root’. After that, you can switch to the ‘root’ user. Ubuntu recommends not using the root account. You add any other user to the sudo group. Remember that Ubuntu automatically added the user you created during the installation process to the sudo group.
To log into the server as the root user via SSH, you must enter the root account credentials to gain administrative control over the server’s shell.
sudo passwdYou can set a ‘root’ password with any user who has sudo rights. Once the ‘root’ password is set, you can switch to the ‘root’ user. Using your password for sudo access ensures user accountability and control, allowing authorized users to perform administrative tasks without sharing the root password.
Setting a strong password for the root account is crucial to maintaining a robust security posture and preventing breaches caused by weak passwords.
Switching back from the ‘root’ user to your regular account, just type
exitsudo usermod -aG sudo edyThis will add the user ‘edy’ to the sudo group, granting them sudo privileges
groups edyLook up the group membership of the user ‘edy’
Once added to the sudo group, the user can execute commands with elevated privileges using the sudo command. The sudoers file you find here /etc/sudoers.
sudo passwd edyI’d love to hear from you. Was this article helpful? Share your thoughts in the comments below. If you prefer, you can also reach me by email or connect with me on Reddit at Navigatetech.
If you’re managing users and groups on your Ubuntu system, it’s a good idea to think about securing your setup as well. One effective way to do that is by monitoring for suspicious login attempts and automated attacks.
I recommend checking out Fail2ban Email Notification, which walks you through setting up alerts so you’re notified whenever Fail2ban blocks an IP. It’s a simple step that adds an extra layer of awareness and control to your server management. A secure system starts with good user management—but it doesn’t stop there.
Hi, I’m Edy Werder. I write hands-on guides about Proxmox, homelab servers, NAS, and WordPress, based on real setups I run and document.
No sponsors, no fluff—just real configs and results.
Enjoying the content?

