
By Edy Werder — IT Consultant & Tech Blogger

Diving into the world of Proxmox to configure VLANs? You’re in the right place. Whether setting up a virtual lab, enhancing security, or streamlining network performance, understanding how to manage VLANs in Proxmox effectively is key. This article will walk you through each step, ensuring you can leverage the full power of VLANs to optimize your network’s efficiency and security.
Let’s get started and make VLAN configuration in Proxmox a breeze.
A VLAN, or Virtual Local Area Network, is a technology that lets you split a single physical network into multiple virtual networks. Each VLAN acts as its separate network, allowing devices to communicate as if they were on the same physical network, even if they’re not. This setup is great for organizing your network into smaller, more manageable sections, enhancing security, and improving network performance.
Proxmox Server uses a model where each node can have multiple network interfaces, both physical and virtual. You typically create bridges when setting up the network on a Proxmox node. These bridges act as virtual switches to which both your physical and virtual machine (VM) network interfaces connect, enabling communication between VMs and between VMs and the outside world.
To set up VLANs in Proxmox, you must first create VLAN-aware Linux bridges. A Linux bridge works like a virtual switch that connects your VMs to the physical network. Making this bridge VLAN-aware allows it to understand VLAN tags and segregate traffic accordingly.
In the image below, Proxmox created two physical network interfaces, eno1 and eno2. vmbr0 is the Linux bridge.

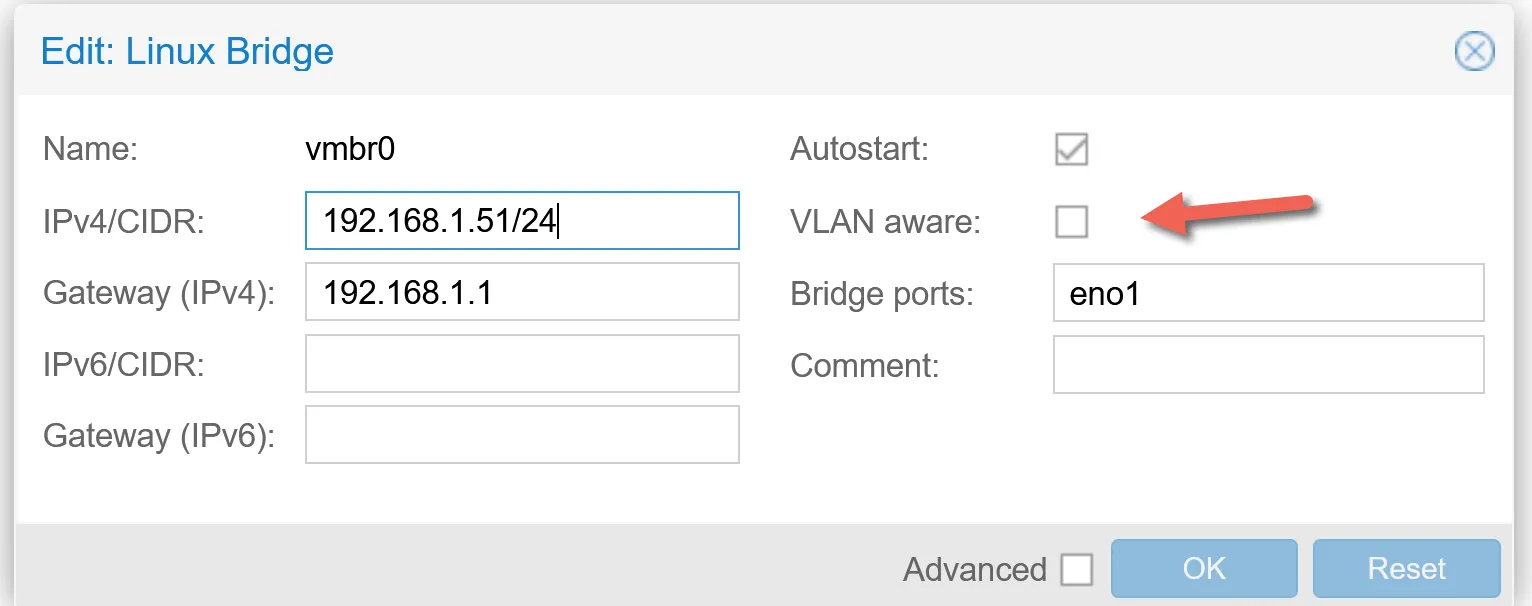
Highlight the vmbr0 Linux Bridge and click ‘edit’. You need to mark the checkbox ‘VLAN aware’ and then click ‘Apply Configuration.’ That’s all. The Proxmox Server is ready for vLans. In this example, you also see the management IPv4 address of the Proxmox node and the Gateway. I didn’t use IPv6, so the fields are empty.
If you want, you can go to the command line (shell) in the Proxmox WebGui or use Putty to check the configuration of the nic before you click ‘VLAN aware”
nano /etc/network/interfaces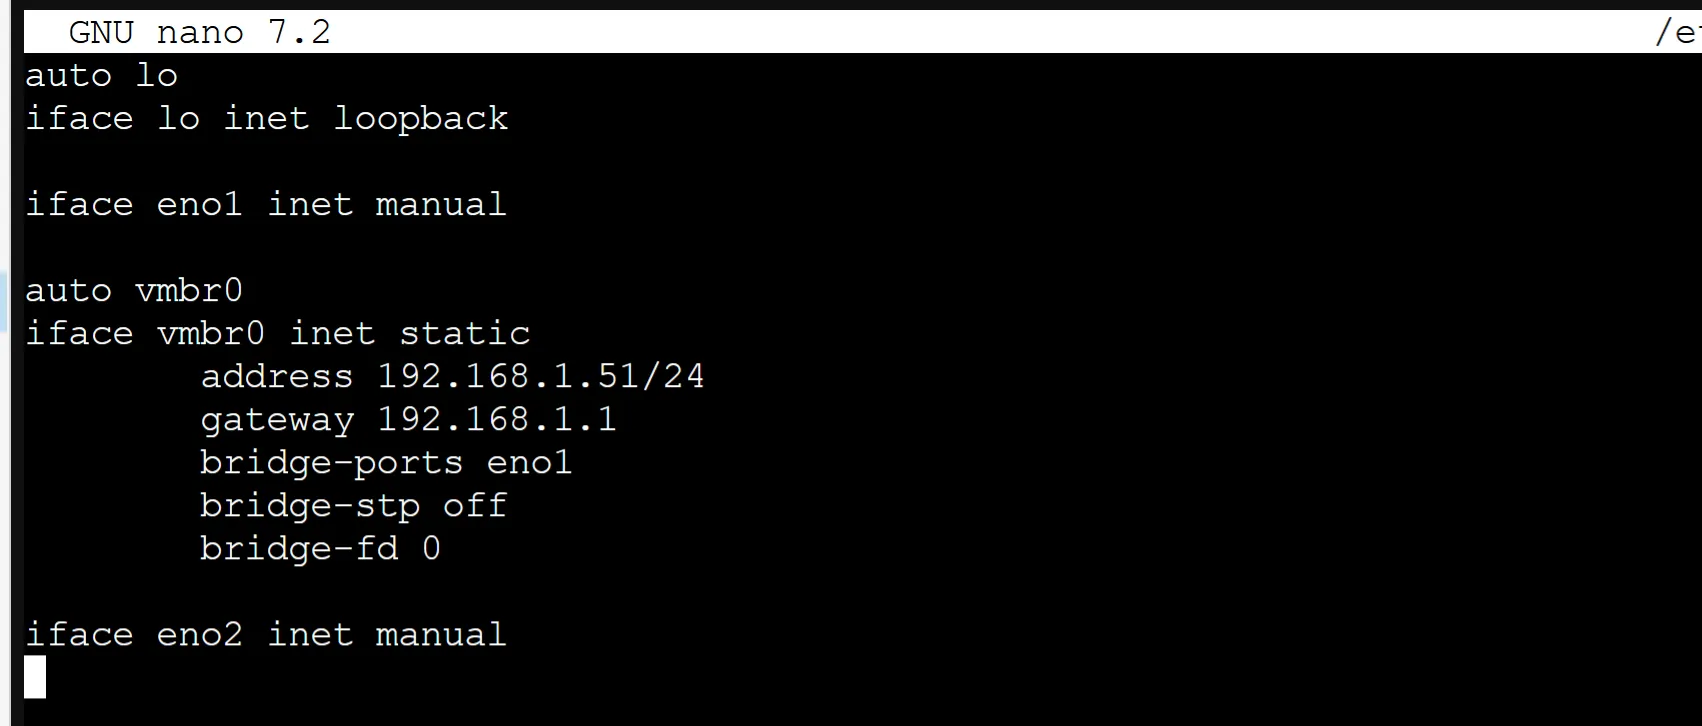
Below is the network interfaces after making the Linux bridge VLAN aware
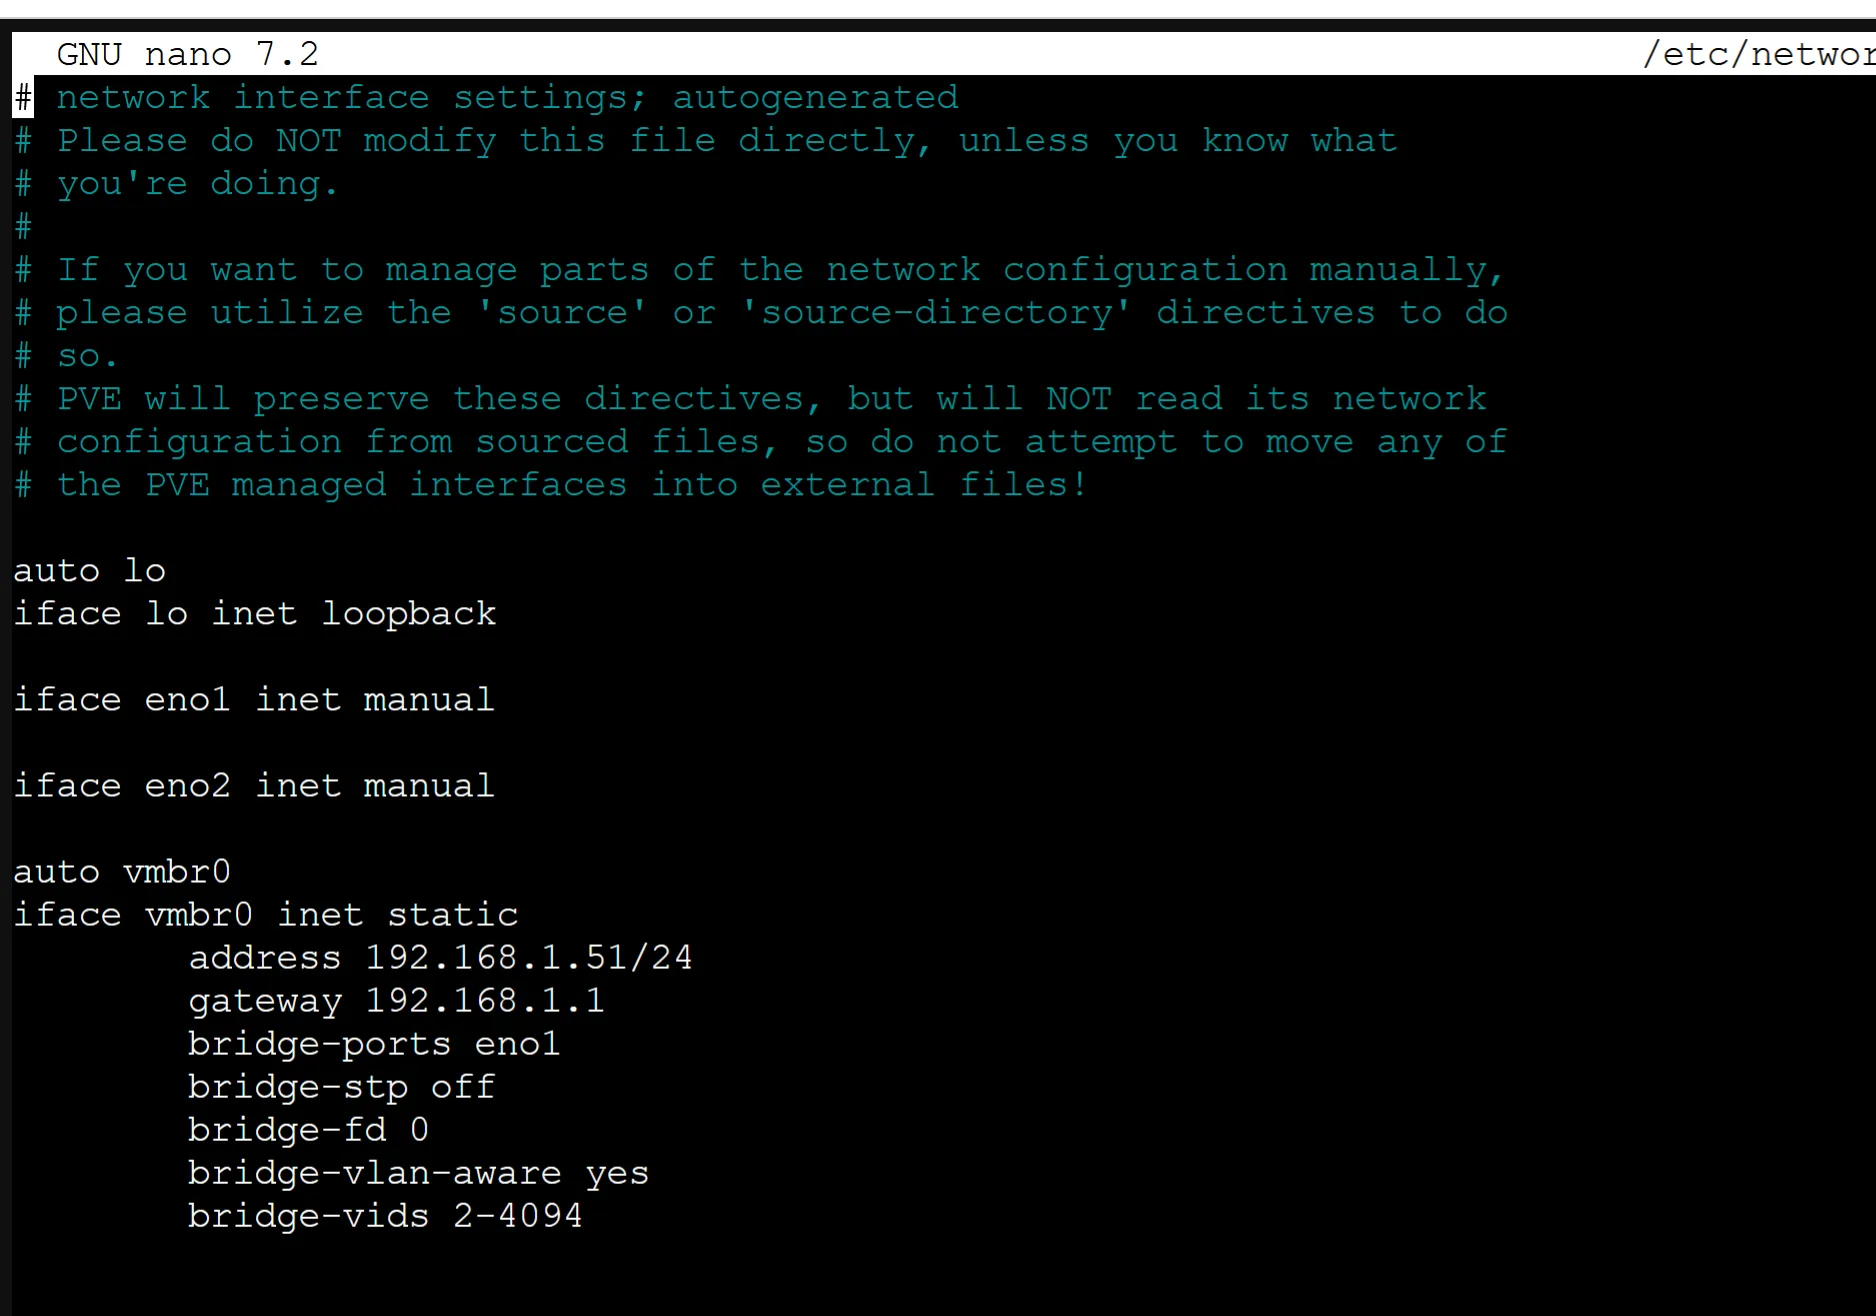
Basically, Proxmox has now created a VLAN trunk for all possible VLANs from 2-4094. VLAN1 is for the native network. You are free to change the configured VLAN, for example to
bridge-vids 2,10,15,20,100When you want to limit the bridge to allow traffic only from specific VLANs, you would use the bridge-vids parameter to specify the permitted VLAN IDs. The above example would indicate that only VLANs with IDs 2, 10, 15, 20, and 100 are allowed on the bridge.
Once you’ve made your Linux bridge in Proxmox VLAN-aware, the next step is to ensure that your Proxmox network configuration works harmoniously with your physical network setup. This integration allows virtual machines (VMs) within Proxmox to communicate efficiently with devices outside the Proxmox environment, including the internet, other servers, and workstations on your network. Here’s how you can achieve this:
Before integrating your Proxmox server with the physical network, it’s essential to understand your existing network’s VLAN setup clearly. This includes knowing the VLAN IDs, configuring your switches to handle VLANs, and which ports are tagged or untagged for specific VLANs.
Below you see an example of a VLAN configuration at a FortiGate firewall.
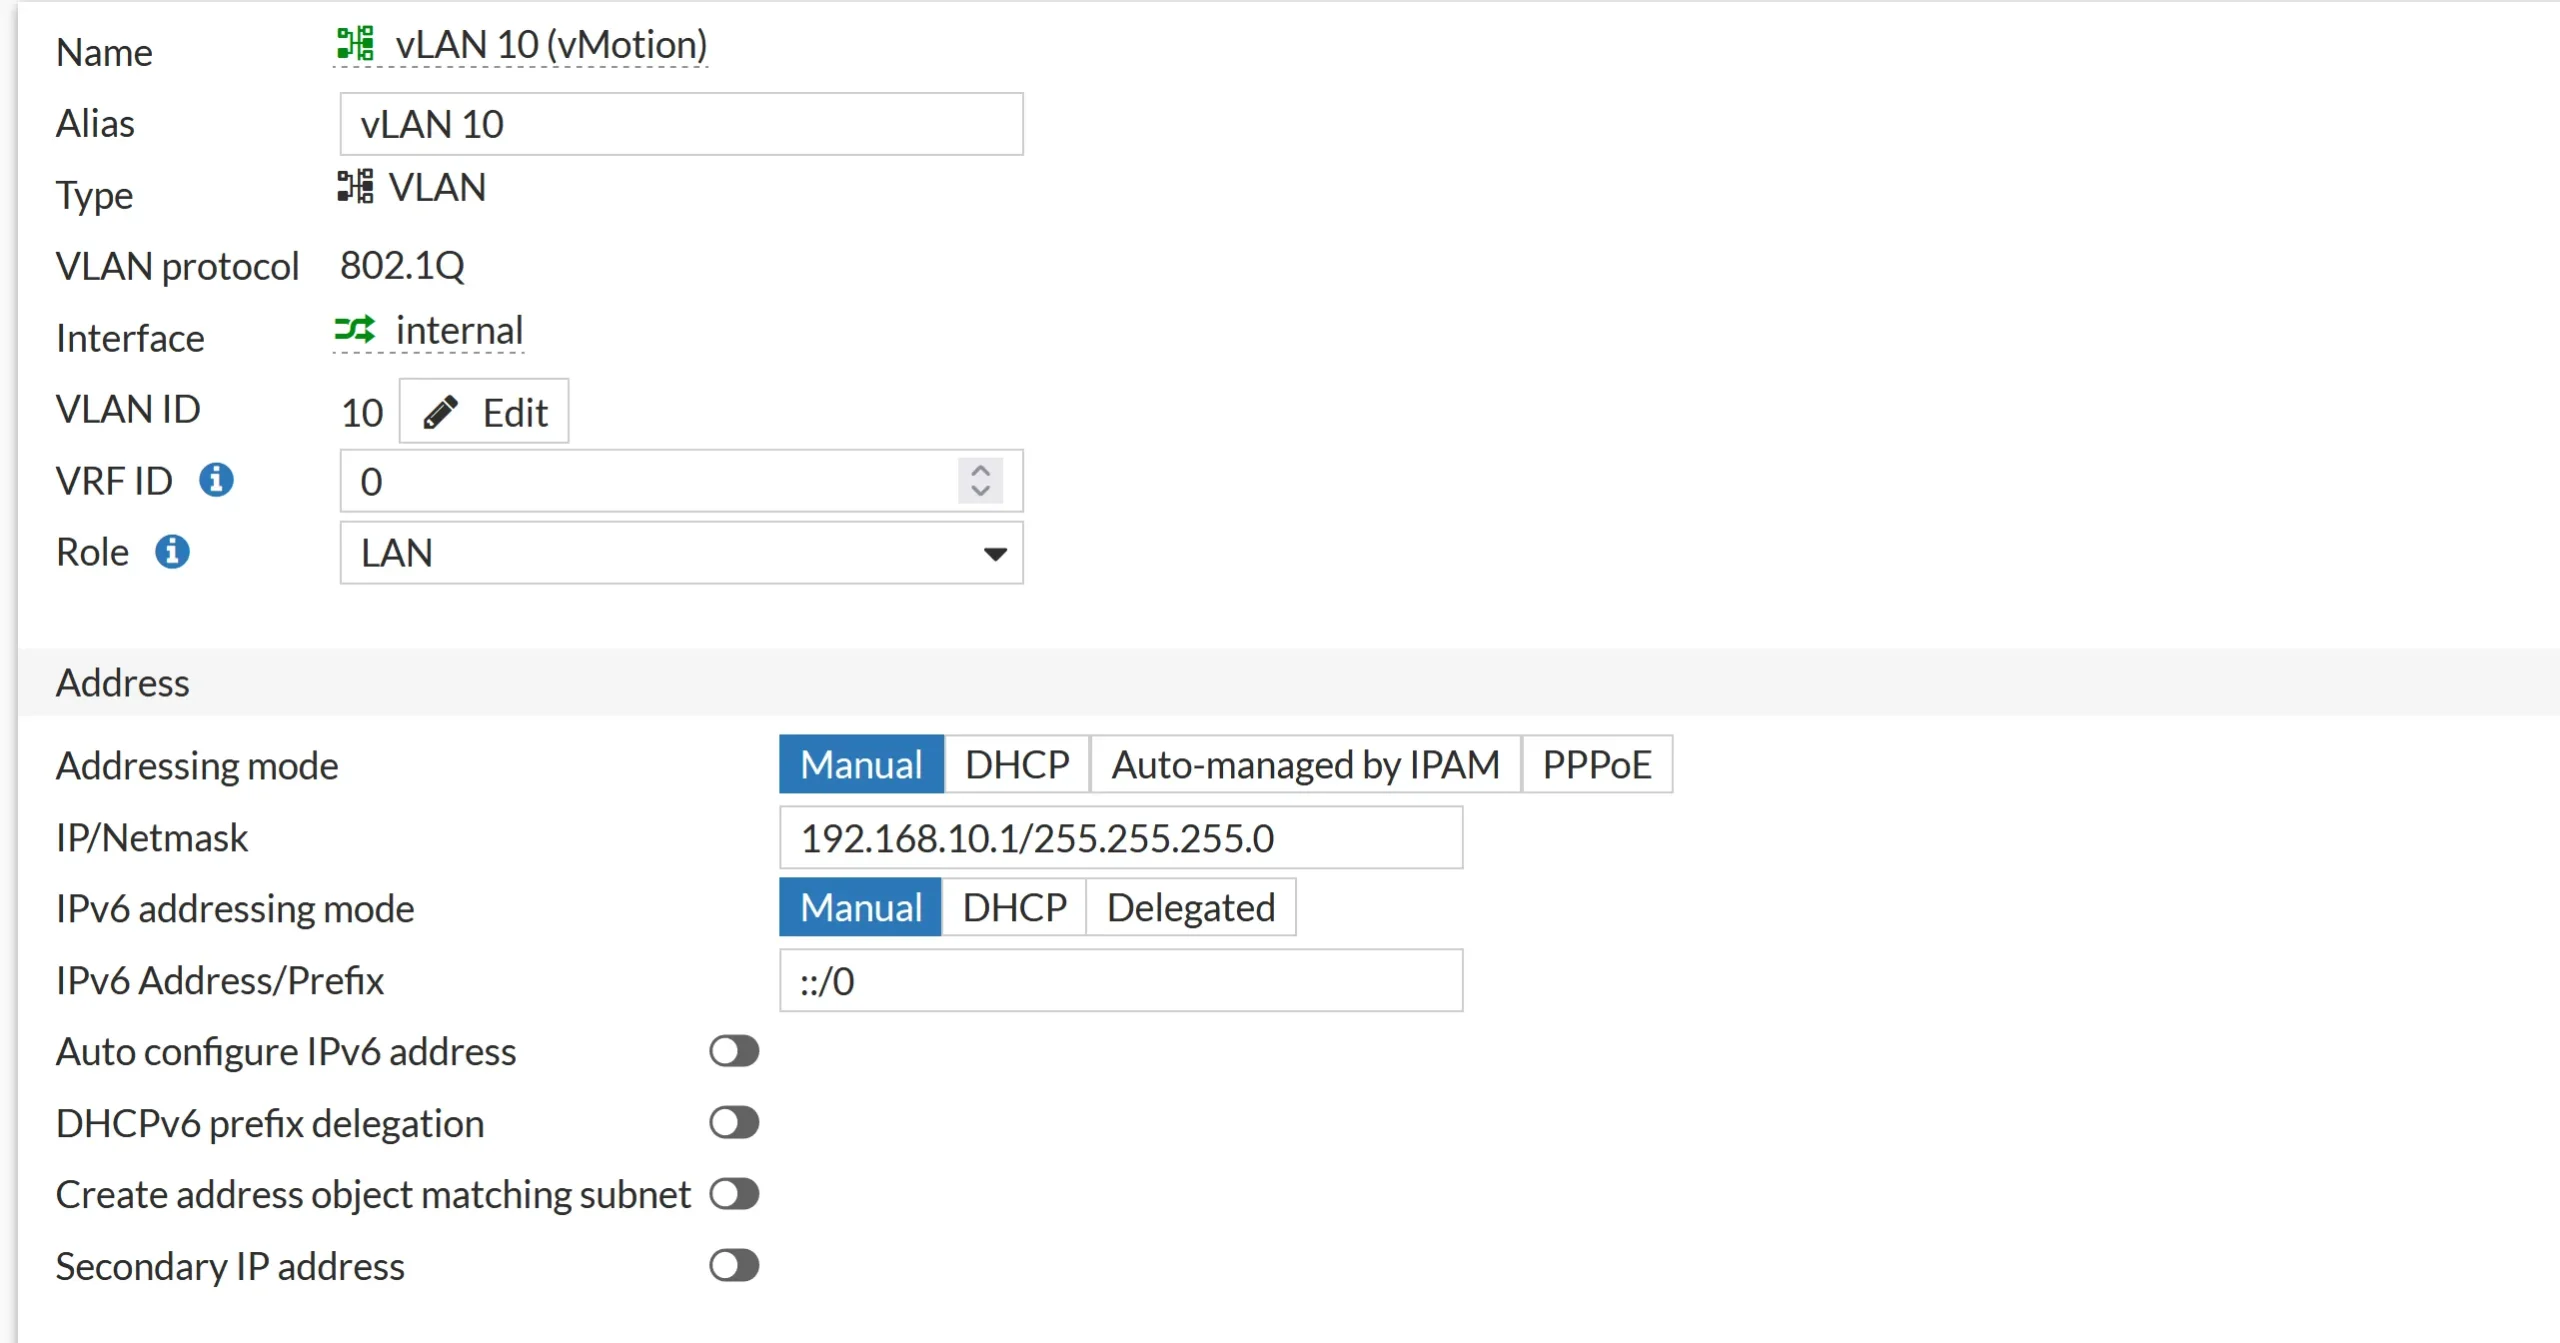
Ensure the VLAN IDs used in Proxmox match those configured on your physical switches. Inconsistencies between VLAN IDs can lead to communication failures. For instance, if a VM in Proxmox is tagged with VLAN 10, the physical switch port connected to the Proxmox server must also allow VLAN 10 traffic.
Check out the table below for great deals on servers available on Amazon.
| Product Name | View on Amazon |
|---|---|
| Dell PowerEdge Dell R630 Server | 2X E5-2690 v4 = 28 Cores | 128GB RAM | 2X 1TB SSD (Renewed) | View on Amazon |
| Dell PowerEdge R730 Server 2X E5-2680v4 2.40Ghz 28-Core 128GB 8X 4TB 12G H730P (Renewed) | View on Amazon |
| ProLiant MicroServer Gen11 Tower Server w/one Intel Xeon E-2434, 3.4GHz 4-core 1P 32GB-U VROC 4LFF‑NHP 4TB HDD iLO KIT 180W External PS (HPE Smart Choice P74440-005) | View on Amazon |
| HPE ProLiant DL20 Gen11 Rack Server w/one Intel Xeon E-2436 Processor, 2.9GHz 6‑core 1P 32GB‑DR MR408i‑o 4SFF 2x500W RPS | View on Amazon |
| Dell PowerEdge R830 Server 2.20Ghz 56-Core 128GB 16x 300GB 15K H730P Rails (Renewed) | View on Amazon |
| Dell PowerEdge R440 Server 2X Gold 6126 2.60Ghz 24-Core 96GB 960GB SSD + 3.6TB (Renewed) | View on Amazon |
| HPE ProLiant DL380 Gen9 2U RackMount 64-bit Server + 2×8-Core E5-2640v3 Xeon 2.6GHz CPUs + 64GB PC4-2133P RAM + 8×600GB 10K SAS SFF HDD, P440ar RAID, 4×GigaBit NIC, 2×Power Supplies, NO OS | View on Amazon |
| HPE Proliant DL380 Gen10 8B SFF 2U Server, 2X Intel Xeon Gold 6126 2.6Ghz (24-cores Total), 192GB DDR4 RAM, 8X 1.2TB 2.5” 10K SAS 12Gbps, P408i-a SR 2GB RAID, No Operating System | View on Amazon |
Assigning VLANs to virtual machines (VMs) in Proxmox VE is essential for network segmentation, enhancing security, and optimizing network traffic. Here’s how to directly assign VLANs to your VMs, ensuring they communicate effectively within their designated network segments.
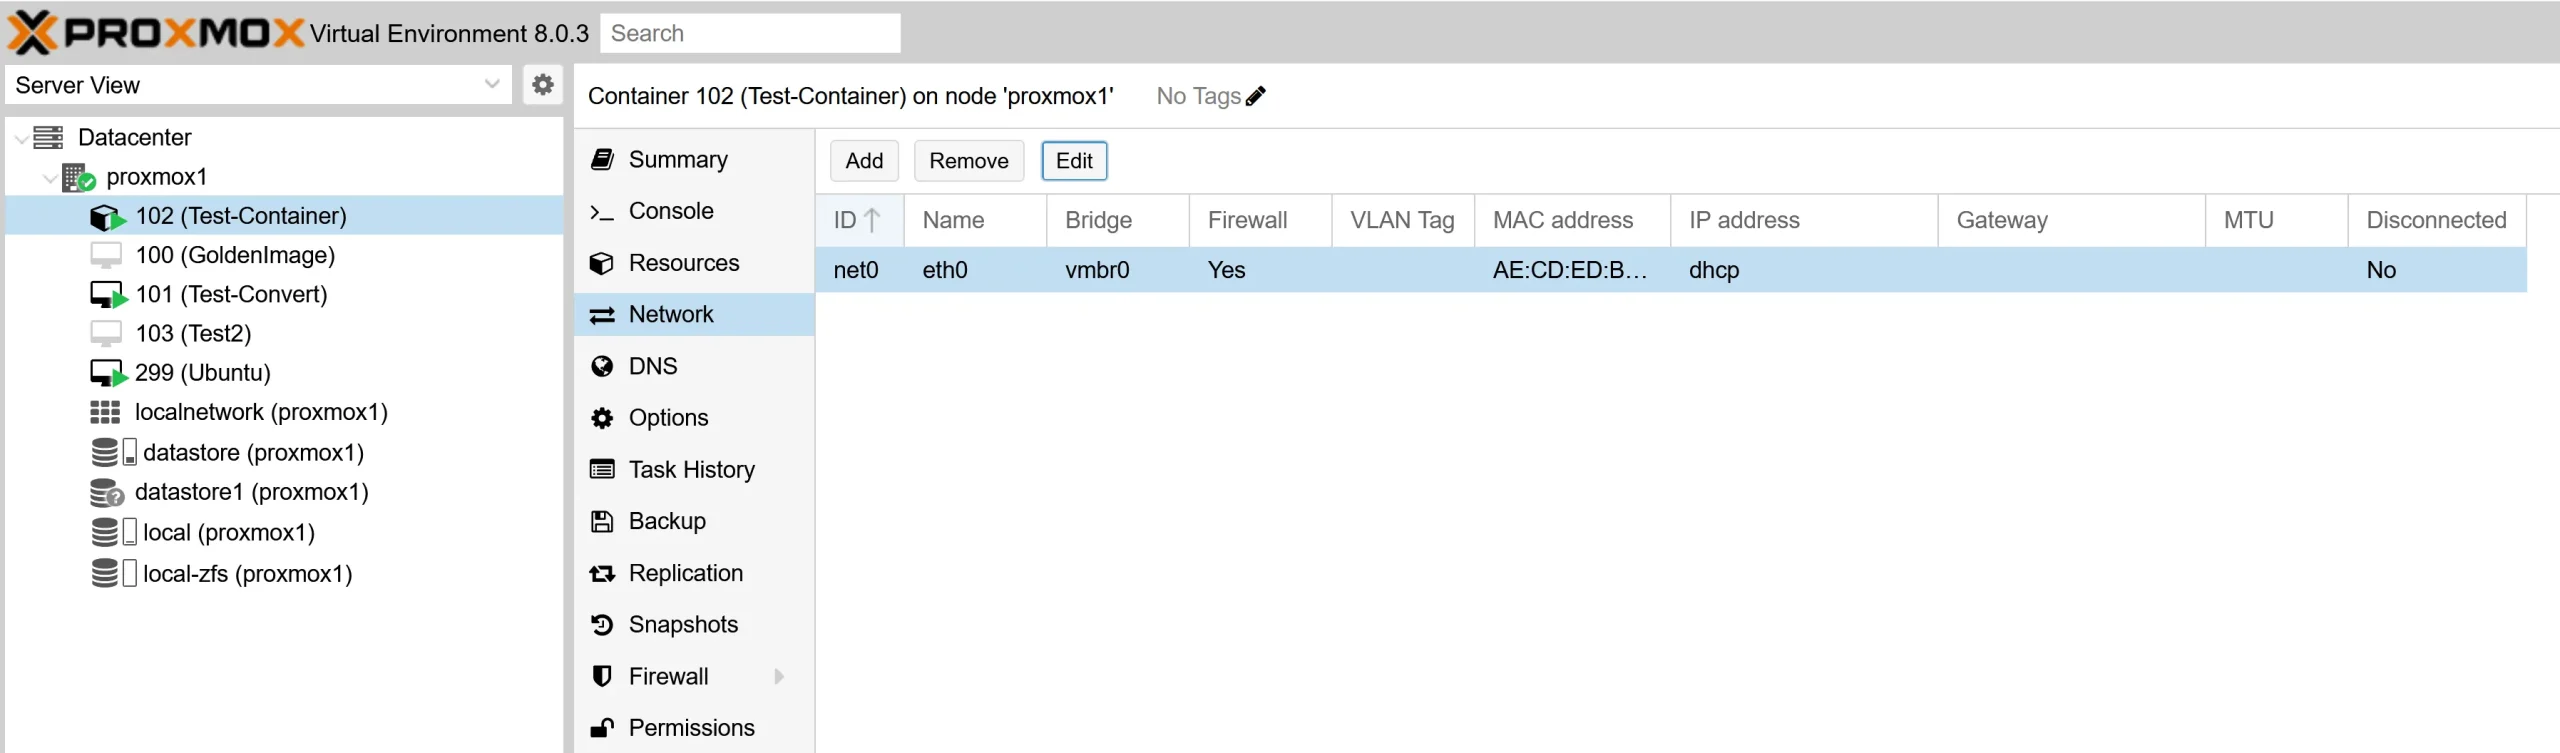
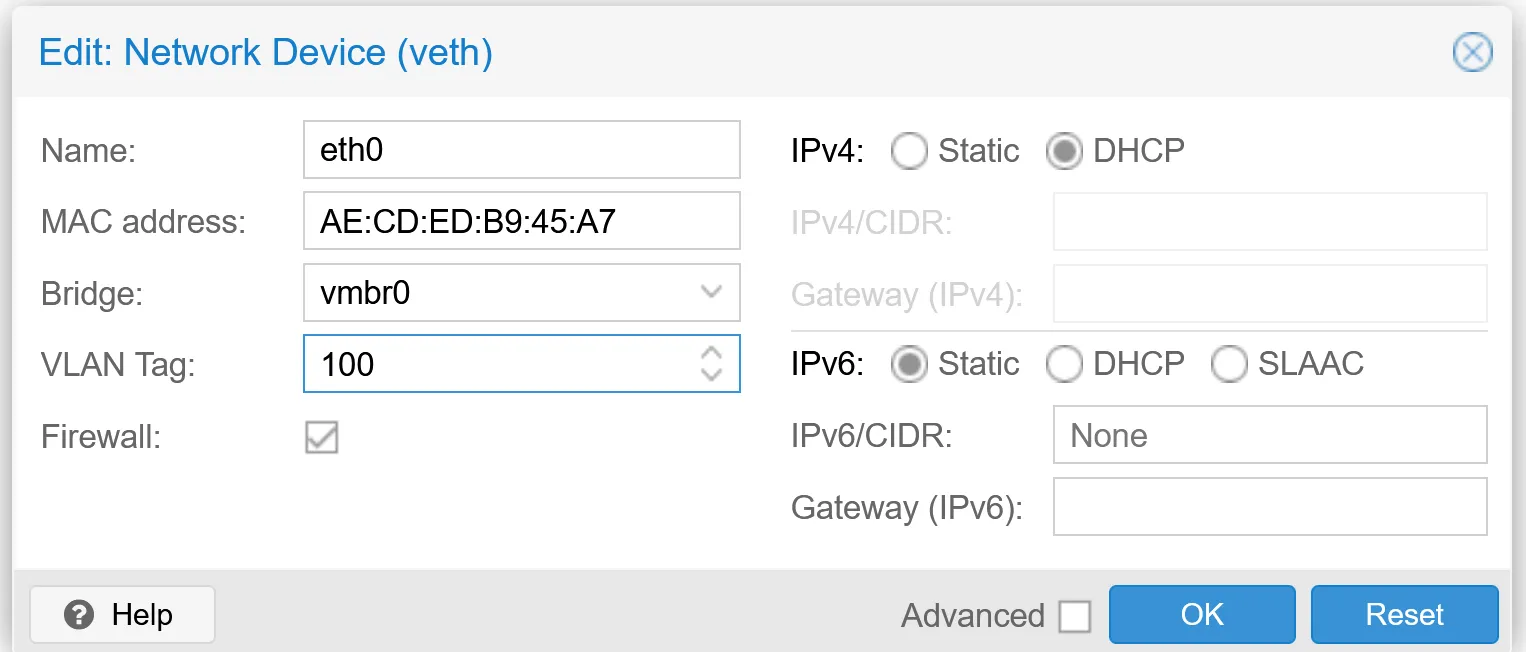
After you’ve assigned a VLAN to the VM’s network interface, you might need to configure the network settings within the VM’s operating system to ensure it correctly uses the designated VLAN’s network configuration:
This step is not necessary when you configured DHCP for your VLAN ID.
/etc/network/interfaces. For Windows VMs, you’ll adjust the settings through the Control Panel or Settings app.Encountering issues while configuring VLANs in Proxmox can be frustrating, but most problems can be resolved by following a systematic approach. Here are steps to diagnose and fix VLAN network configuration issues:
I’d love to hear from you. Was this article helpful? Share your thoughts in the comments below. If you prefer, you can also reach me by email or connect with me on Reddit at Navigatetech.
If you found the VLAN configuration insights on Proxmox valuable, you might be interested in further exploring how different storage solutions can impact your setup. I recommend checking out “Proxmox Ceph vs ZFS“, which dives into comparing Ceph and ZFS within Proxmox environments. This follow-up article provides a detailed analysis of their performance, scalability, and reliability, helping you make informed decisions about your infrastructure. It’s an essential read for anyone looking to optimize their storage solutions in Proxmox.
Hi, I’m Edy Werder. I write hands-on guides about Proxmox, homelab servers, NAS, and WordPress, based on real setups I run and document.
No sponsors, no fluff—just real configs and results.
Enjoying the content?
