
By Edy Werder — IT Consultant & Tech Blogger
This guide is for homelab users and small-business IT admins moving VMs from VMware ESXi to Proxmox VE, especially if you’re rethinking VMware after Broadcom’s recent licensing and packaging changes.
Editor’s Note: This article was updated in February 2026 to reflect the latest Proxmox Import Wizard workflow for migrating VMware ESXi VMs. The manual conversion method remains included for reference.
If you want to move a VM from VMware ESXi to Proxmox, the easiest way today is the built-in Import Wizard in the Proxmox web interface.
This importer was introduced with Proxmox VE 8.2 and has improved since then. It lets you connect to your ESXi host, select a VM, and import it without the old VMDK command-line dance.
In this guide, I’ll show the wizard method first (the one most people should use). I keep the manual method further down for edge cases and for readers who want to understand what happens under the hood.
- In Proxmox: Datacenter → Storage → Add → ESXi
- Make sure the VM on ESXi is powered off and has no snapshots
- Ideally, uninstall VMware Tools and install VirtIO drivers (Windows)
- Import the VM, then install QEMU Guest Agent
- Expect a NIC rename or network reset, so note your IP settings first
Introduction: VMware to Proxmox migration
Moving a VM from VMware ESXi to Proxmox VE is straightforward today because Proxmox includes a built-in Import Wizard (introduced in VE 8.2 and improved since).
This guide focuses on the wizard method first. It is the fastest path for most homelabs and small environments because you can import directly from the Proxmox web UI instead of manually copying VMDKs.
I recommend testing the migration with one or more test VMs before moving the production environment.
A few expectations before we start: the VM must be powered off, and imports often fail if the VM has snapshots. Also, the migration can reset the network interface, so it’s smart to note your current IP settings first.
Proxmox uses VirtIO for storage and network drivers, often requiring changes for Windows VMs, while Linux usually requires no changes. Windows may require reactivation due to hardware changes during migration. Although I haven’t experienced it yet.
After the import, I’ll show the small “cleanup” steps that make the VM feel native on Proxmox, such as enabling VirtIO (Windows) and the QEMU Guest Agent. For completeness, I keep the older manual method further down for edge cases.
VMware Workstation: Can you import it too?
The import wizard only works with VMware ESXi. If you’re running VMware Workstation Pro, the wizard won’t apply to you.
That said, the manual method should still work, because Workstation VMs are typically just VMDK disks plus a VM configuration, and Proxmox can import VMs from OVF (and also import VMDK disks manually).
Note: I haven’t personally tested this process with Workstation, so consider it an untested but likely option. If you try it, I’d love to hear your results so I can update this guide for others.
If you try this approach, please leave a comment on the article — your feedback will help me confirm and refine the guide for other readers.
Step-by-Step: Convert VMware to Proxmox VE with the Import Wizard
Proxmox VE brings together everything you need—VMs, containers, storage, and clustering—in one web-based interface. But let’s skip the theory and get practical. Below, I’ll walk you through the exact steps to import a VMware VM into Proxmox using the new wizard.
Step 1: Add the ESXI repository to Proxmox
- Navigate to ‘Datacenter’, ‘Storage’, and click the ‘Add’ button
- You should see the entry for ESXi
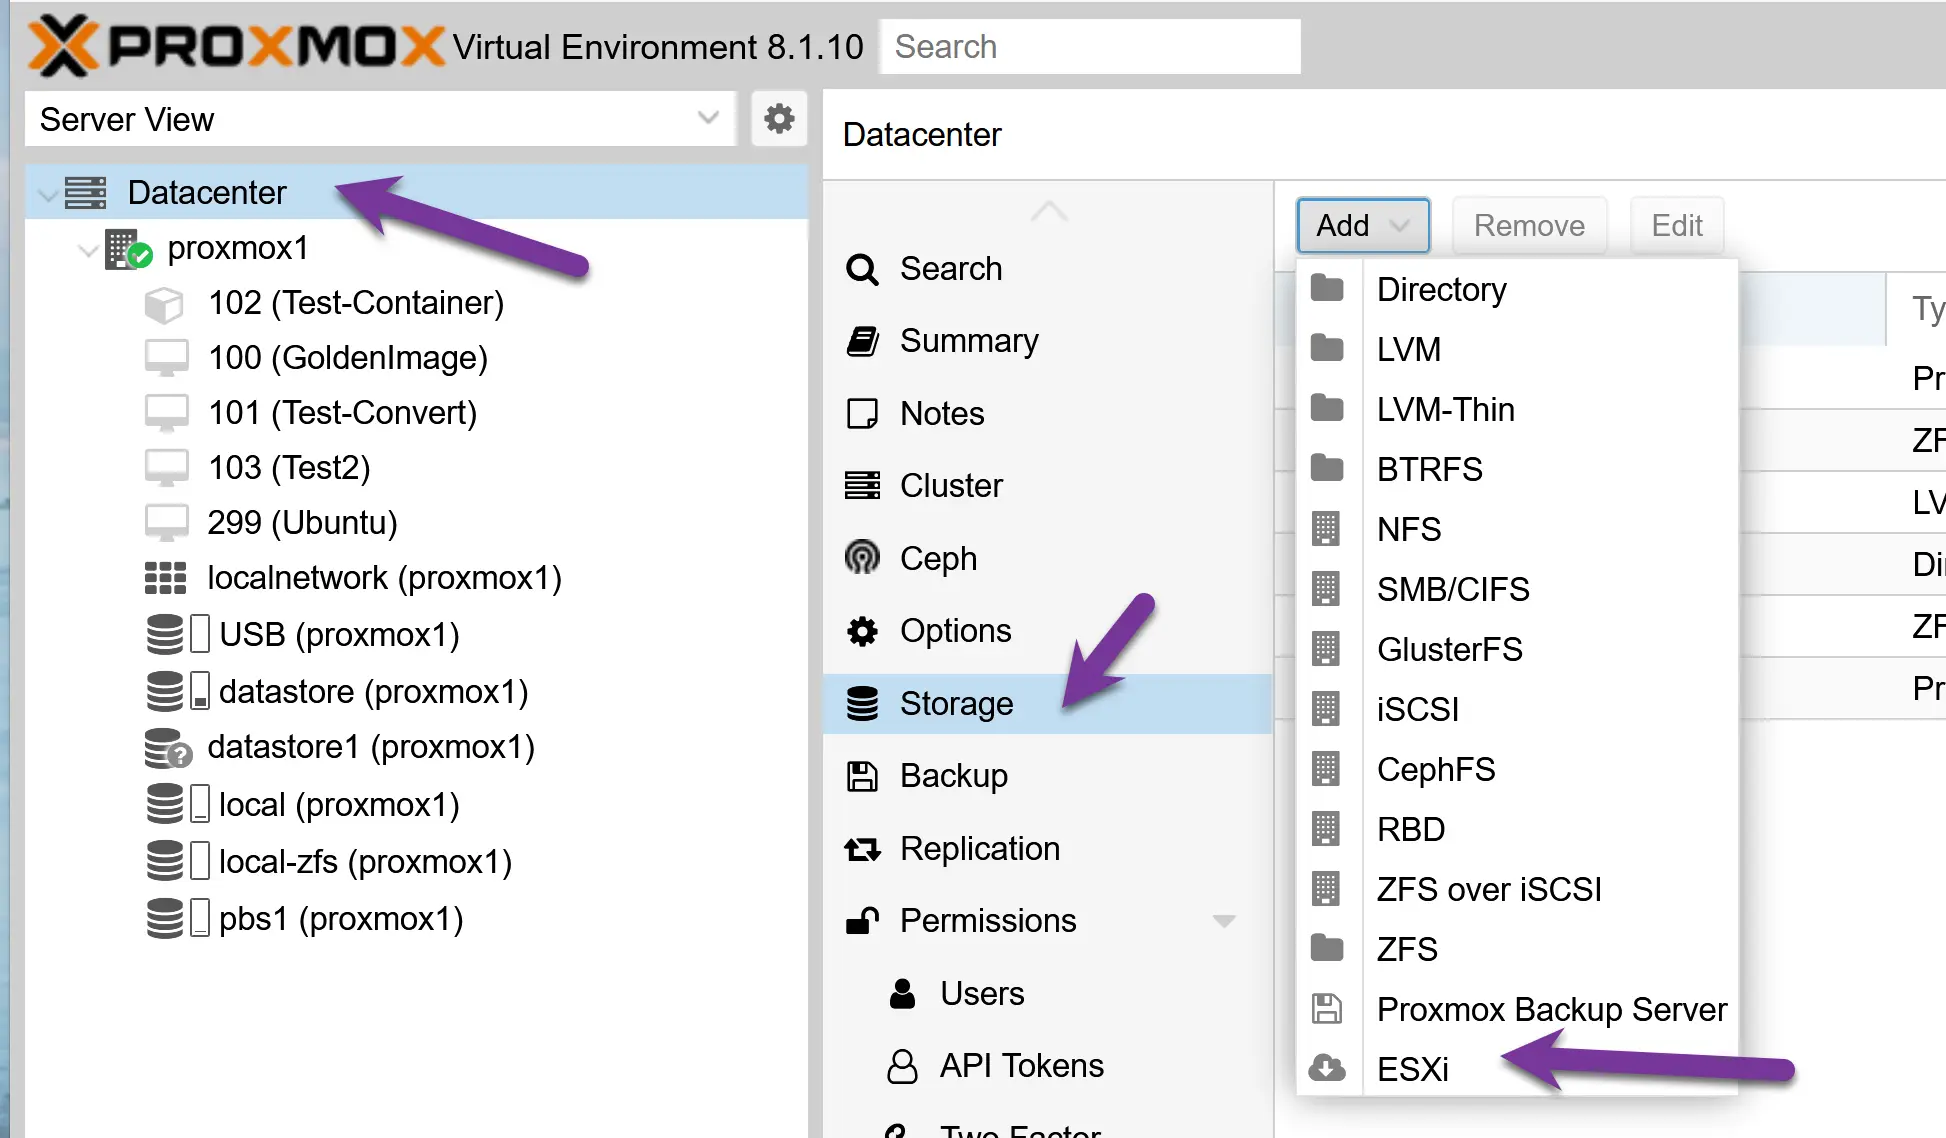
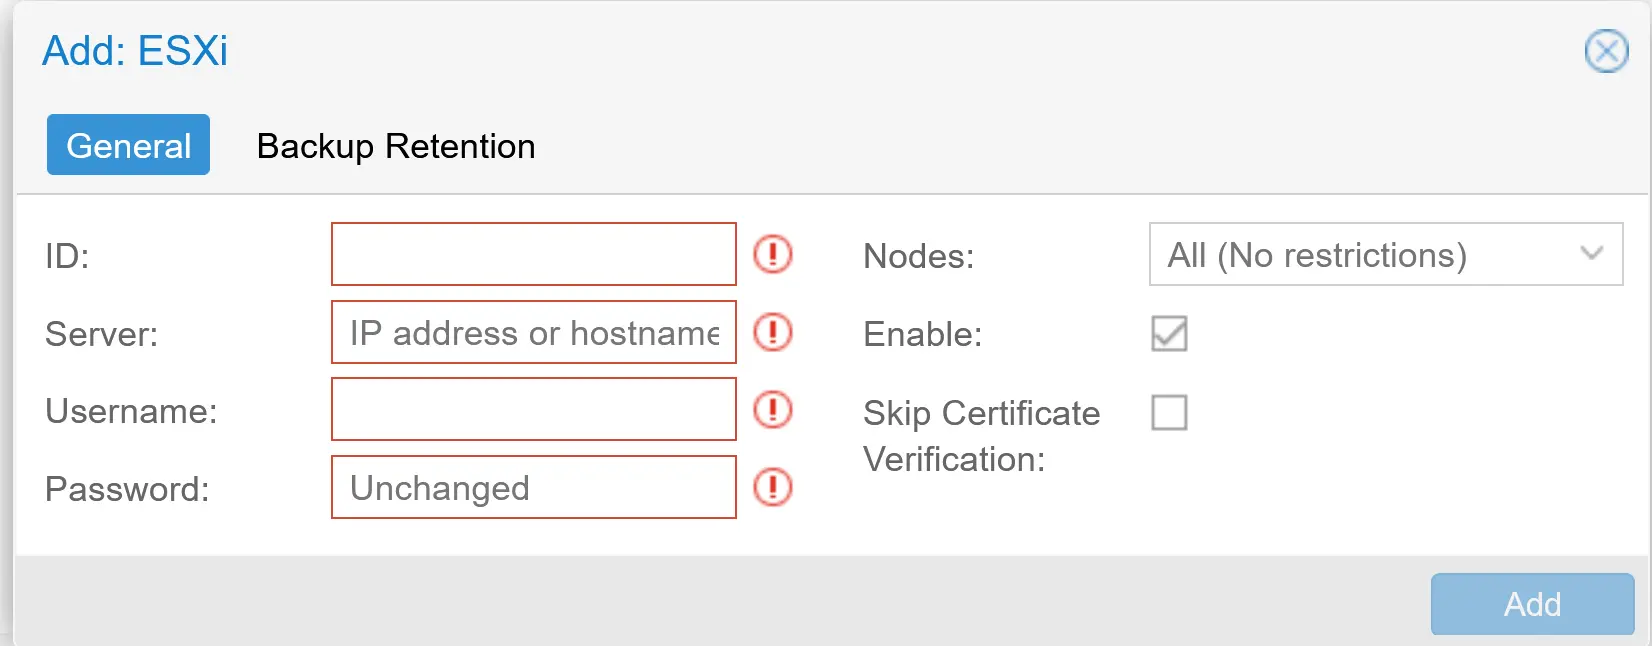
- It’s time to add your ESXi repository to the Proxmox environment.
- For the ID, use letters, not numbers.
- Use the IP address and credentials of your ESXi server. You can add the VCenter IP, but Proxmox states that the migration will take longer.
- I don’t use a certificate for my ESXi; I checked the ‘skip.’ I like that Proxmox added this feature.
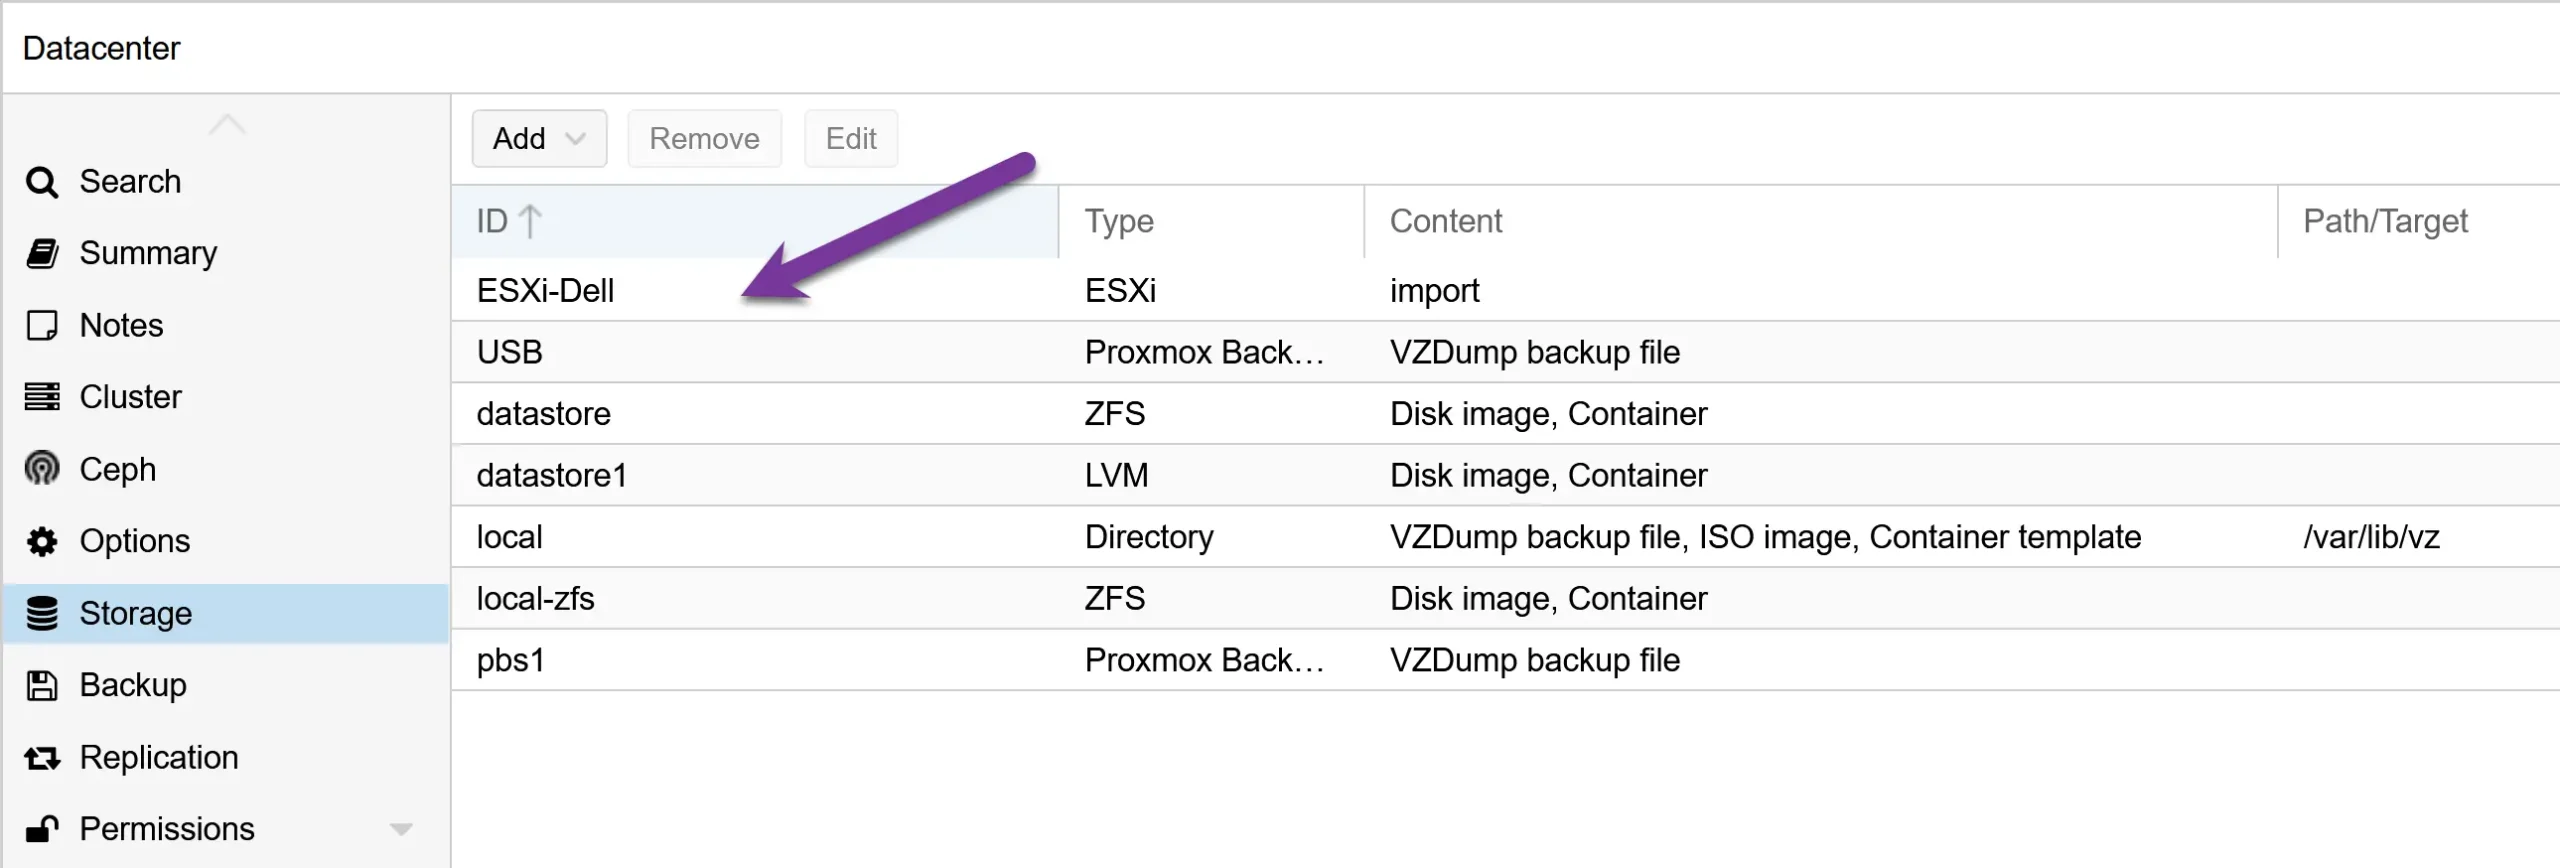
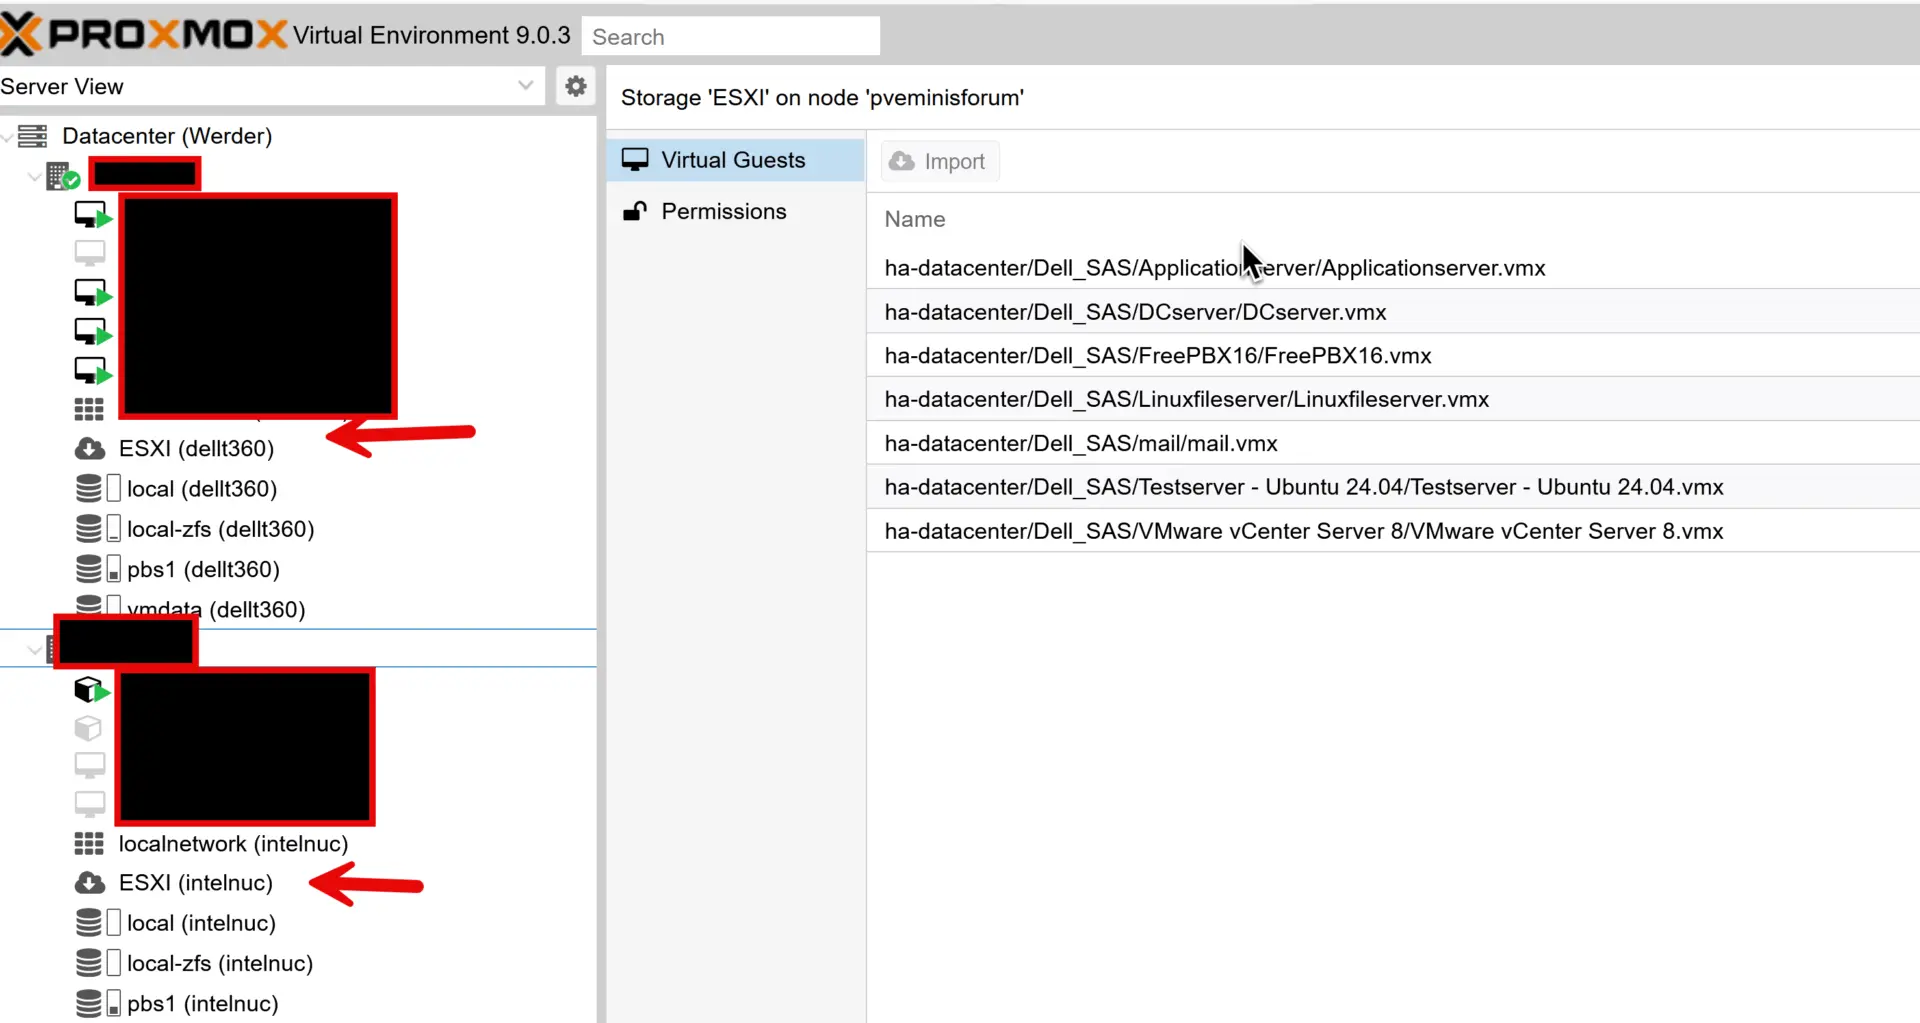
If your inputs were correct, you will see the ESXi storage, see the image below.
Step 2: Import a VMware ESXi VM
- The new ESXi storage is available on each Proxmox node
- Click on it, and on the right side, you will see all the VMs available.
- I import my ‘Test Server,’ which is a Windows Server.
Before clicking Import, a few things to mention
Pro tip: Install VirtIO drivers while the VM is still on ESXi (Windows)
ESXi does not use VirtIO devices, but having the VirtIO drivers installed in Windows ahead of time makes the Proxmox cutover smoother. After the import, you can switch disk and NIC to VirtIO without doing extra driver gymnastics.

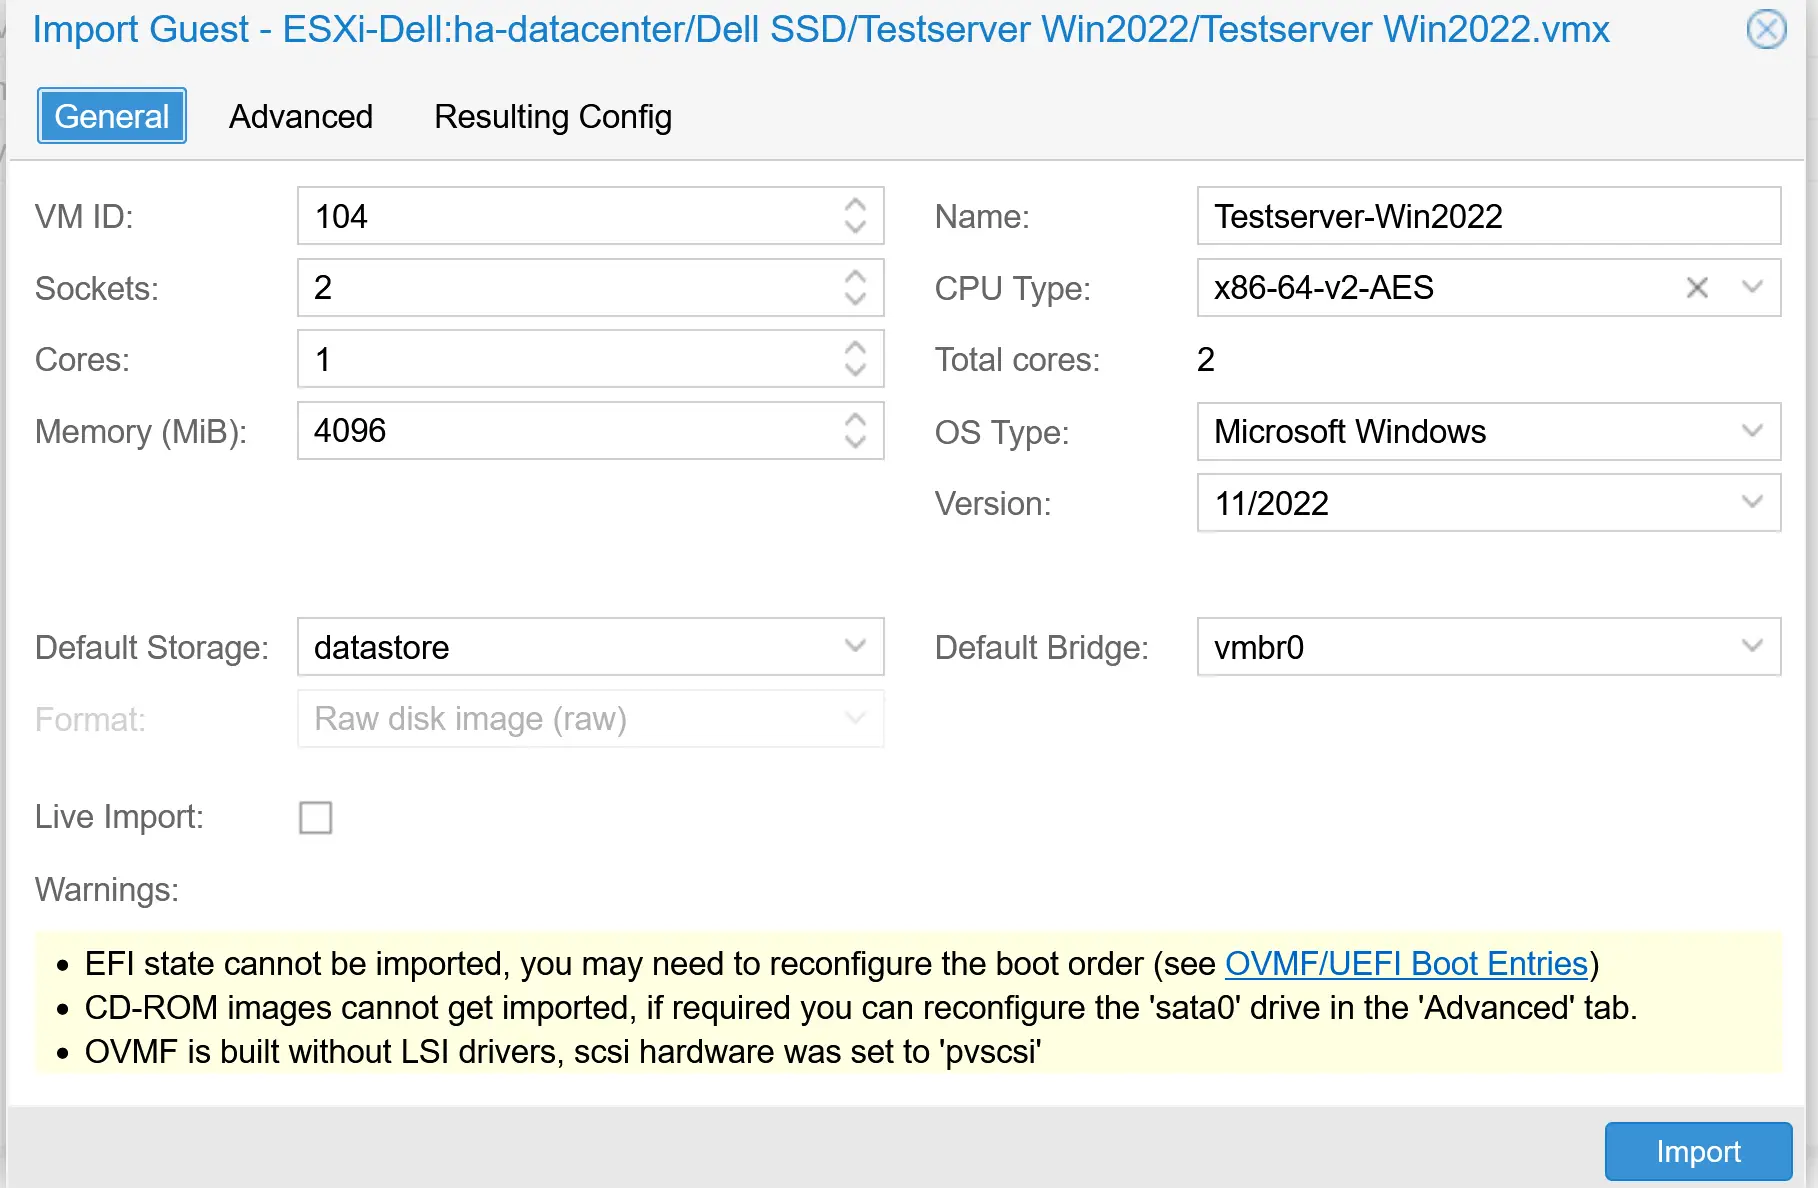
Click the ‘Import’ button, and the import wizard will appear. The wizard will recognize the settings from the ESXi VM.
Note on “Live Migration” in the Import Wizard
In the General tab, you’ll see a live migration checkbox. This doesn’t mean you can migrate a powered-on VM directly from ESXi to Proxmox. Instead, if enabled, Proxmox will boot the VM as soon as it has migrated “enough” of the disk and continue streaming the remaining data in the background.
I don’t recommend using this option for two reasons:
Practical workflow: after a migration, most admins want to tweak VM settings (controllers, VirtIO drivers, CPU/RAM) before the first boot. Starting too early just adds risk.
Performance and data safety: With live migration, the VM’s disk I/O is slower during the transfer, and if the process fails, any changes made mid-migration are lost (though the original VM on VMware remains intact).
In most cases, it’s cleaner and safer to let the migration finish completely, adjust settings, and then boot the VM in Proxmox.
- Click the ‘Import’ button to start the migration process.
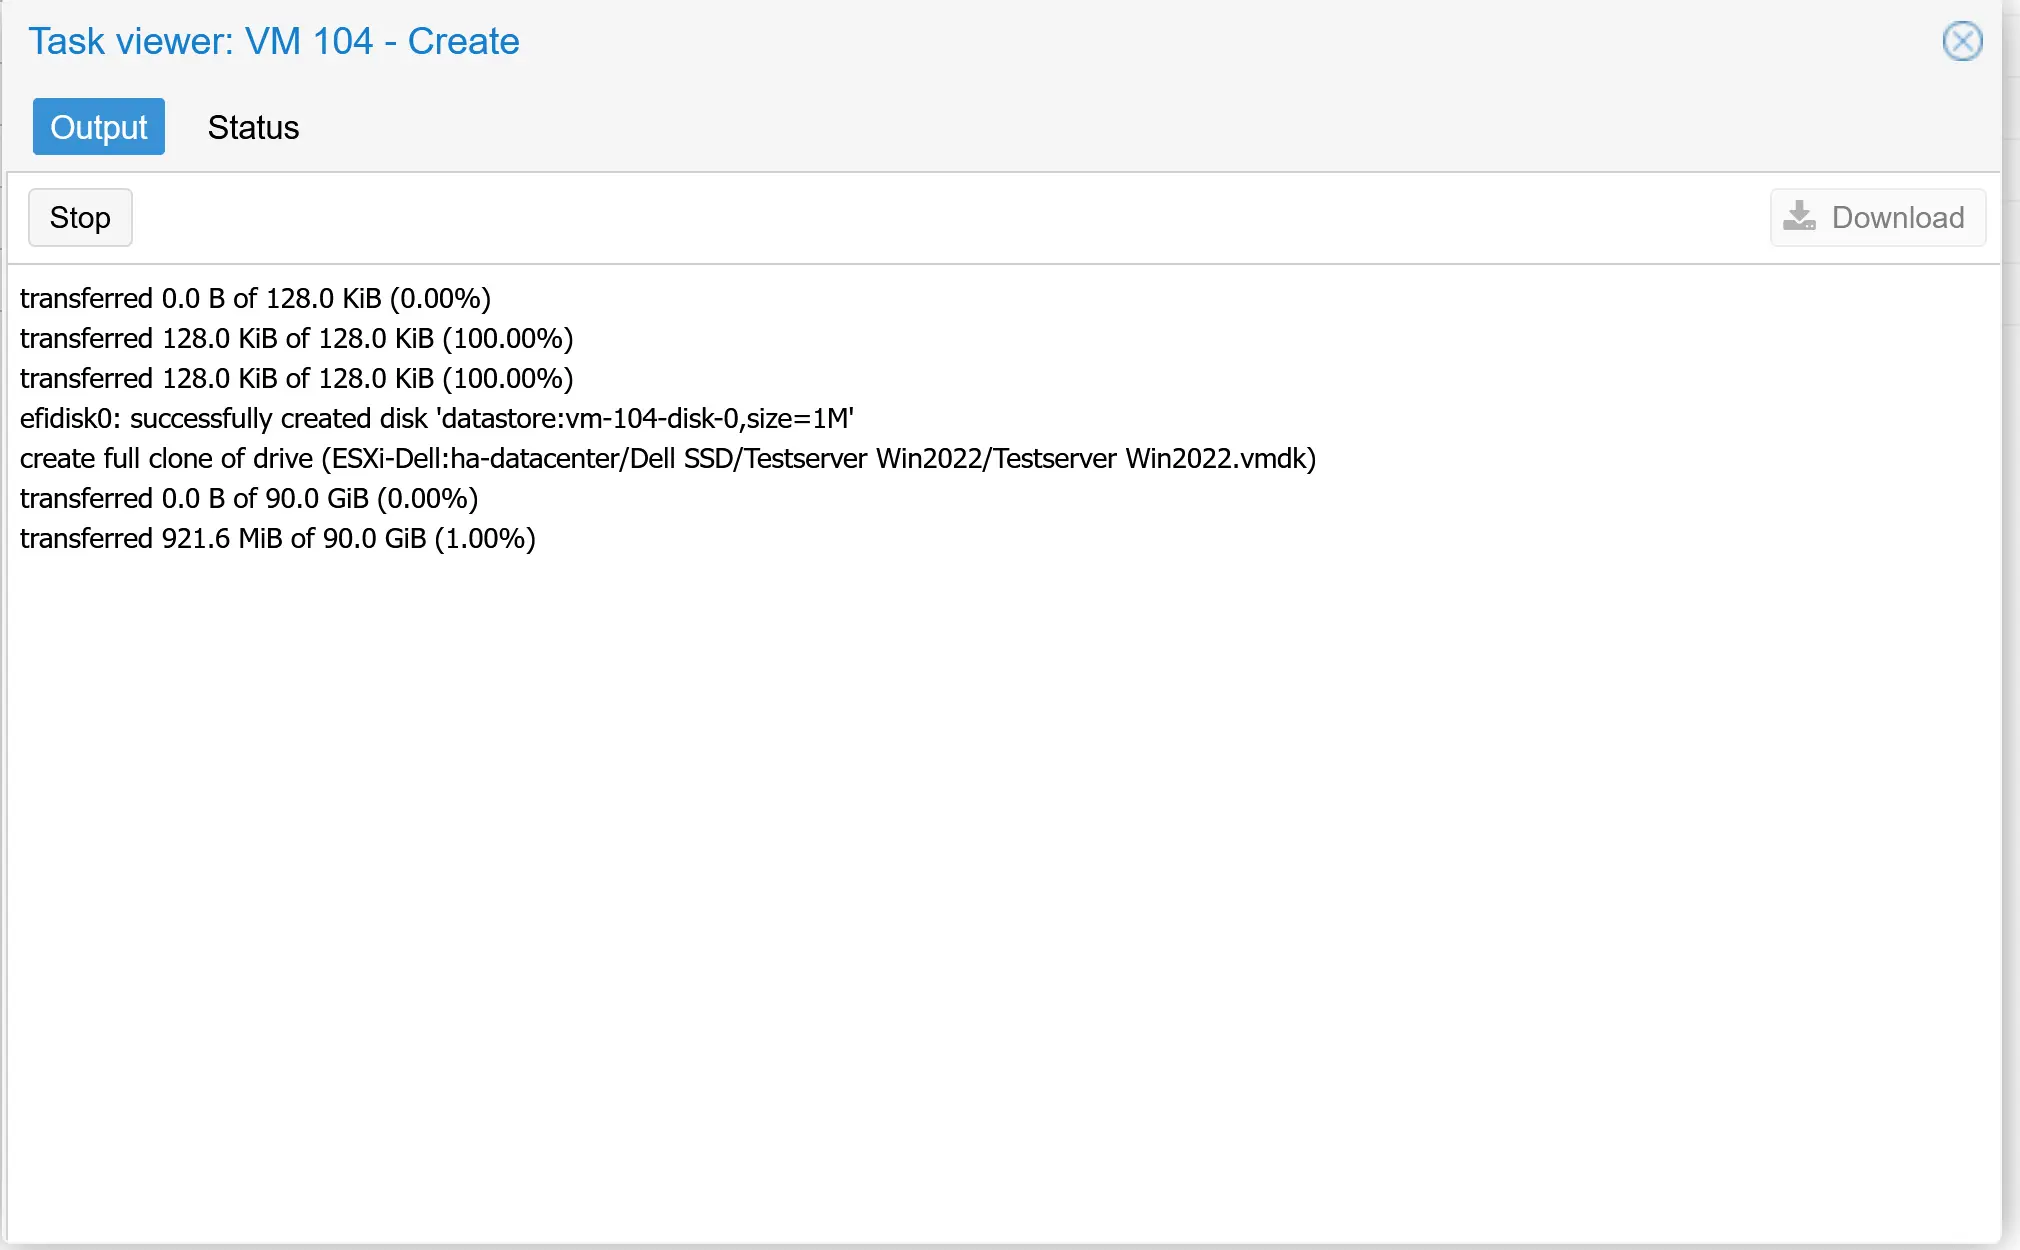
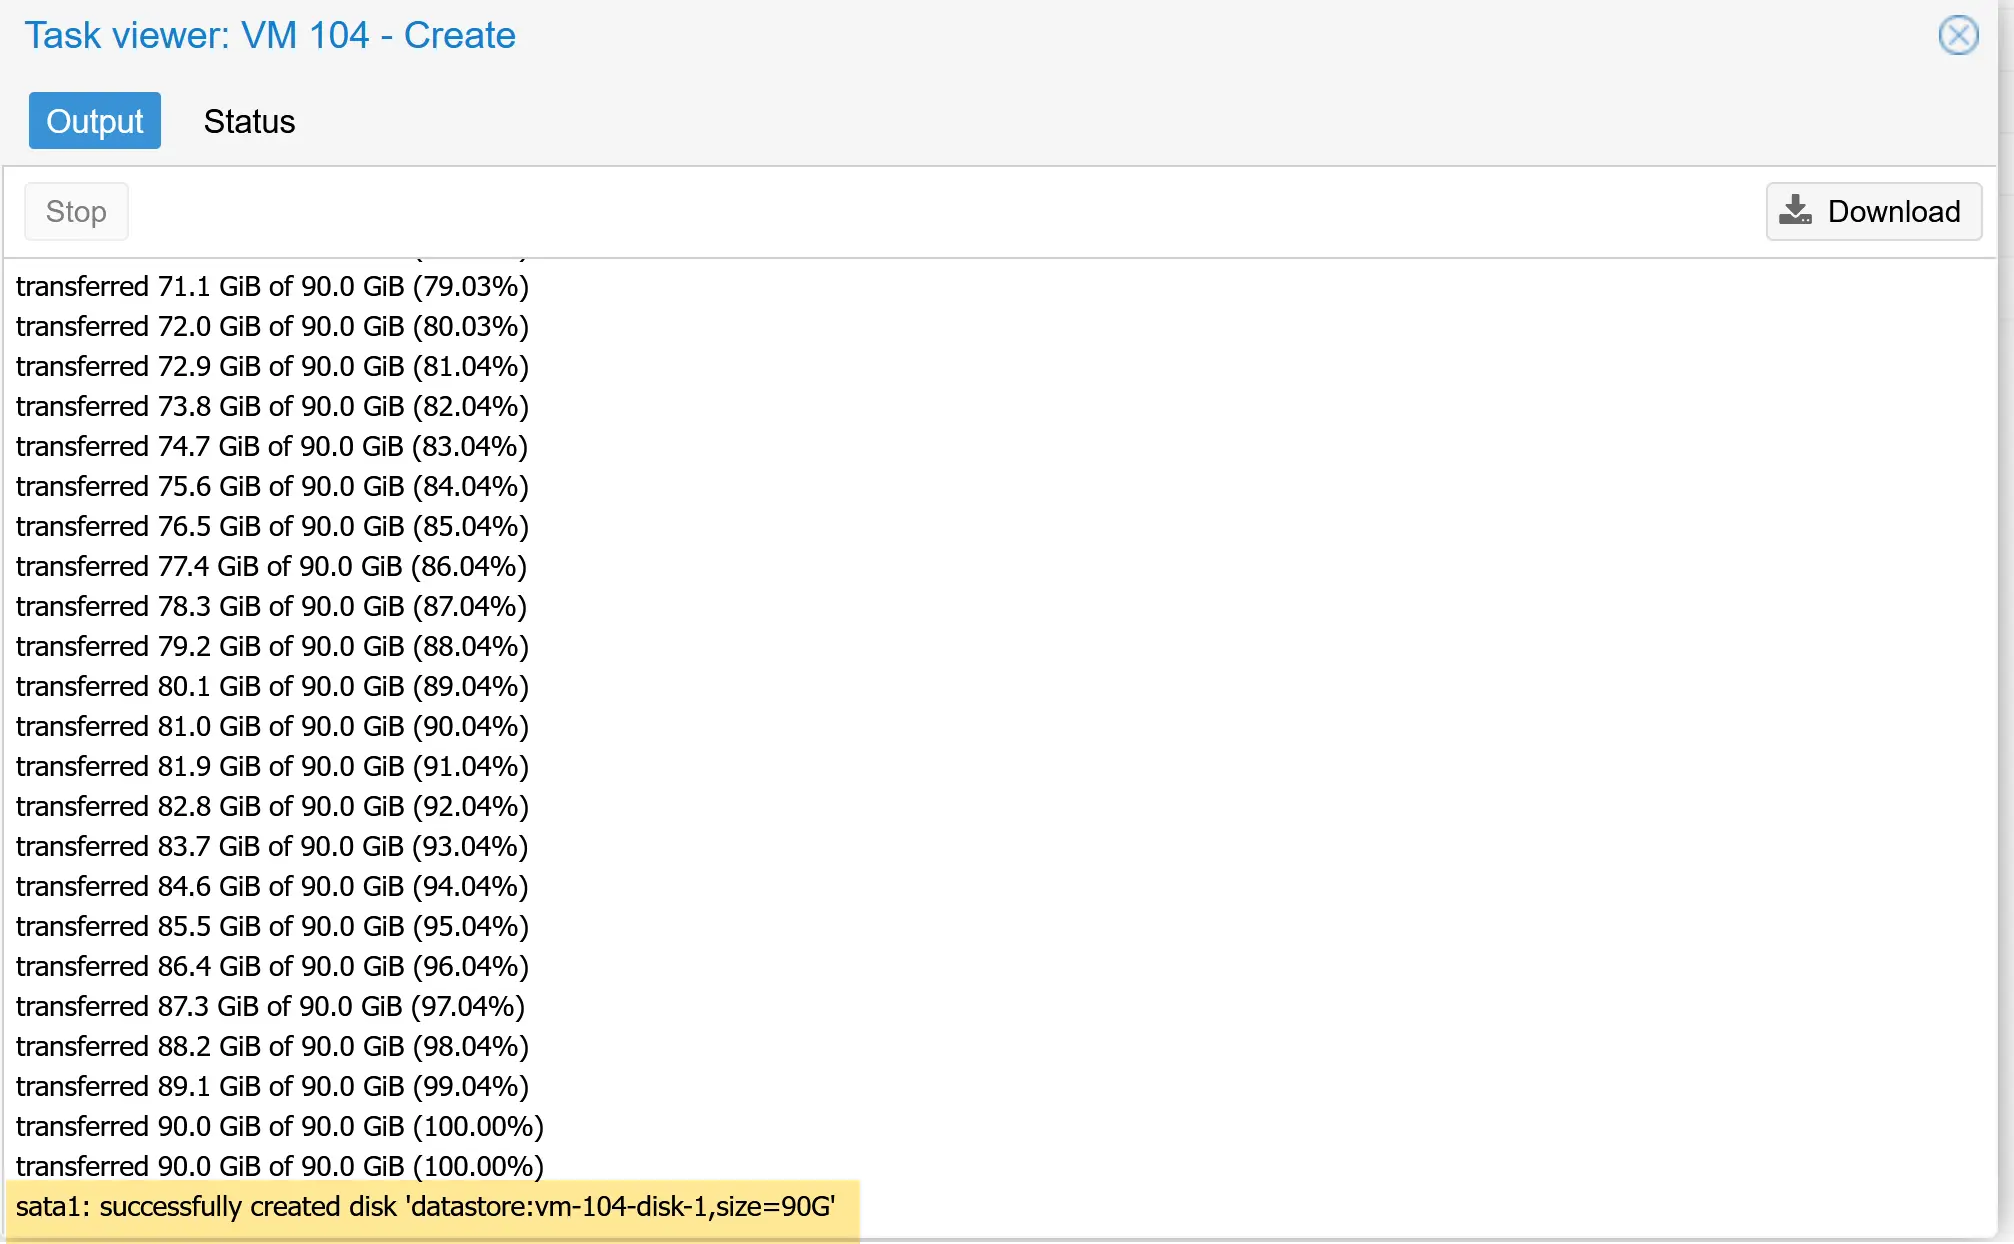
In the right image, you see the task finished successfully
Step 3: Start the converted VM
Now, it’s time to boot up the converted VM. The new VM will be visible on the left side.
As you can see from the picture below, the Windows VM booted, and the SCSI controller is type VirtIO.
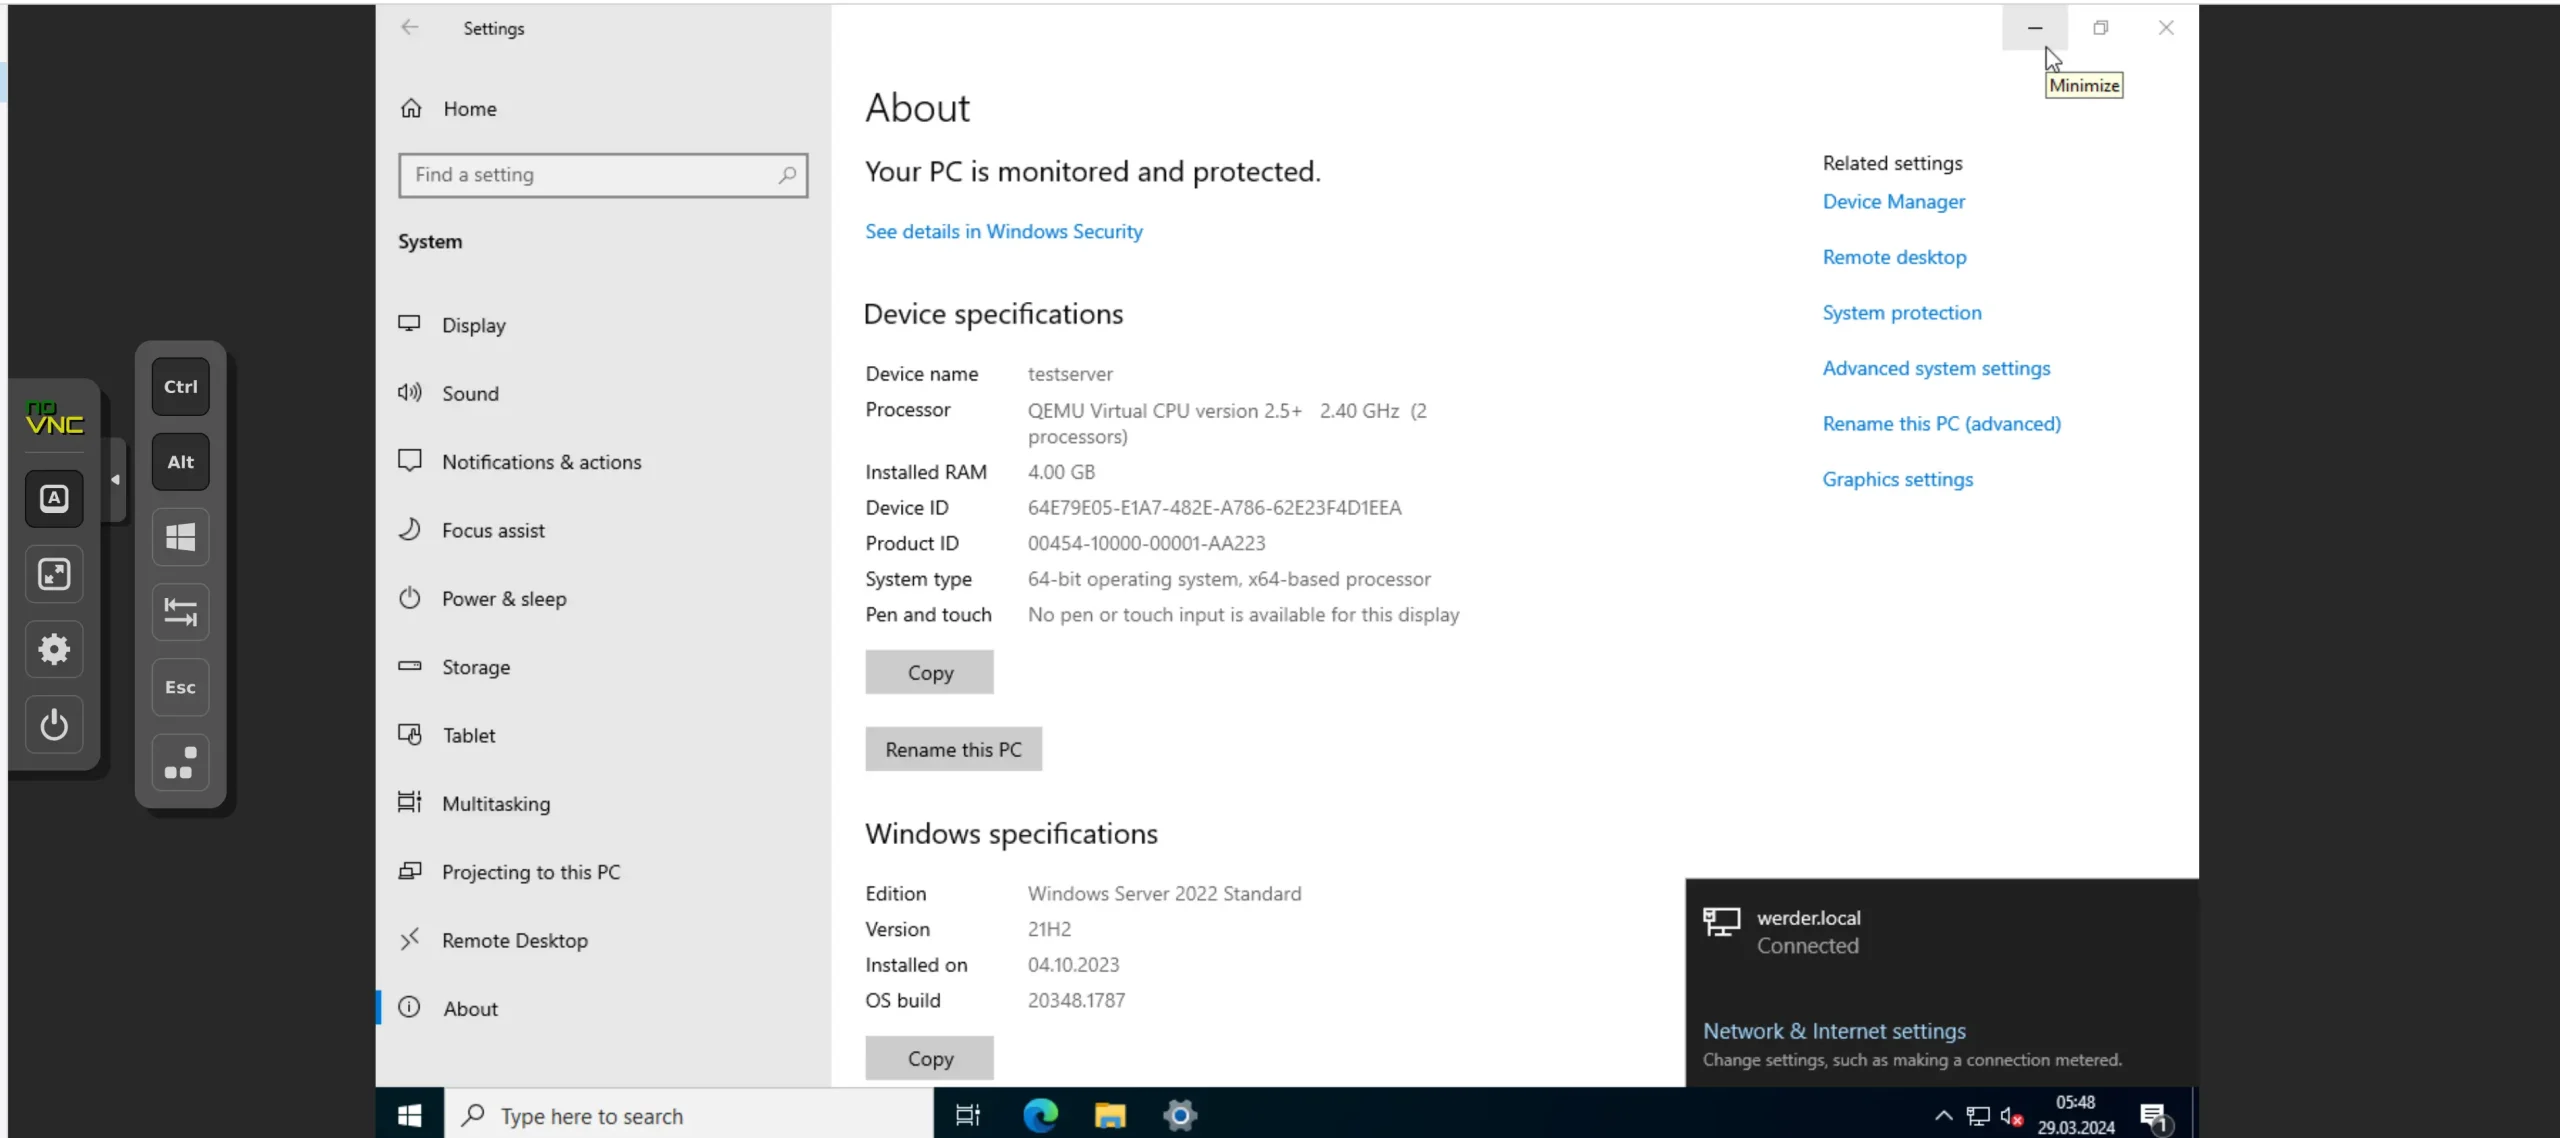
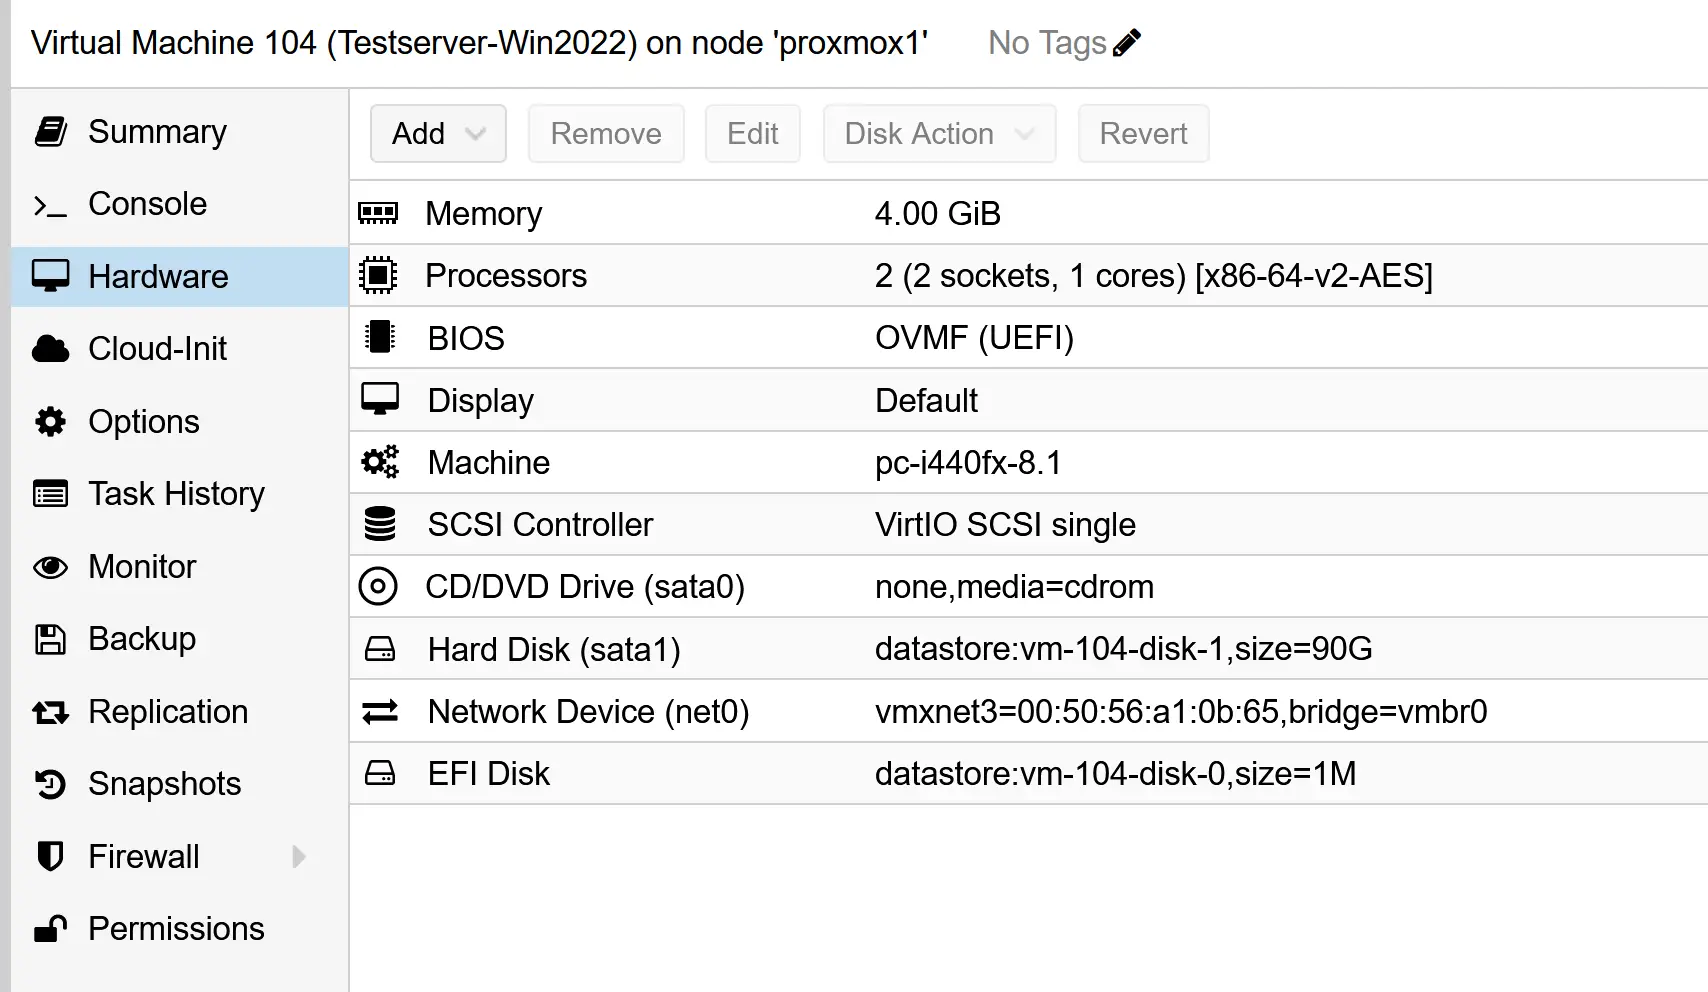
Pretty neat, right?
Proxmox has really simplified the VMware migration process.
Best Mini-PC to run Proxmox or VMWARE

Fine-Tuning Windows VMs After Import
If your imported Windows VM crashes at boot or you simply want the best performance, adjusting the controller and disk bus type can make a big difference.
- Adjust the Controller and Boot Disk
- In the VM hardware settings, set the controller type to VMware PVSCSI.
- Detach the imported boot disk.
- Edit the disk and change its bus type to SATA.
- Reattach it and try to boot again.
- Windows should now start successfully.
- Prepare for VirtIO Performance
- Shut down the VM again.
- Add a new disk with the VirtIO Block bus type.
- Boot the VM, open Computer Management → Disk Management, bring the new disk online, and initialize it.
- (This assumes VirtIO drivers were installed beforehand. If not, install them first.)
- Switch Disks to VirtIO
- Power down the VM.
- Detach the boot disk and change its bus type to VirtIO Block.
- Change the controller type to VirtIO SCSI.
- Reattach the boot disk and start the VM.
- Repeat the process for any additional disks, not just the boot disk.
- Windows should now boot normally and benefit from optimal VirtIO performance.
Note: If you’re not chasing every bit of performance, you can leave your disks on SATA and the VM will still run reliably. These steps are primarily for users who want to fine-tune their settings for optimal speed.
Be sure to check out my article on how to install the Proxmox equivalent of VMware Tools.
Fine-Tuning Linux VMs After Import
For Linux VMs (such as Ubuntu and Debian), the process is much easier than for Windows because VirtIO drivers are already included in the kernel.
- After importing, you can safely switch the disk bus to VirtIO SCSI and the network card to VirtIO (paravirtualized) right away.
- The only adjustment you may need is updating the network interface name so the VM keeps the same static IP:
- On Debian, edit
/etc/network/interfaces(e.g., changeens192→ens18). - On Ubuntu, edit the netplan config under
/etc/netplan/*.yaml. - Finally, install the QEMU Guest Agent for better Proxmox integration:
sudo apt updatesudo apt install qemu-guest-agent -y - Then enable it in the Proxmox GUI under VM → Options → QEMU Guest Agent.
That’s it — no extra driver installs or controller tricks are needed. Linux VMs usually boot and run smoothly right after migration.
Below, you see a choice of mini-PCs that run Proxmox. These are great for testing Proxmox clusters in your IT department or home lab.
-
 Buy on Amazon$1,149.00
I earn a commission if you make a purchase, at no additional cost to you.
04/09/2026 07:53 am GMT -
 Buy on Amazon$379.99
I earn a commission if you make a purchase, at no additional cost to you.
04/09/2026 07:53 am GMT


The steps above cover everything you need with the new import wizard. For completeness, I’ve kept the old manual conversion process in this article. It’s now obsolete, but it highlights how much more complicated migration used to be — and why many people hesitated to make the switch to Proxmox.
Step-by-Step: Convert VMware to Proxmox (Manual Method)
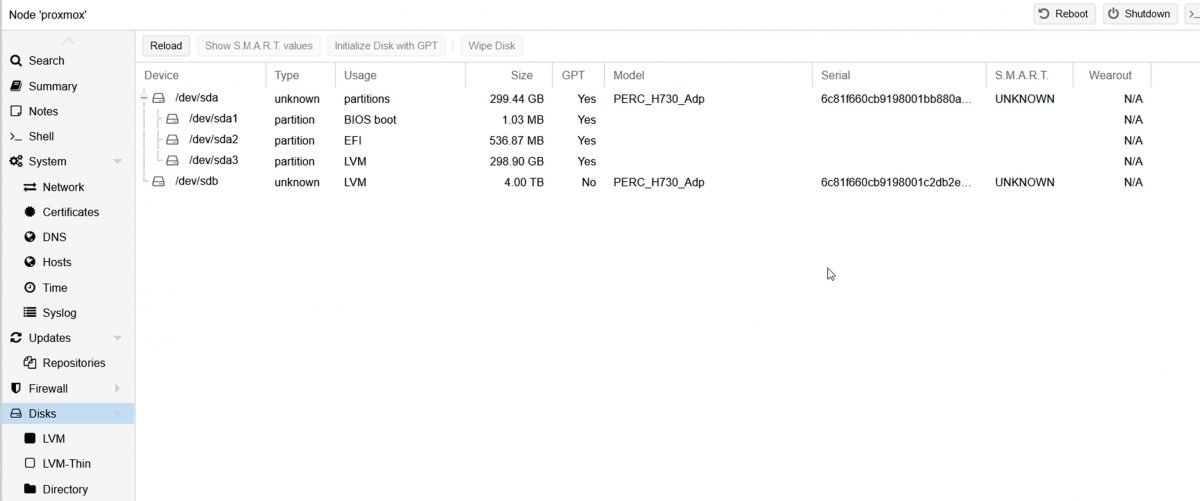
I assume you have already installed Proxmox and configured local storage. The sample Proxmox installation used in this article is on a Dell PowerEdge T630. I have 6 disks attached to a Dell PERC Adapter. I use Proxmox VE 8.1
Step 1: Locate the VM(s) in your VMware environment
Enable the SSH service in VCenter or ESXI. It’s best to SSH directly with Putty or Kitty.

- cd /vmfs/volumes is where the datastore is located
- locate the storage where the VM reside
- in my case, it is on the storage ‘Dell_SAS, cd /”Dell SAS”
- I want to convert the VM ‘WindowServer2022’
- We need to move both vmdk files to Proxmox
Step 2: Transfer the files with scp to the Proxmox environment
Go to the Proxmox environment and open the ‘shell’ console
scp -v root@192.168.1.56:/vmfs/volumes/5f57b3e1-433e2c24-0b26-2cea7f5aa14f/WindowsServer2022/WindowsServer2022-flat.vmdk /mnt/lvol/images/WindowsServer2022-flat.vmdkfor the flat vmdk file, repeat the same step for the vmdk file (shown in the picture above. My destination location is /mnt/lvol/images, which I configured earlier (not the scope of this article). SCP transfer may take a while, depending on the size of the vmdk files. Shut down the VM before the transfer and delete any snapshots. It is also a good idea to deinstall the VMware tools from the VM.
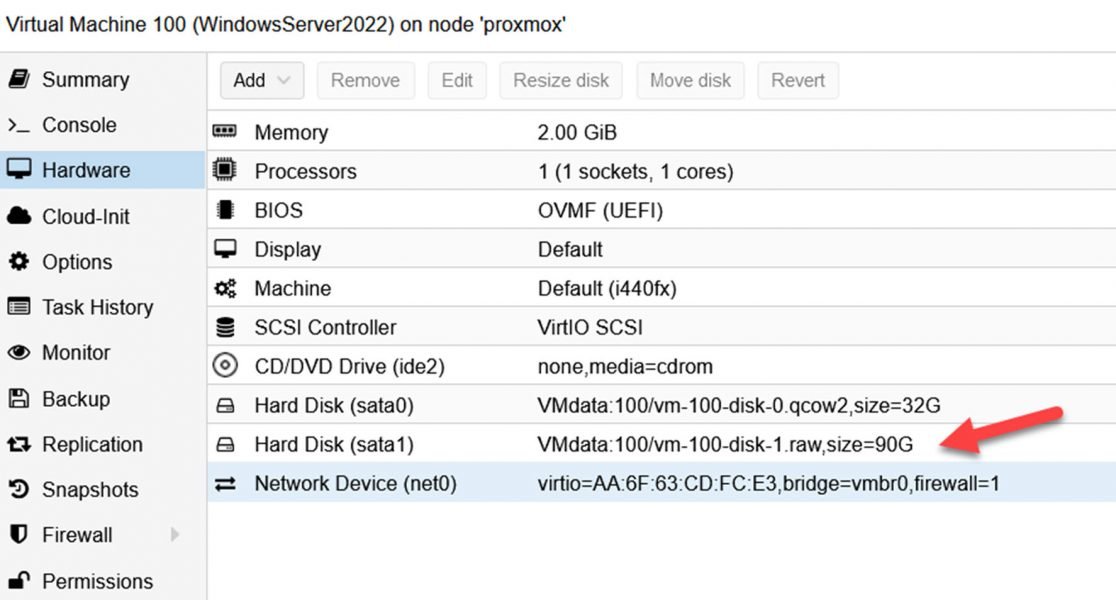
Step 3: Create a Proxmox VM with the GUI
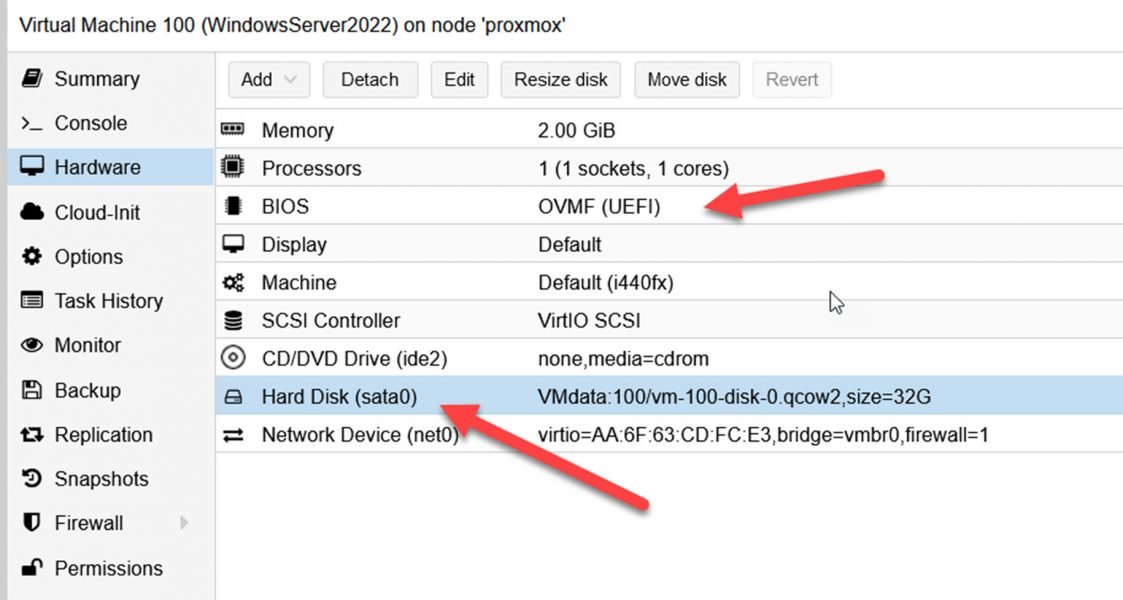
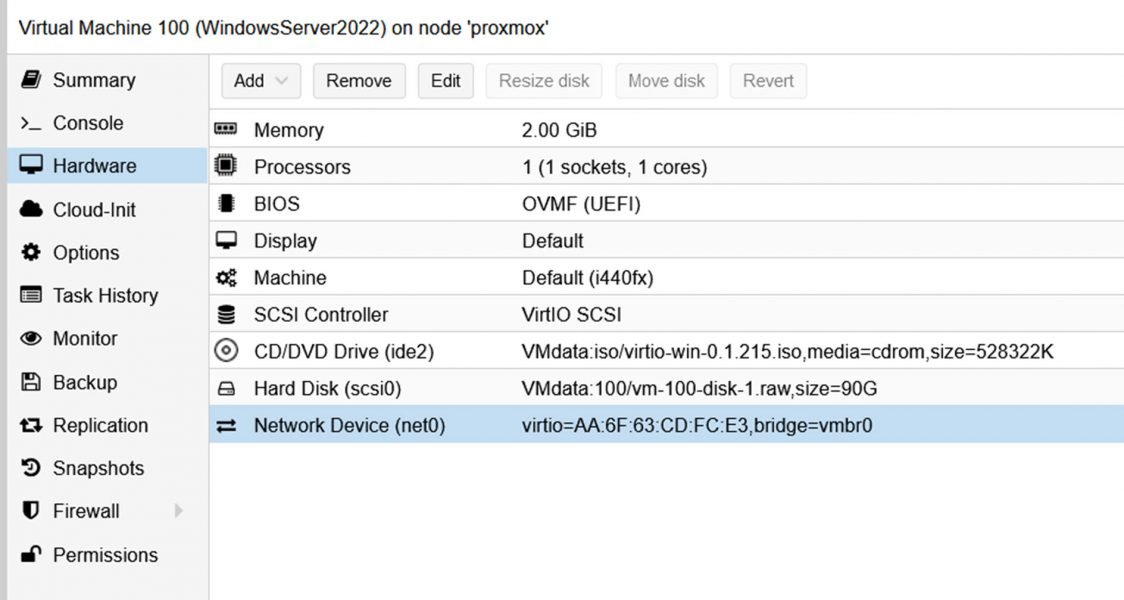
There are two key considerations: select the correct BIOS and choose SATA as the type for the hard drive. The size of the hard drive doesn’t matter. My virtual machine has the ID 100
Step 4: Import the VMDK disk
qm importdisk 100 /mnt/lvol/images/WindowsServer2022.vmdk VMdata -format raw
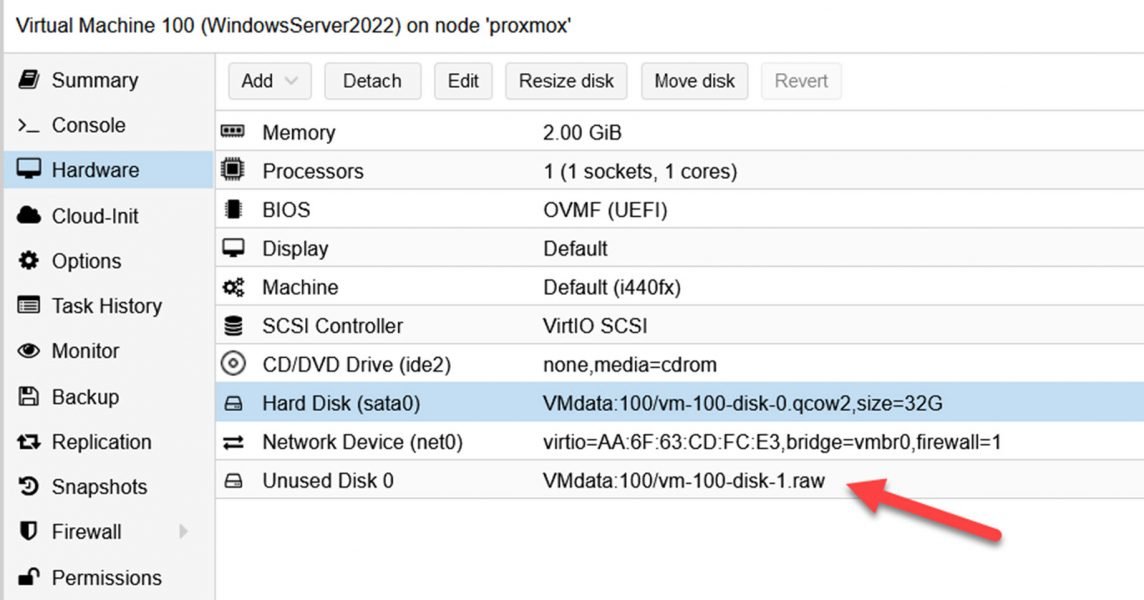
The converted vmdk disk will automatically appear as ‘Unused Disk’ in the Proxmox GUI. Now highlight it and click ‘Edit’. Make sure the ‘bus/type’ is SATA too. A converted Windows VM would not boot in Proxmox without SATA as the bus type. In the next step, we are going to install the VIRTio drivers.
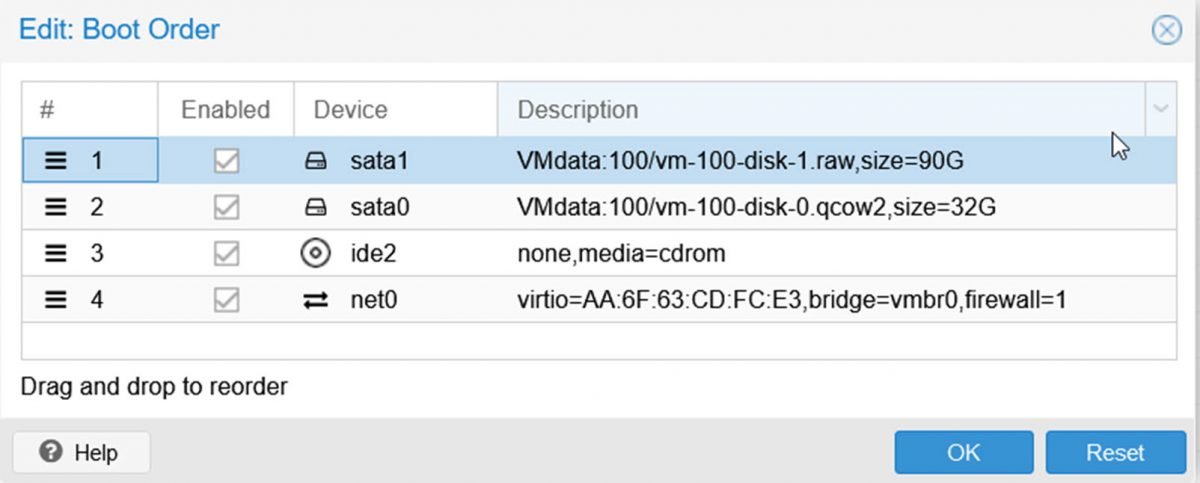
Go to ‘Options’, change the boot order, and ensure the newly attached disk is enabled.
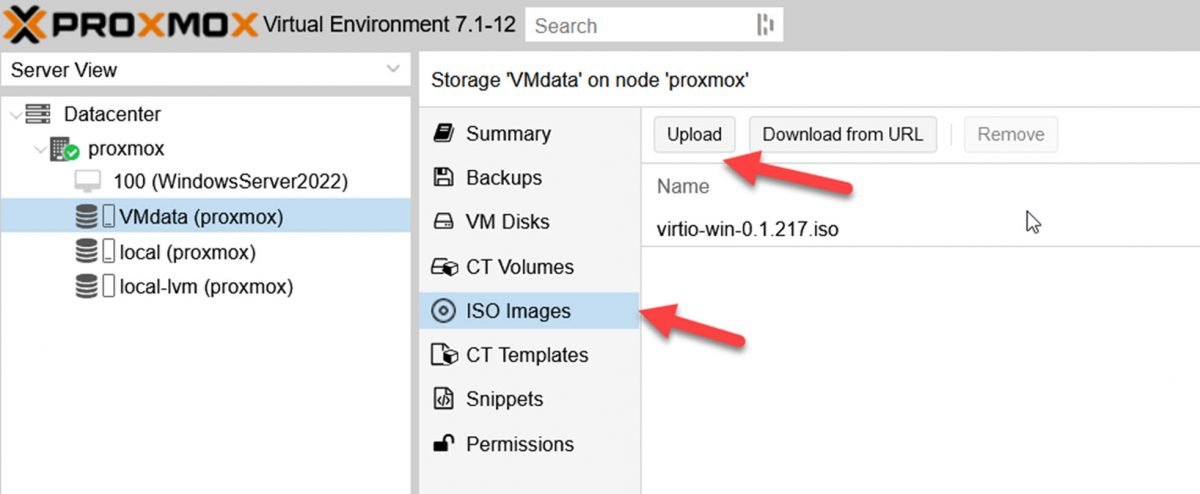
Step 5: Start the VM and install the VirtIO drivers
You can download the VirtIO drivers from this page. Windows VirtIO. Depending on how you set up the local storage, you can upload the ISO directly to the Proxmox store
and attach them to the CD-ROM in the VM
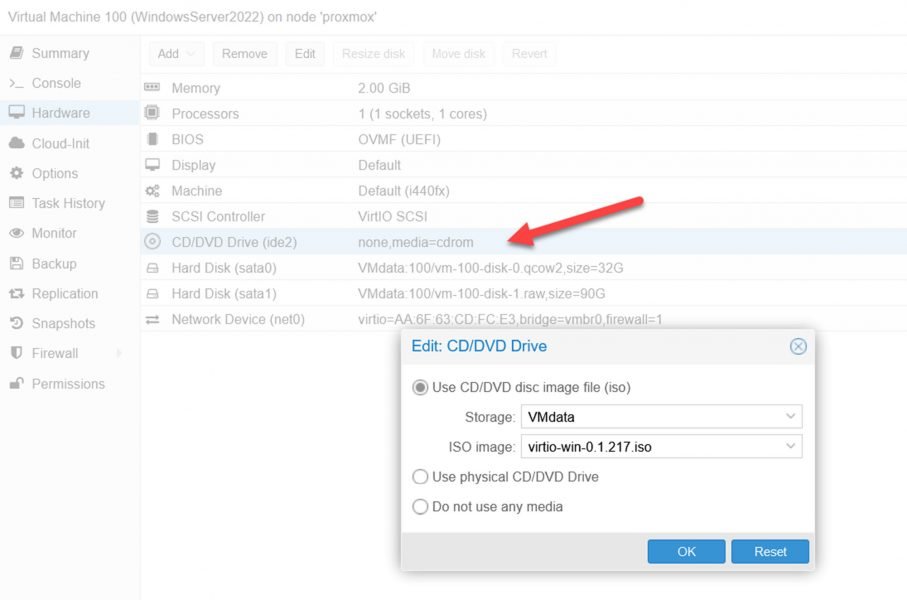
Now we are ready to start the VM for the first time on the Proxmox environment.
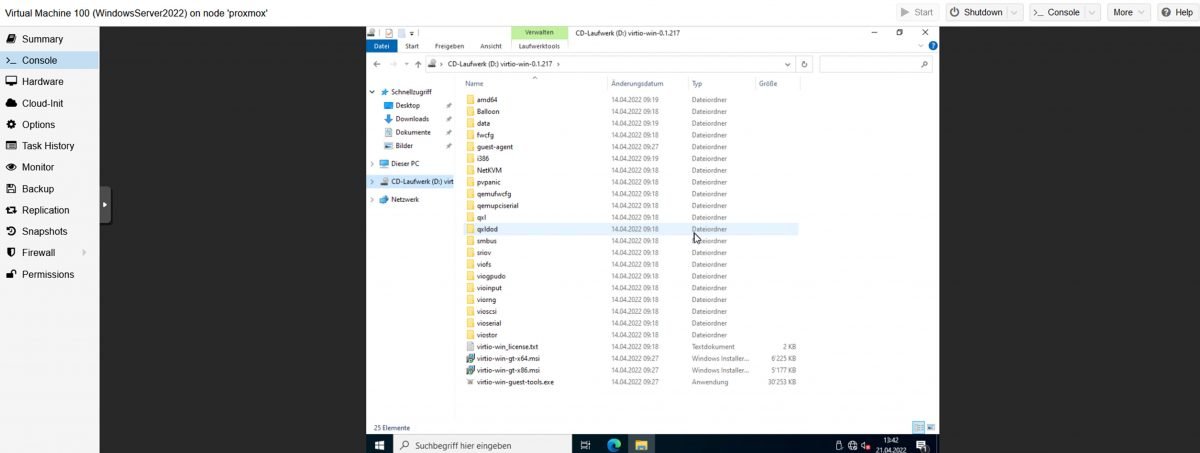
We can now install the Windows drivers. Since I already attached the VirtIO driver ISO, it is mounted in the Windows VM. In most cases, it is the 64-bit driver’s virtio-win-gt-x64 to execute
After installation, shut down the VM, and then you can change the SATA bus/type of the attached hard disk to ‘VirtIO’ for best performance. Also, you can remove the disk that was created when we set up the Proxmox VM.
I have seen instances where Windows crashed at boot-up when the VirtIO driver was installed. A solution is to add another hard drive with the bus/type ‘VirtIO.’ Windows loads the VirtIO driver for the new HD. After that, you can remove the second HD and change bus/type to ‘scsi’ for the first Hard Disk.
I would appreciate your feedback. Was this article helpful? Please share your opinion with me in the comment section below. Or, if you prefer a more personal touch, feel free to email me directly at info@edywerder.ch. Your thoughts and insights are always appreciated.
Before you go …
If you found the guide on transitioning from VMware to Proxmox insightful, you might be interested in a more in-depth comparison between these two platforms. I recommend checking out Proxmox vs ESXi, which delves into the strengths and weaknesses of each. This comparison will provide a clearer understanding of how Proxmox stacks up against VMware’s ESXi, helping you make an informed decision for your virtualization needs. This article is precious if you consider which platform best aligns with your technical requirements and business objectives.
About the author
Hi, I’m Edy Werder. I write hands-on guides about Proxmox, homelab servers, NAS, and WordPress, based on real setups I run and document.
No sponsors, no fluff—just real configs and results.
Enjoying the content?

Nice article, I like your tips.
hi Edy,
first of all, thanks for the article. I am getting ready to migrate windows2022/2025. I have a question about below:
1. Make sure there are no snapshots!
2. Uninstall the VMware Tools
3. Install the Proxmox VirtiO drivers
4. Power off the VM on ESXi (It’s required)
Based on how I am reading it, you are saying we need to install Proxmox VirtiO driver on the windows VM in Vmware correct? Also, is the driver from here? https://github.com/virtio-win/virtio-win-pkg-scripts/blob/master/README.md
The one called virtio-win-guest-tool.exe?
thank you
Hi – Yes I would install the VirtiO drivers before you migrate it to Proxmox. It makes it easier and avoids a step. If you do that on first boot when in Proxmox Windows will see the required Proxmox drivers and install them. It’s not a must though I recommend it based on my experience it makes things more smoother.
Please download the VirtiO drivers from here https://pve.proxmox.com/wiki/Windows_VirtIO_Drivers – the link is also in my article. There are two files to install one is the guest and the other is the msi to install all drivers. There are two MSI files for 32bit and 64bit. Perhaps I should point it out better in my article.
Goold luck and welcome to Proxmox? You won’t regret it.
Thank you, found virtio for windows and it resolved the issue I was having but thank you for quick response.
Another question. I noticed that when I enterd the imported VM and looked at the the ipconfig, it looks it reverted to dhcp. Is this expected behavior? I was expecting the ip configuration would carryover to the imported VM.
once again,
thank you
Yes it is expected, because in Proxmox it is a new nic adapter. It’s like as it would be a new server with a different network card. I think that I mention it in my article that IP might change. It’s best to note the IP prior converting.
Hi Edy, first of all thank you for posting these steps, specially the new method.
Personally I was over-excited to do this and read to fast, so I had to do the import several times to succeed.
Since you were asking for feedback, here some notes to consider.
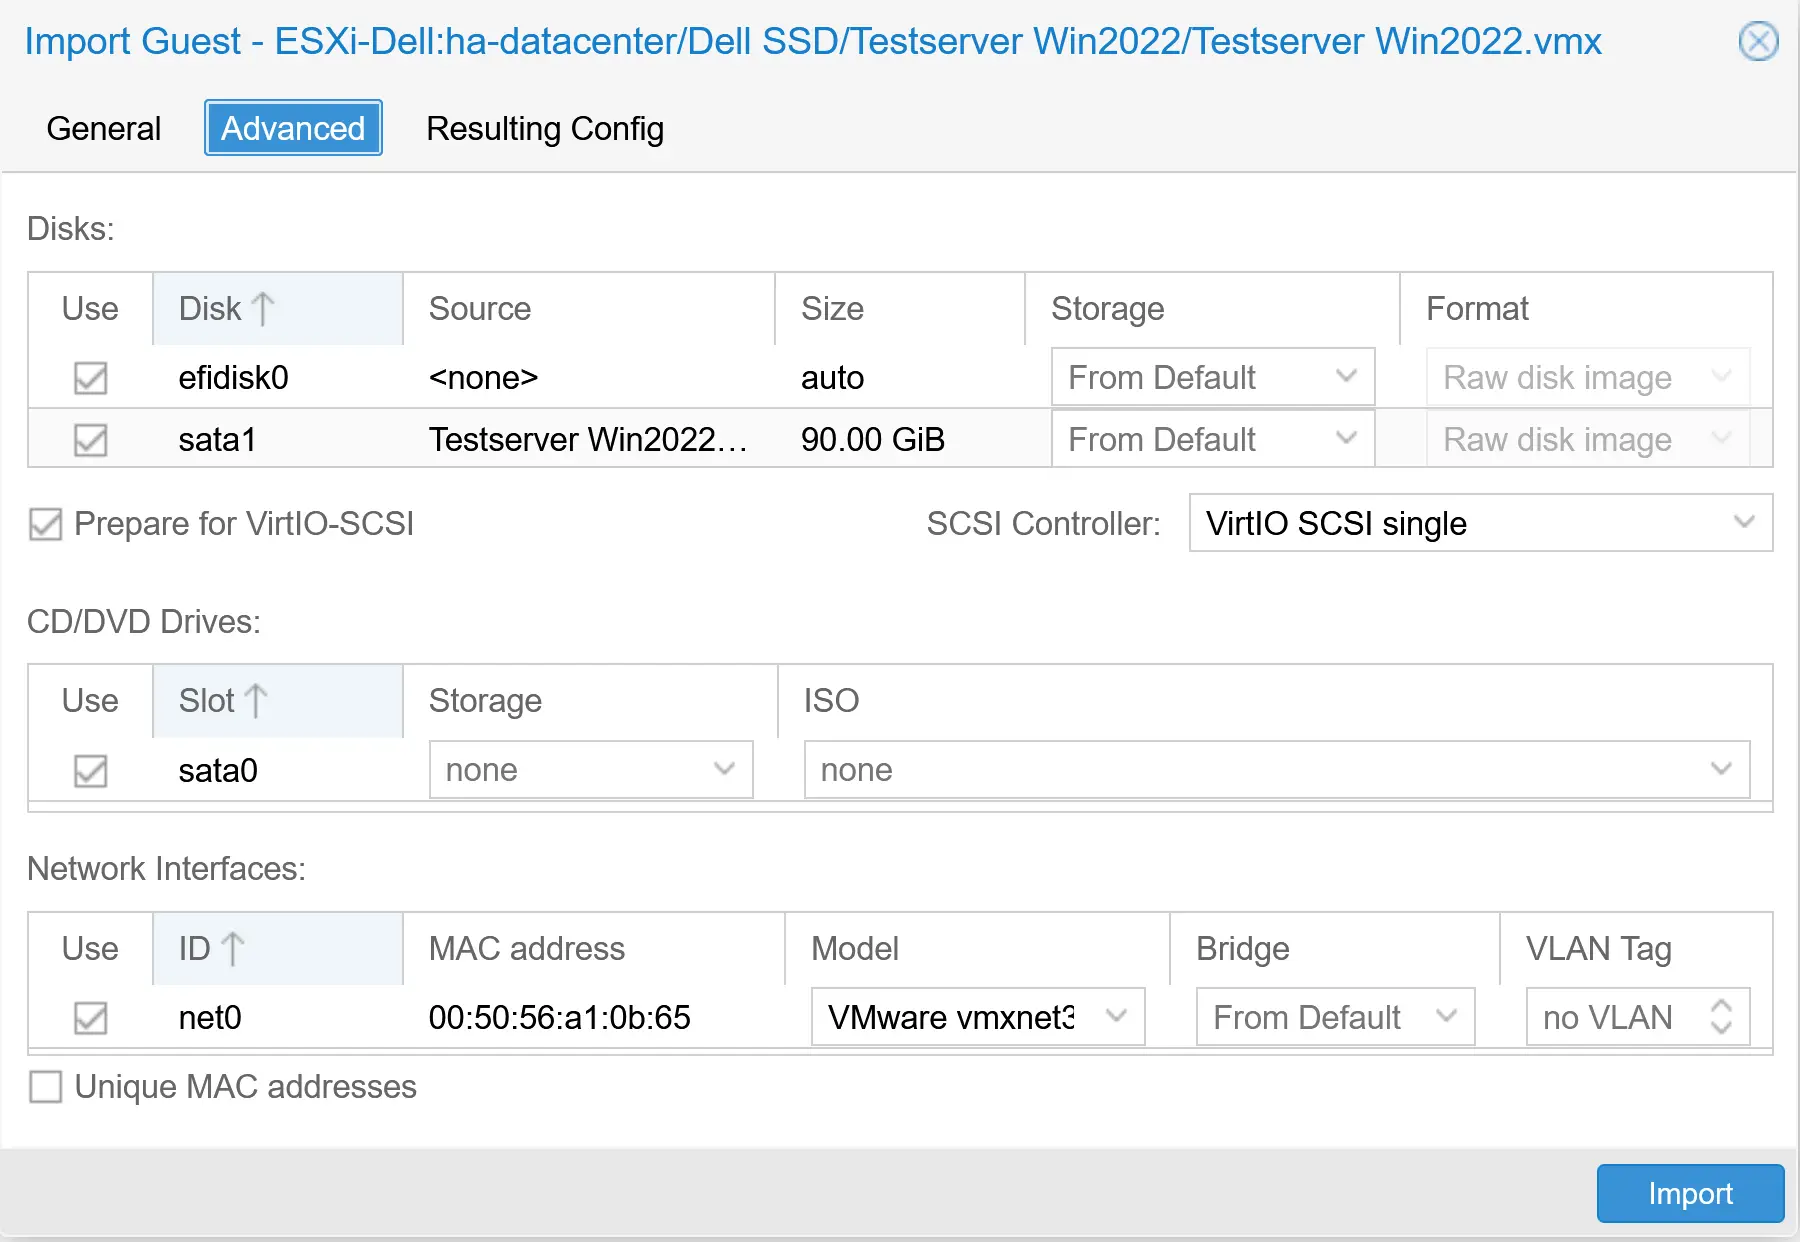
When you are @ the step to actually import the VM, the advanced tab, point out that you tick: Prepare for VirtIO-SCSI
This will change your disk to sata and also the controller changed to VirtIO SCSI.
Before I noticed this on your screenshot, the import went bad on booting, and came with BSOD inaccessible boot device.
You mentioned to use letters in ID, why not take a new screenshot :), it is a great guide, make it perfect.
My expierence was with Windows Server 2022. My steps to prepare were, download the VirtIO driver iso first. Since this was a VMware VM and I used the remote console, after uninstalling vmtools, the bit gets harder to use only your keyboard.
I mounted the VirtIO drive ISO first, then uninstalled vmtools without reboot. Then installed the VirtIO drivers, then the reboot, then shutdown.
Hopefully this makes sence for you and thanks again.
Hello Cees,
Thanks for your comment. I will review my blog and make it more perfect. I appreciate your feedback and taking the time to leave a comment.
I have a windows 2000 vmdk I need to convert to proxmox. Is there VirtI0 drivers available for windows 2000?
I doubt there is – Try to start the VM in the Proxmox environment with SATA controller instead of using SCSI Controller.
Is there a similar blog for migrating Ubuntu Servers from ESXi to Proxmox? I assume the process is similar but wanted to see if you had a step by step that is as good as this one.
You can use the same process as mentioned. An Ubuntu Server is also a vmdk file on ESXi. No difference between a Windows VM
Thank you so much for this definitive guide, I managed to migrate one of my Domain controllers from VMware to Proxmox and currently busy with the second one. I am very new to Proxmox so I can tell you this has been a learning curve to say the least, but I love learning about new and different technologies. Your guide was the best one I have seen for this type of conversion, thank you again!
Thank you for your comment. I’m happy that my article was helpful to you.