
By Edy Werder — IT Consultant & Tech Blogger
Do you want to unlock the full potential of your ESXi environment by implementing a flawless Virtual LAN (VLAN) setup?
Imagine a highway system without lanes—chaos reigns, with no order or structure. In virtualization, VLANs are the lanes that bring order to network traffic. VLANs, or Virtual Local Area Networks, provide essential segmentation within a virtualized environment, making them a crucial component for anyone working with VMware ESXi.
ESXi VLANs enhance security by isolating network segments and improve performance by reducing network congestion. Before setting up VLANs, you need a solid understanding of ESXi, the virtual switch, and the underlying network infrastructure.

Why use ESxi VLANs?
Implementing VLANs offers numerous advantages that can significantly enhance your network’s functionality. Below are the key benefits of integrating VLANs into your virtual environment:
Key Benefits of Implementing VLANs
- Enhanced Security: VLANs restrict access to sensitive data by segmenting network traffic.
- Improved Performance: By reducing broadcast traffic, VLANs can optimize network performance.
- Simplified Management: VLANs make it easier to manage and troubleshoot network issues.
What are the prerequisites for setting up VLANs?
You should establish a few prerequisites before setting up VLANs on VMware ESXi. This groundwork ensures a smooth and successful VLAN implementation. First and foremost, you must clearly understand your network structure and the goals you aim to achieve with VLANs. Additionally, here’s what’s essential:
- ESXi Server: Installation version 6.5 or higher, as this guide is tailored for those releases.
- Physical Network Infrastructure: Properly configured physical network infrastructure that supports VLAN tagging.
- Network Switch Configuration: An ESXi host connected to a network switch configured for VLANs.
- Administrative Privileges: Administrative privileges for your ESXi hypervisor to make the necessary changes.
- Familiarity with Management Tools: Familiarity with vSphere Client or vCenter, especially if managing multiple hosts.
- Unique IP Addresses for VMs: Each VM should have a unique IP address to ensure proper network communication and avoid IP conflicts within the VLANs.
Lastly, having some technical savvy and the know-how to configure these settings in VMs and ESXi hosts is a significant plus!
Essential VLAN Tagging Concepts
What is the difference between VST, VGT, and EST?
The world of VLAN tagging is all about where the magic happens – right at the point of tagging network traffic. The key differences among VST, VGT, and EST revolve around that specific spot.
With Virtual Switch Tagging (VST), the ESXi vSwitch tags the packets before they leave the host. It’s the middle manager of tagging, you could say. Your host network adapters must connect to trunk ports on the physical switch. With VST, the virtual switch handles much of the heavy lifting, making sure each data packet is labeled with the right VLAN as it travels through the virtual landscape.
Virtual Guest Tagging (VGT) gives power to the virtual machine itself. Here, the VMs take charge of their tagging, like putting their name on their lunchbox before heading to the fridge. The host takes those packets, tags intact, and passes them along. This method will require an 802.1Q VLAN trunking driver installed in the guest OS to understand and manage VLAN tags.
External Switch Tagging (EST) is like outsourcing – the physical switch outside of the ESXi environment does all the work. The VMs and virtual switches just use a single LAN, and the external physical switch sorts it all into VLANs. It’s simple and hands-off from the virtual perspective.
Each method has its place, depending on your network’s complexity, security requirements, and management preferences. But no matter which road you take, you end up with a neatly organized flow of traffic that knows where to go.
The table below provides a quick reference to help you compare these methods.
| Feature | Virtual Switch Tagging (VST) | Virtual Guest Tagging (VGT) | Tagging (VGT) External Switch Tagging (EST) |
|---|---|---|---|
| Tagging Responsibility | ESXi host’s virtual switch | Virtual machine (VM) | Physical network switch |
| Configuration Complexity | Moderate | High | Low |
| Flexibility | Centralized management, easier to configure | Highly flexible, VM-specific tagging | Limited flexibility, depends on the physical switch |
| Common Use Case | General purpose, simplifies administration | Scenarios needing VM-level VLAN control | integration with existing physical networks |
| Performance Impact | Minimal, handled by the virtual switch | Potentially higher, depending on VM configuration | Minimal, handled by physical switch |
Virtual Switch Tagging (VST)
Example: A company has an ESXi host running multiple VMs that must be separated by department, such as HR, Finance, and IT. The IT team uses VST to manage VLANs directly from the ESXi host. Each department’s network traffic is tagged and managed through port groups assigned to specific VLAN IDs (e.g., VLAN 10 for HR, VLAN 20 for Finance, VLAN 30 for IT), making it easy to maintain and administer from a central location.
Virtual Guest Tagging (VGT)
Example: A software development firm must run various development and testing environments on the same physical server. To incorporate an efficient virtual machine networking stack, each VM, configured for different projects, needs specific network isolation and control. Using VGT, each VM is configured to handle its own VLAN tagging, enabling developers to independently manage their network traffic without impacting other VMs. This setup allows the developers to configure their environments as needed, ensuring efficient project segregation and workflow.
External Switch Tagging (EST)
Example: A large enterprise has a sophisticated physical network infrastructure with multiple VLANs configured on its Cisco physical switches. It decided to integrate VMware ESXi hosts into this network. By using EST, the physical switches manage the VLAN tagging. The ESXi hosts are connected to the physical network without configuring VLANs on the virtual switches, leveraging the existing network setup for traffic segregation and management.
Step-by-Step: How do you create VLAN in VMware Vcenter?
Setting Up Standard Virtual Switches for VLANs – VST method
Creating a VLAN in vCenter involves configuring the virtual switch to recognize and manage VLAN traffic. Follow these steps to set up a VLAN.
Step 1: Access vSphere Client
- Open vSphere Client in your browser: Launch the VMware vSphere Client and log in to your vCenter Server.
- Select the Host or Cluster: In the inventory pane, navigate to the ESXi host or cluster where you want to configure the VLAN.
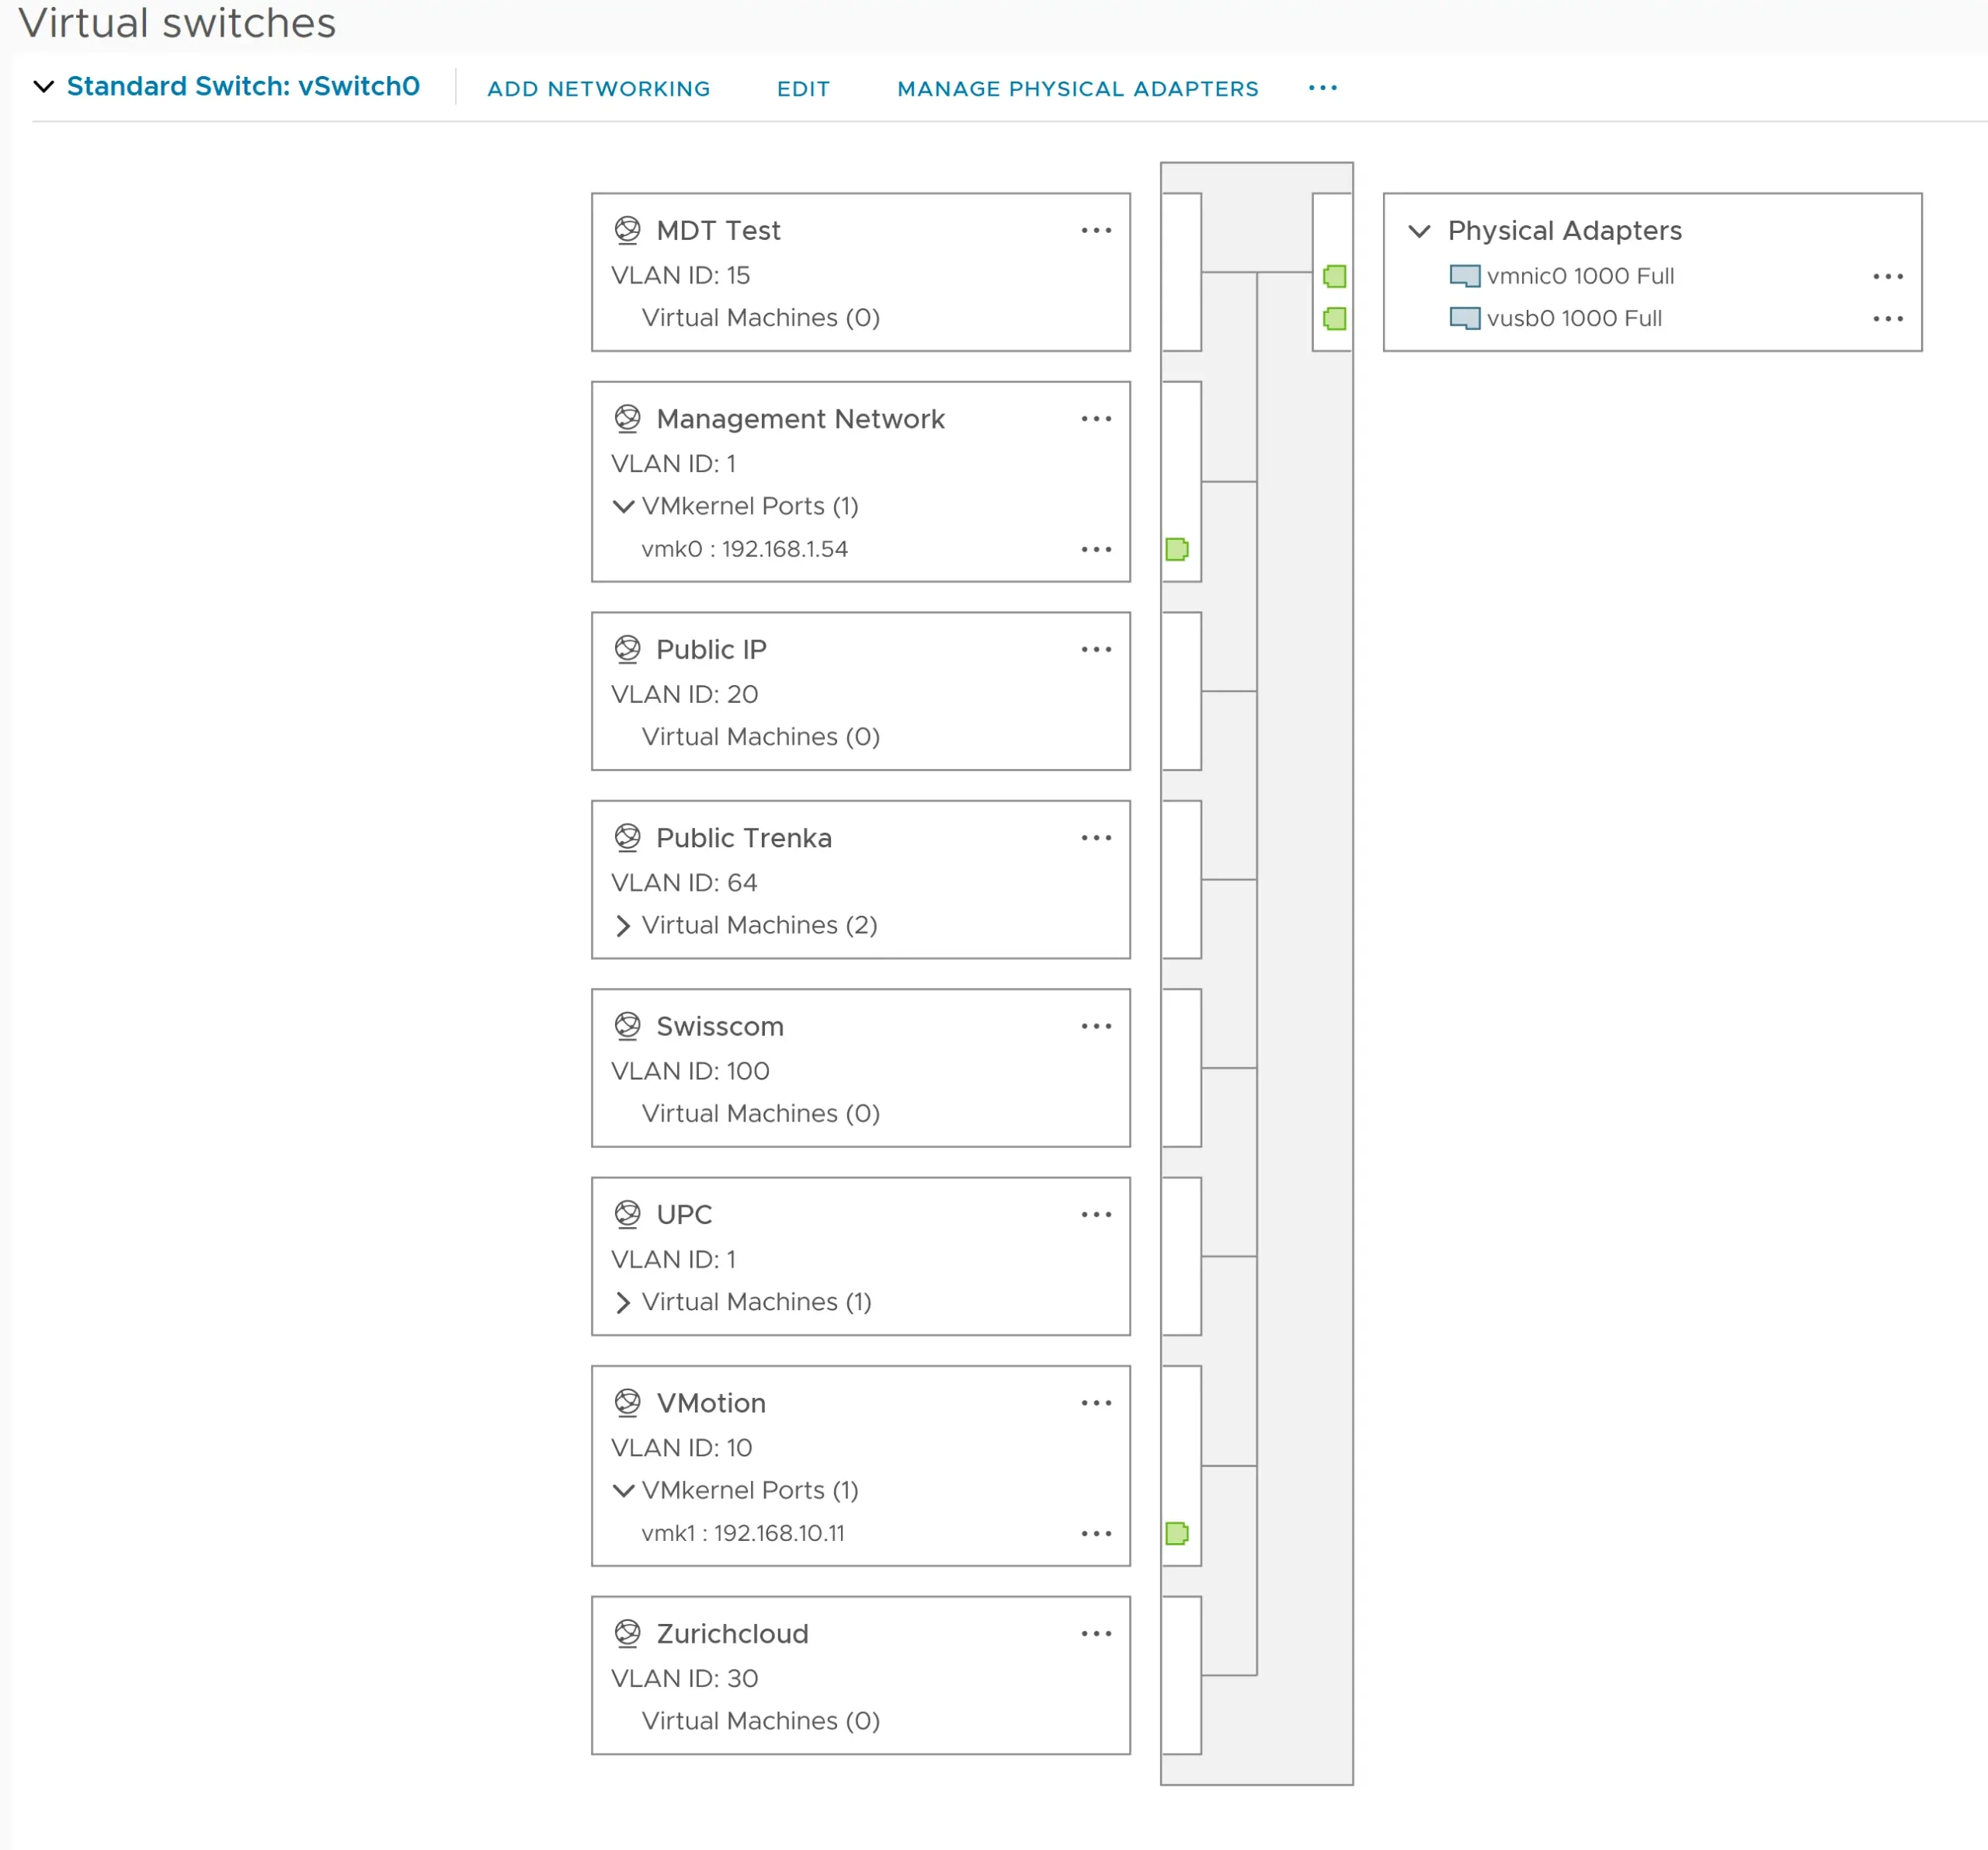
- Go to Configure: Click on the ‘Configure’ tab, then ‘virtual switches’ to view the network configuration.
Step 3: Create or Edit a Virtual Switch
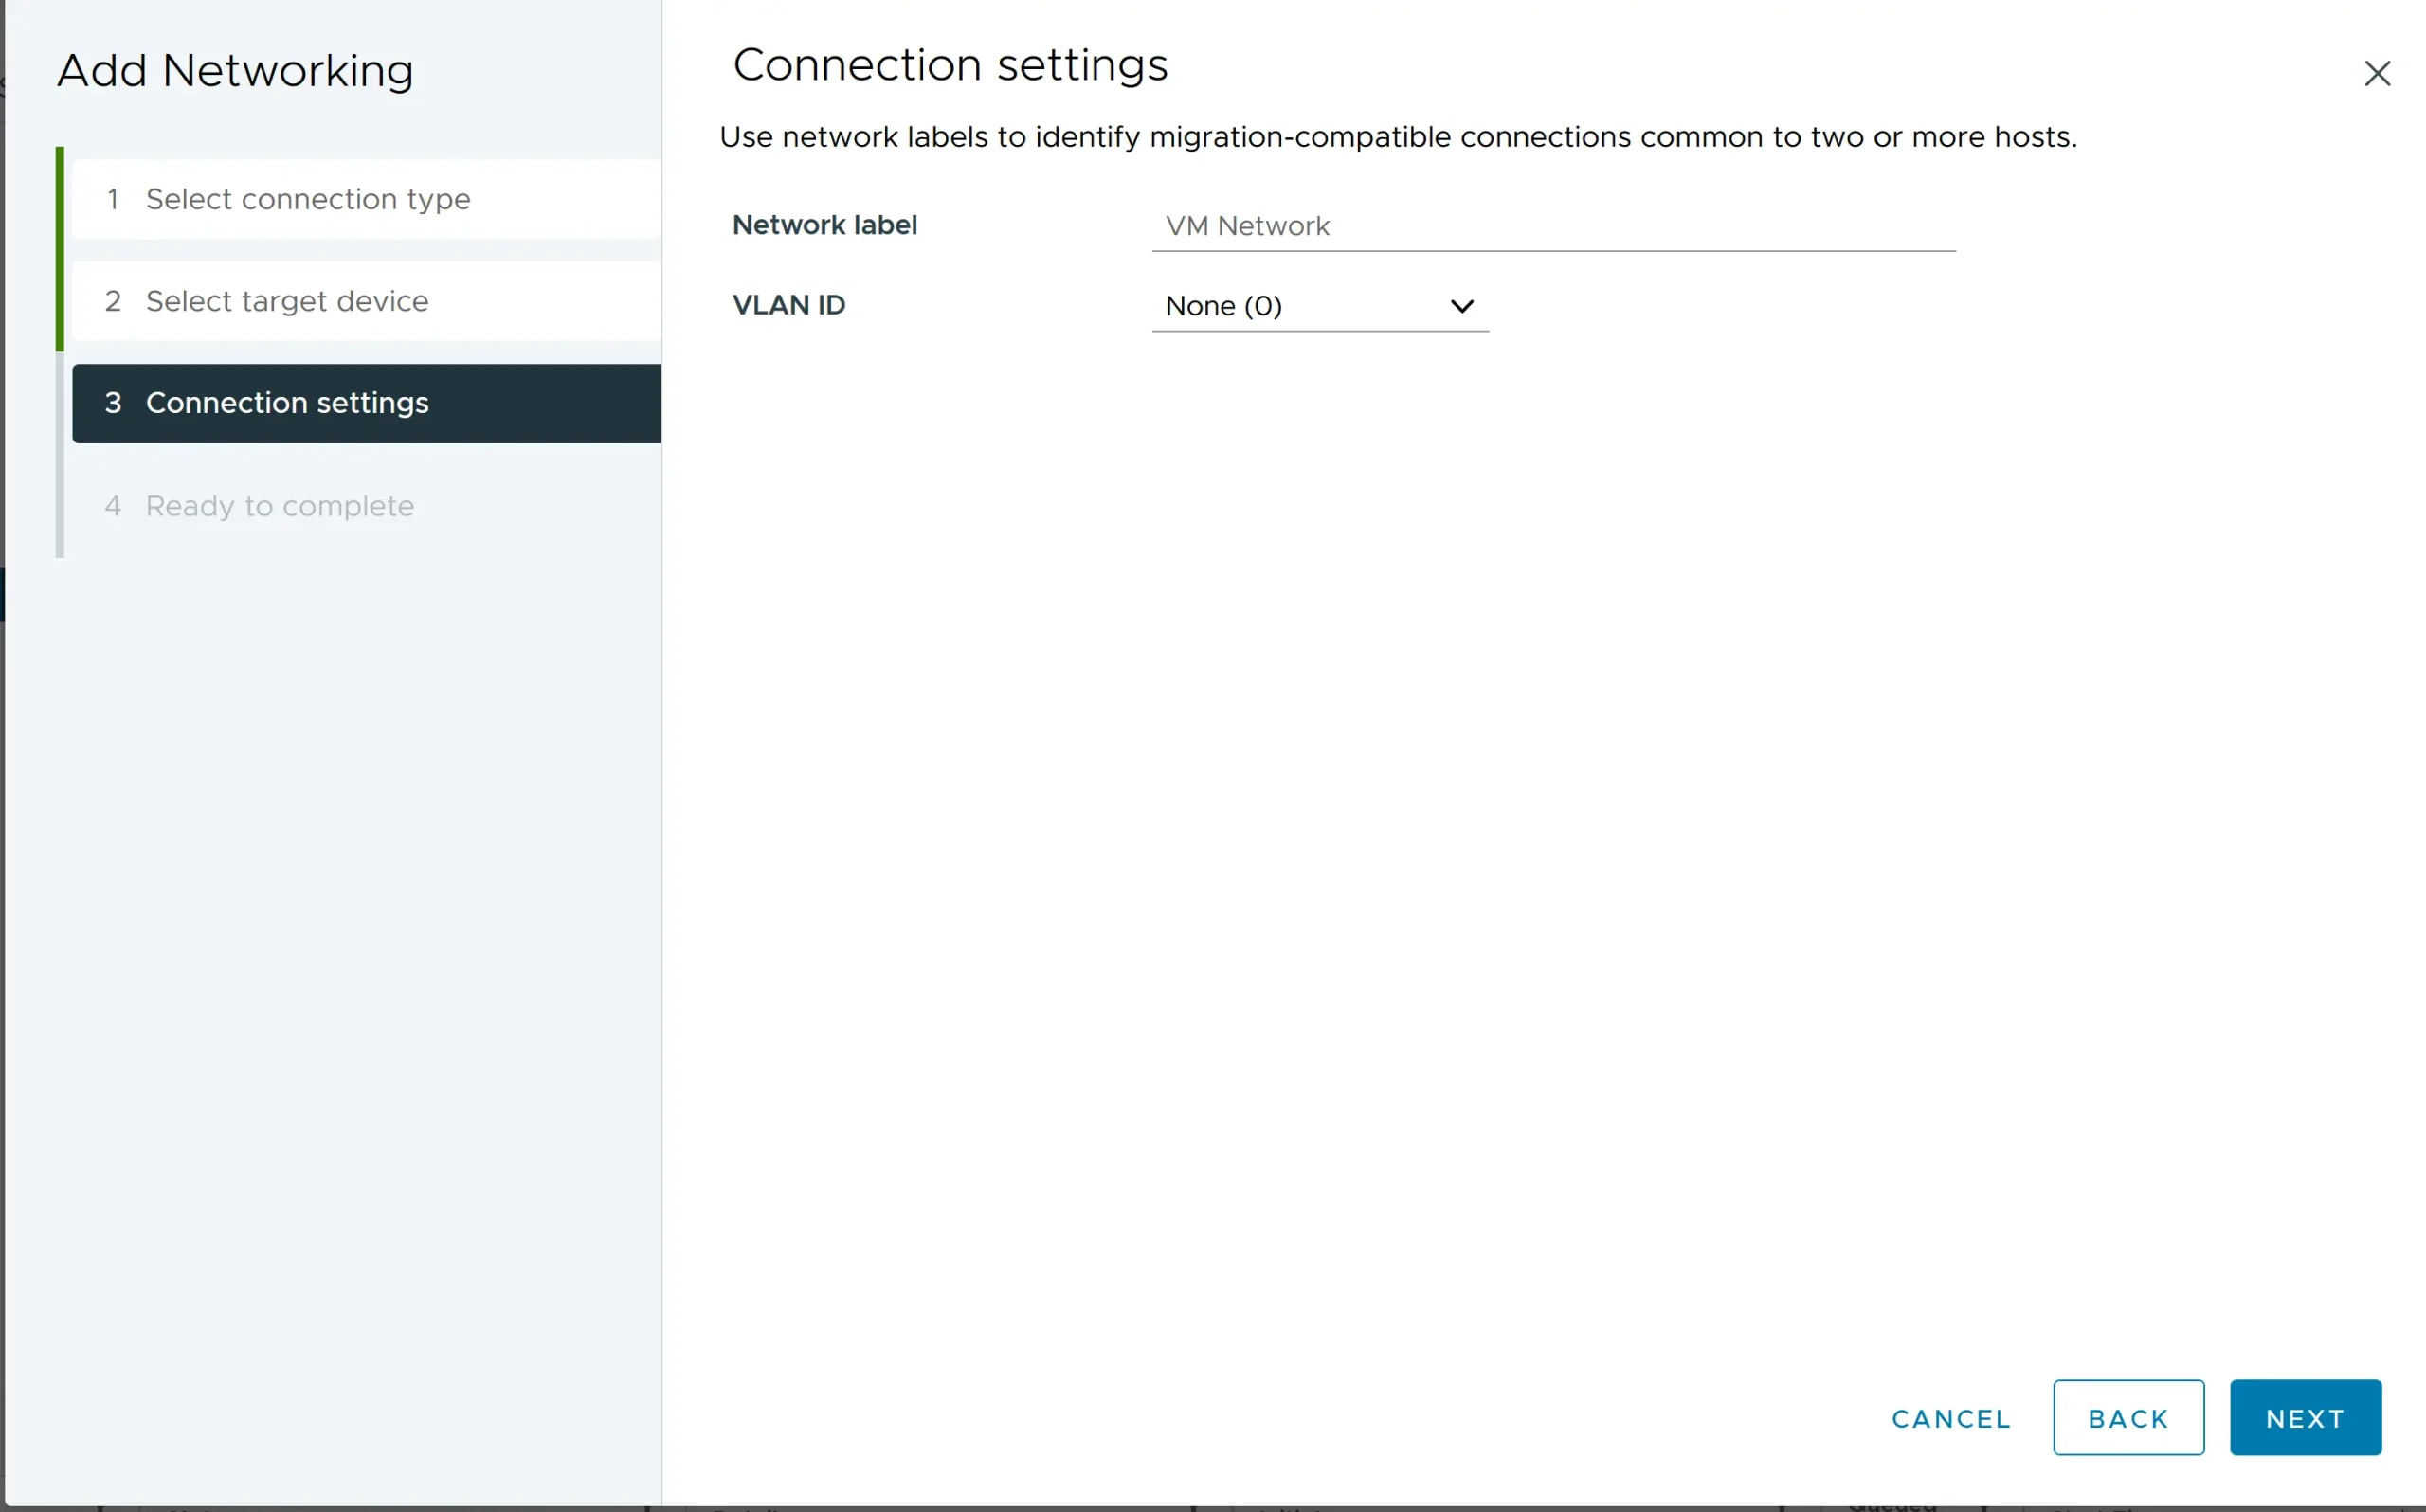
- Click ‘Add Networking’.
- Choose ‘Virtual Machine Port Group for a Standard Switch’ and click ‘Next’.
- Select ‘Create a new standard switch’ or select an existing one and click ‘Next’.
Step 4: Add a Port Group
- Under the selected virtual switch, click ‘Add Port Group’.
- Enter a name for the port group (e.g., “VLAN 10 Network”).
Step 5: Assign VLAN ID
- In the ‘VLAN ID’ field, enter the VLAN ID you want to assign to this port group (e.g., “10” for VLAN 10).
- Click ‘Next’ and then ‘Finish’ to save the configuration.
Step 6: Configure Network interfaces (Uplinks)
- Go to the ‘Physical Adapters’ tab within the virtual switch settings.
- Verify that the network adapters are connected to the physical switch ports configured for the VLAN.
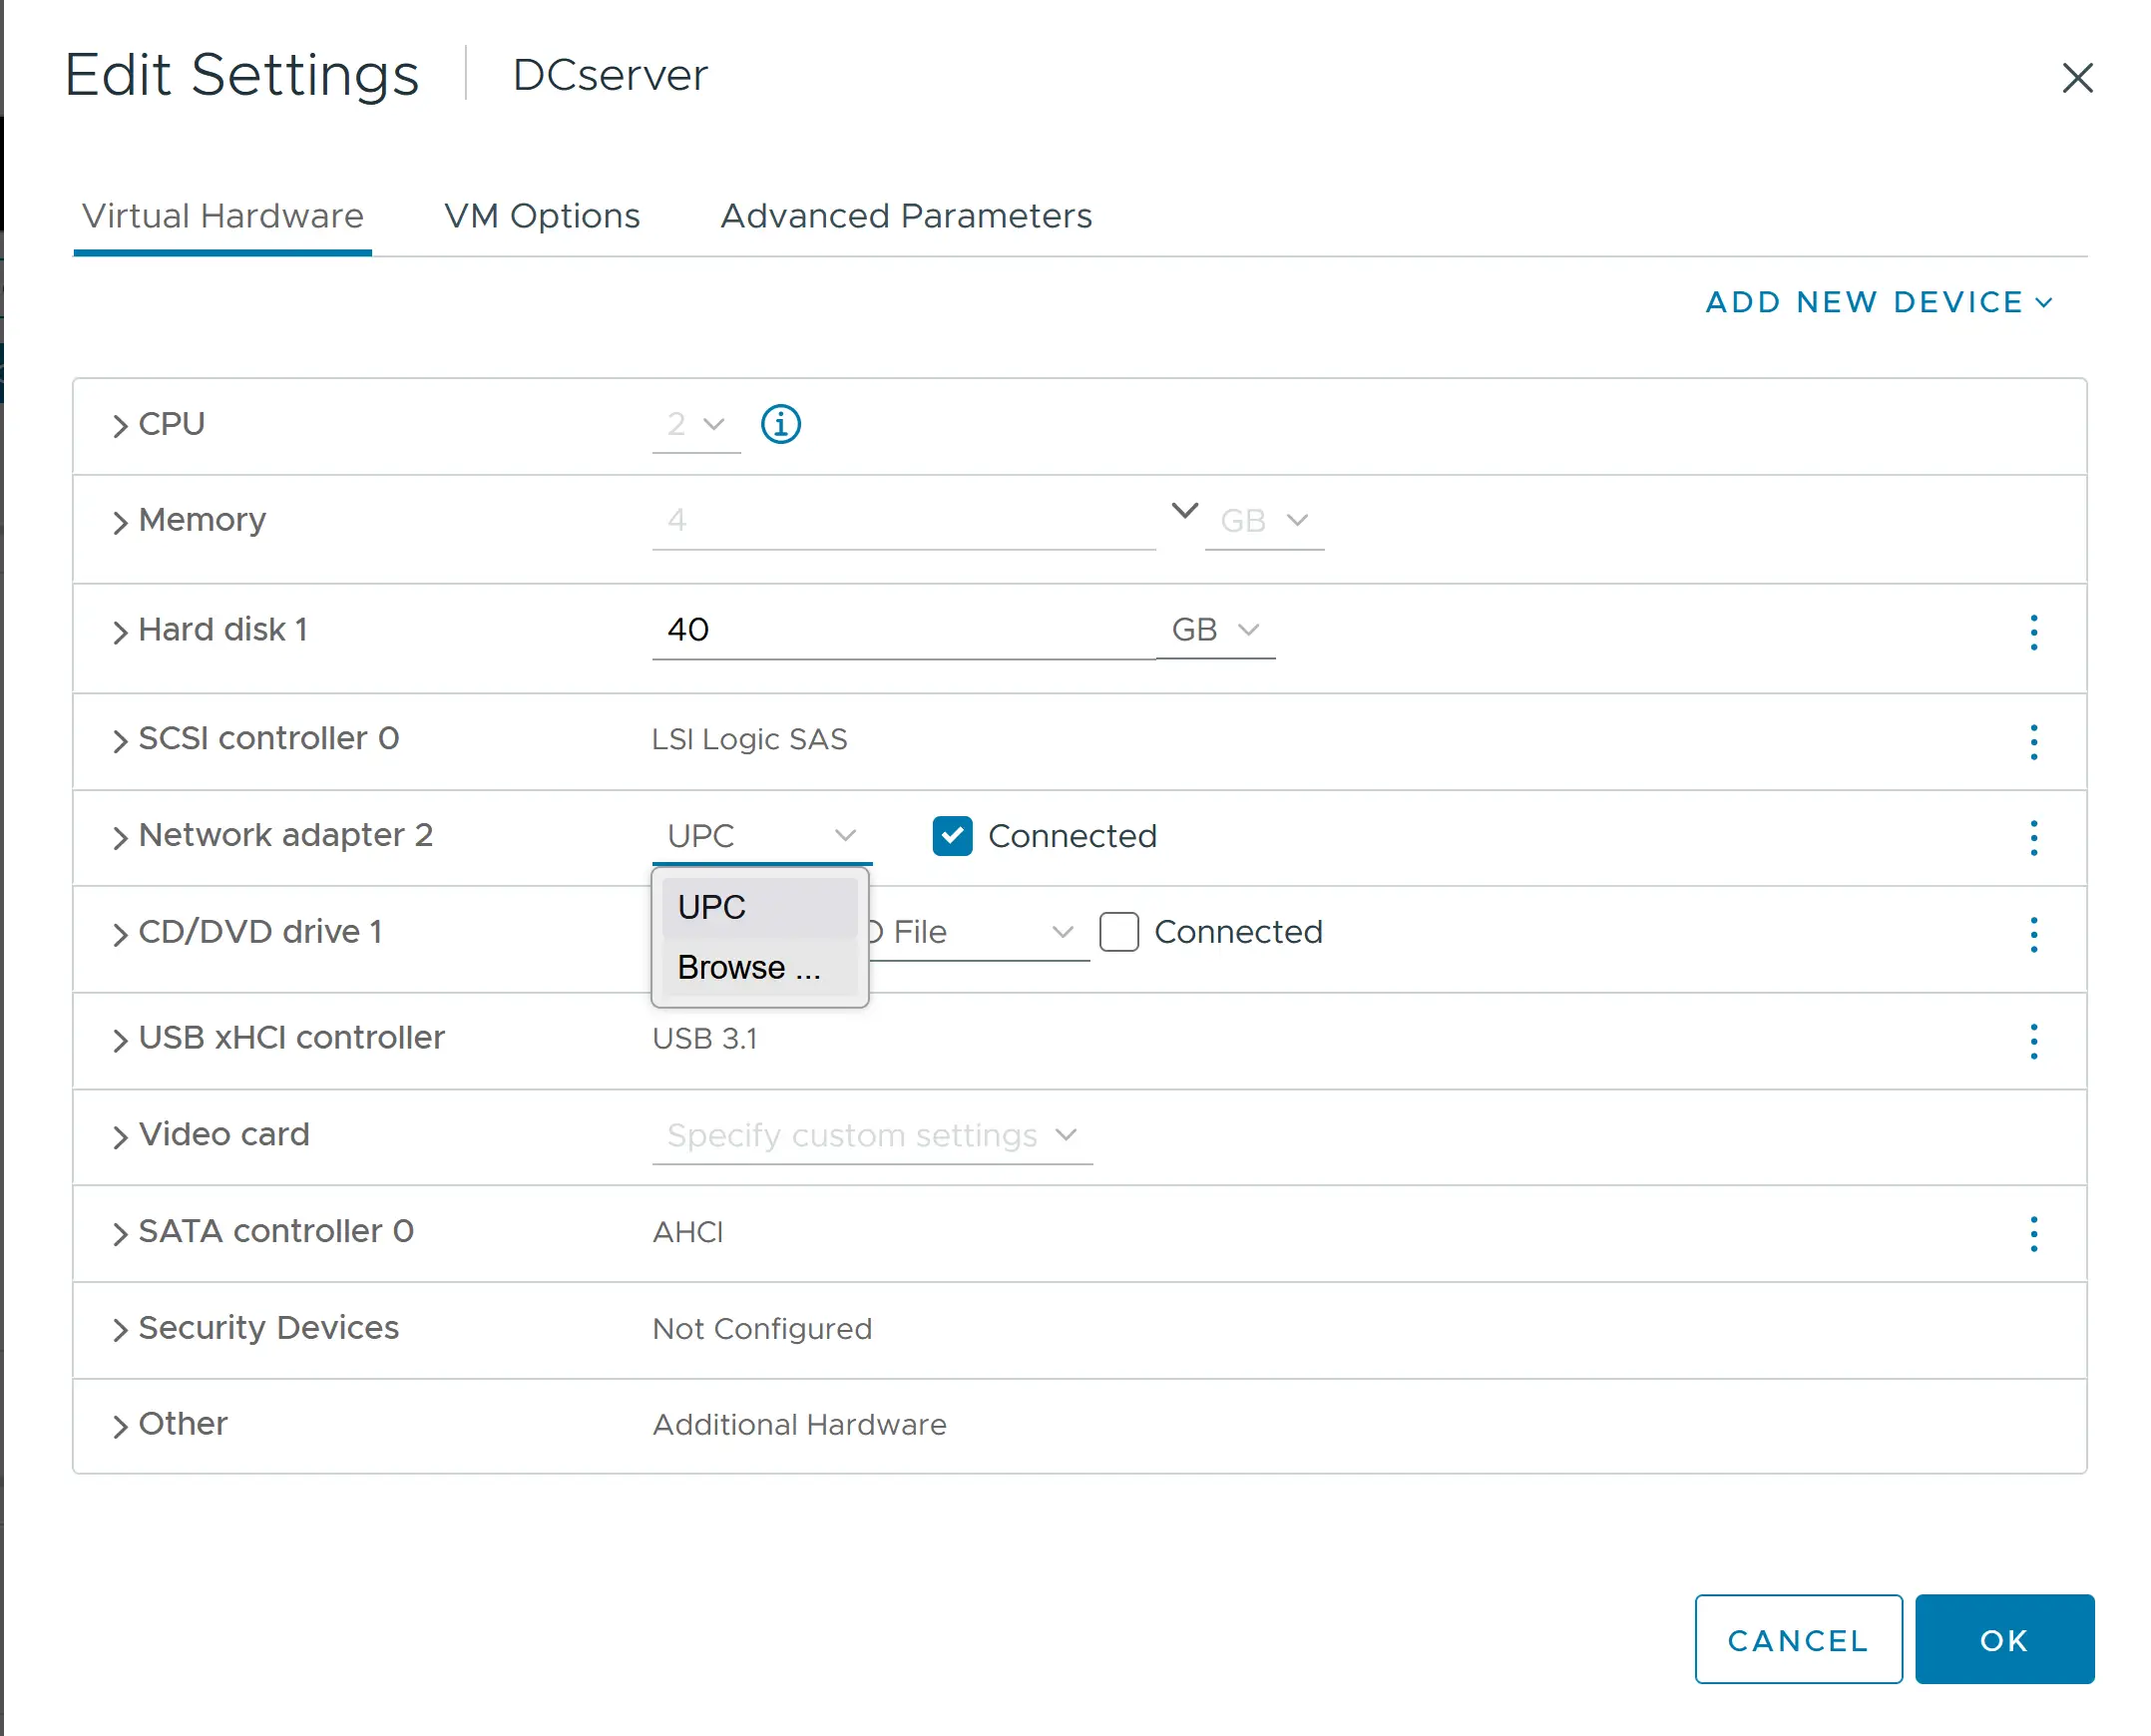
Step 7: Assign VMs to the Port Group
- Select the virtual machine that needs to be connected to the VLAN.
- Right-click the VM and choose ‘Edit Settings’.
- Under the ‘Virtual Hardware’ tab, find the network adapter.
- Change the network label to the new port group (e.g., “VLAN 10 Network”).
- Click ‘OK’ to apply the changes.

Expert Tip: Always double-check that your physical switch trunk mode ports allow the specific VLANs you’ve tagged. Otherwise, it’s like sending invitations to a party without giving guests the address — the packets won’t know where to go! And keep a record of those VLAN IDs. Mistakes can lead to cross-wired data or, worse, a security hiccup. You’re now set to enjoy the nifty segmentation and neat traffic management that VST promises!
Remember, Standard Virtual Switches are great for small to medium-sized environments or wherever fine-grained control over each host’s networking setup is needed. If you’re looking for more centralized management, consider Distributed Virtual Switches for VLANs.
Check out the table below for great deals on servers available on Amazon.
| Product Name | View on Amazon |
|---|---|
| Dell PowerEdge Dell R630 Server | 2X E5-2690 v4 = 28 Cores | 128GB RAM | 2X 1TB SSD (Renewed) | View on Amazon |
| Dell PowerEdge R730 Server 2X E5-2680v4 2.40Ghz 28-Core 128GB 8X 4TB 12G H730P (Renewed) | View on Amazon |
| ProLiant MicroServer Gen11 Tower Server w/one Intel Xeon E-2434, 3.4GHz 4-core 1P 32GB-U VROC 4LFF‑NHP 4TB HDD iLO KIT 180W External PS (HPE Smart Choice P74440-005) | View on Amazon |
| HPE ProLiant DL20 Gen11 Rack Server w/one Intel Xeon E-2436 Processor, 2.9GHz 6‑core 1P 32GB‑DR MR408i‑o 4SFF 2x500W RPS | View on Amazon |
| Dell PowerEdge R830 Server 2.20Ghz 56-Core 128GB 16x 300GB 15K H730P Rails (Renewed) | View on Amazon |
| Dell PowerEdge R440 Server 2X Gold 6126 2.60Ghz 24-Core 96GB 960GB SSD + 3.6TB (Renewed) | View on Amazon |
| HPE ProLiant DL380 Gen9 2U RackMount 64-bit Server + 2×8-Core E5-2640v3 Xeon 2.6GHz CPUs + 64GB PC4-2133P RAM + 8×600GB 10K SAS SFF HDD, P440ar RAID, 4×GigaBit NIC, 2×Power Supplies, NO OS | View on Amazon |
| HPE Proliant DL380 Gen10 8B SFF 2U Server, 2X Intel Xeon Gold 6126 2.6Ghz (24-cores Total), 192GB DDR4 RAM, 8X 1.2TB 2.5” 10K SAS 12Gbps, P408i-a SR 2GB RAID, No Operating System | View on Amazon |
Addressing Common VMware VLAN Challenges
How to check VLANs on the ESXi host?
You must know where to look to play detective with your VLANs on an ESXi host. Checking the VLANs is crucial for troubleshooting and ensuring your network is configured correctly.
Here’s how you can check VLANs on your ESXi host:
- Fire up your vSphere Client — the magnifying glass for your VLAN hunt.
- Click on the ESXi host, then navigate to the ‘Configure’ tab.
- Go to the ‘Networking’ section and click ‘Virtual switches.’ Here, you’ll see a list of your vSwitches and their associated port groups.
- Each port group’s VLAN ID will be displayed right next to it. This number is your VLAN tag, the secret code that tells your network where data should be going.
Expert Tip: Don’t just give those VLAN IDs a quick glance. Make sure they match your intended network design. If something seems off, investigate by comparing them to your physical switch settings. A mismatched VLAN ID can lead to network mayhem, and nobody wants that. A vigilant double-check now saves you from a networking headache later!
What does the VLAN to port setting look like?
The VLAN to port setting in a VMware ESXi host bridges your virtual network and your VLAN configuration. It dictates which VLAN a particular port group on a virtual switch belongs to.
When you peek into these settings, here’s what you’ll typically see:
- In the vSphere Client, after navigating to your host’s ‘Configuration’ tab and diving into ‘Networking’, you’ll find your virtual switches and port groups.
- Select a port group to reveal its properties, which will be listed, including a ‘VLAN ID’ setting. This specific spot is like the heart of VLAN tagging.
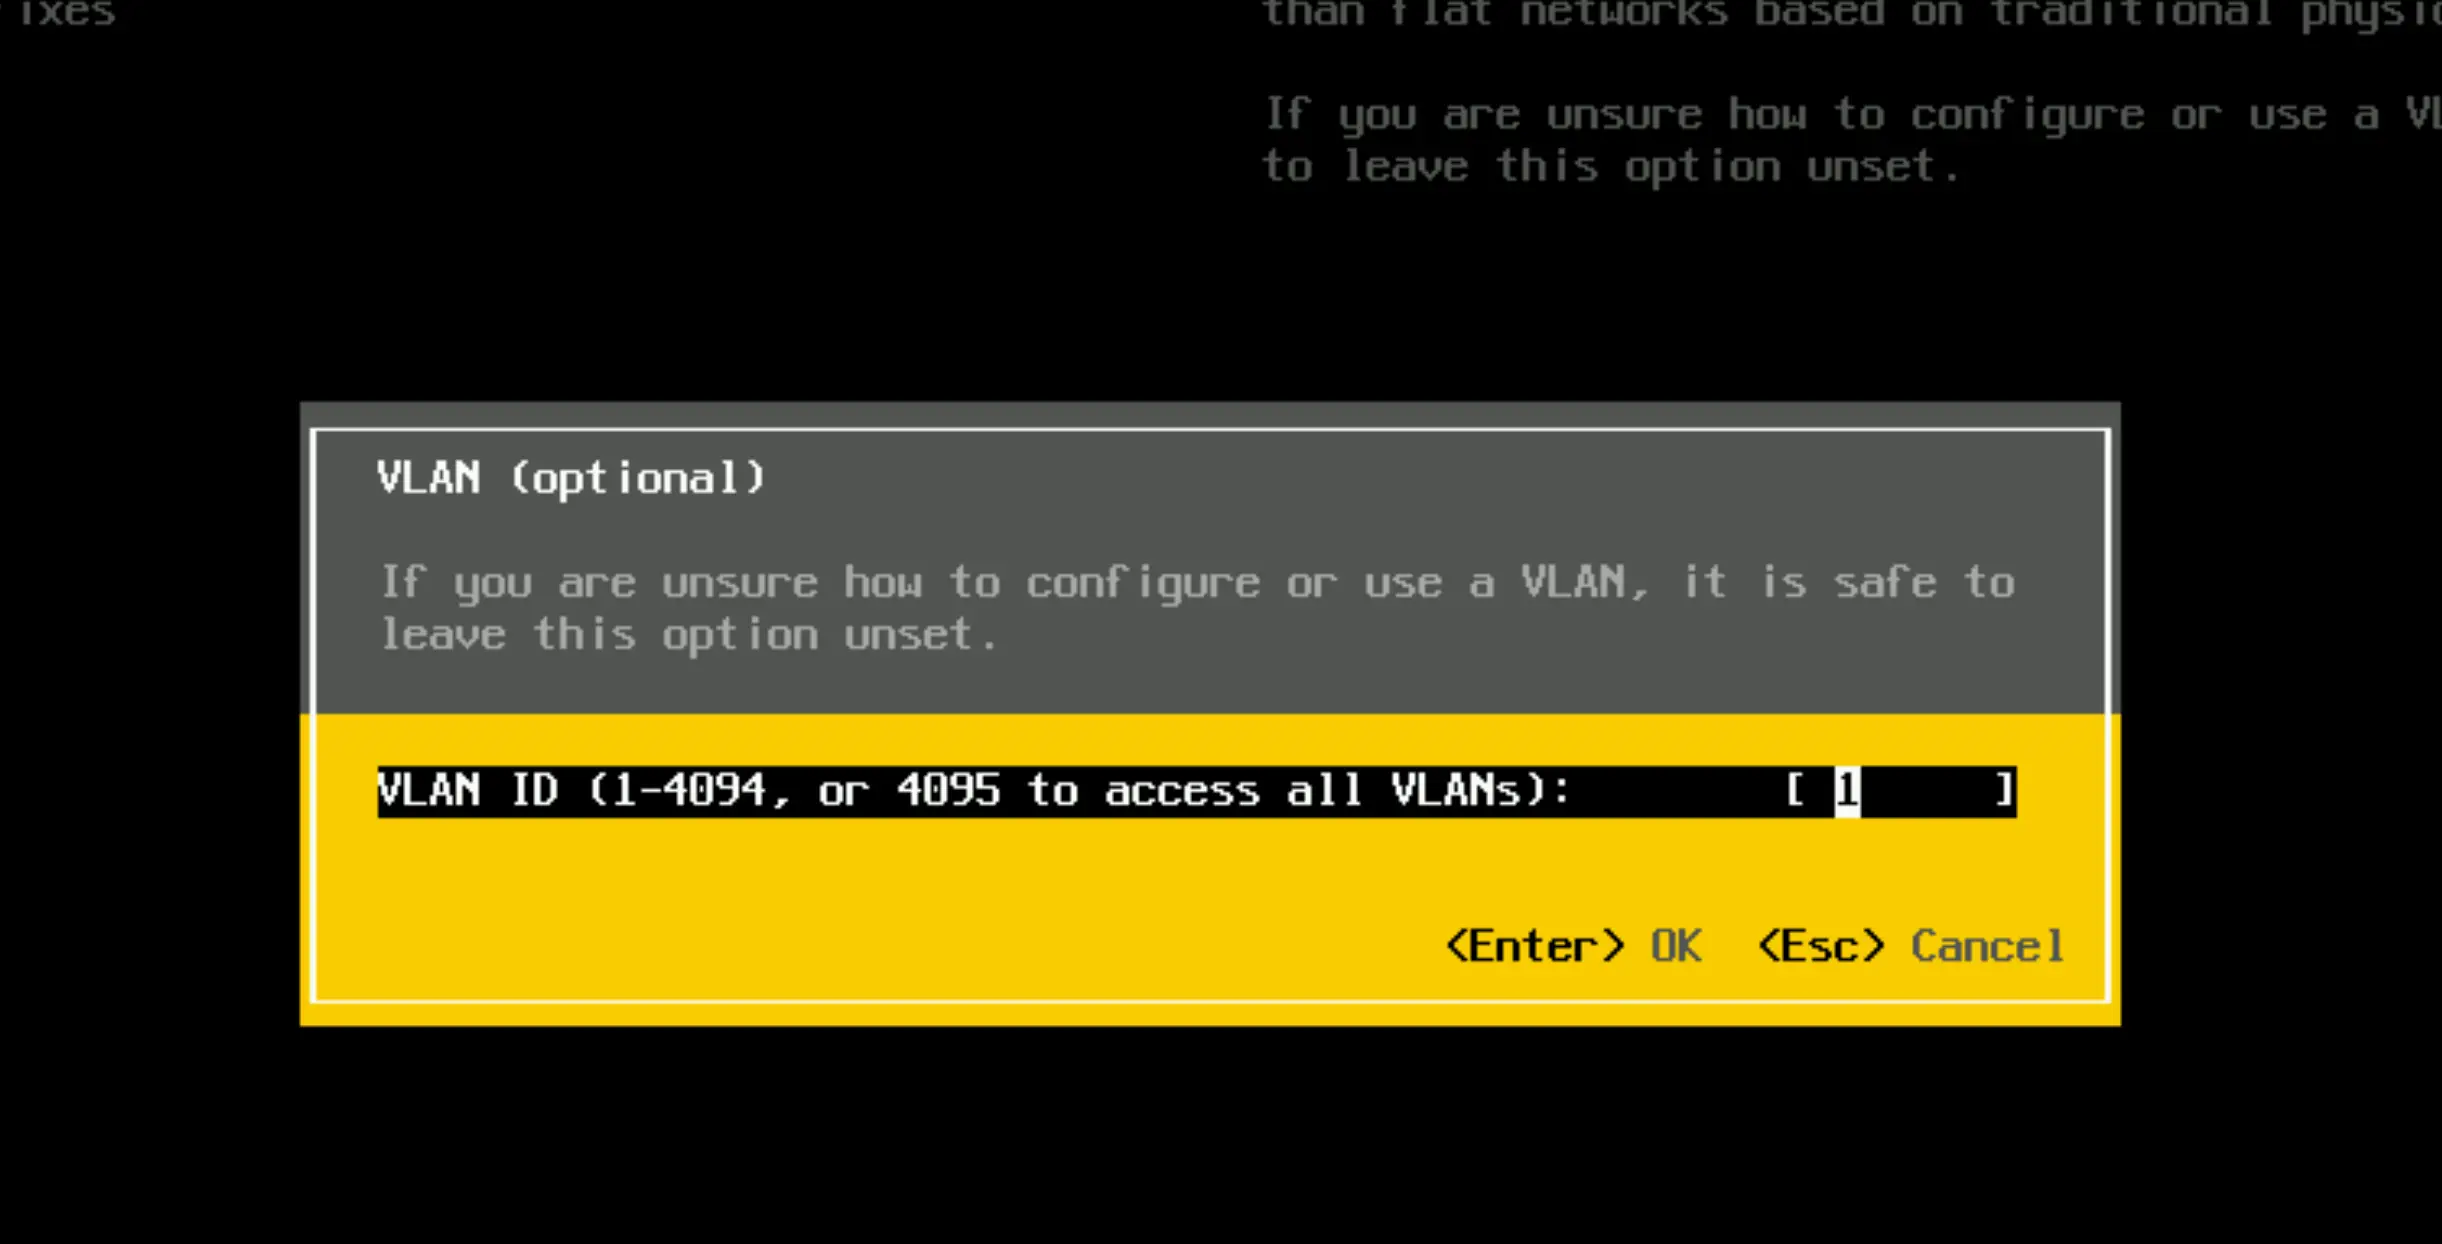
- This space will either show you a number that corresponds to your VLAN (1-4094), zero (0) indicating no VLAN, or 4095 for all VLANs when Virtual Guest Tagging (VGT) is your chosen path.
Example Configuration Screen
When configuring a port group, the settings typically include:
- Name: Port Group Name (e.g., “Marketing VLAN”).
- VLAN ID: Numeric VLAN identifier (e.g., “30”).
- Network Label: Descriptive label for the network.
What is VLAN 0 in ESXi?
VLAN 0 indicates that the traffic should be untagged when leaving the ESXi host. Essentially, when a port group is configured with VLAN ID 0, any traffic passing through that port group will not have any VLAN tags. This is often used to signify default or native VLAN traffic.
Detailed Explanation:
- Untagged Traffic: VLAN 0 sends packets without any VLAN tags. When a virtual machine’s network adapter is configured to use VLAN 0, it communicates on the physical network’s native VLAN, which is typically untagged.
- Native VLAN: In many physical network setups, VLAN 0 corresponds to the switch’s native VLAN. The native VLAN is a default VLAN that doesn’t require tagging. Traffic on this VLAN is transmitted without any VLAN tags.
- Configuration: When configuring a port group with VLAN ID 0 in ESXi, the virtual switch does not add any VLAN tags to the frames it sends out. This can be useful in scenarios where the physical switch expects untagged frames or when integrating with networks that use untagged traffic.
Example Use Case:
Consider an ESXi host connected to a physical switch where VLAN 1 is the native VLAN (default VLAN for untagged traffic). If you have a port group configured with VLAN 0, any VM connected to this port group will send untagged traffic to the physical switch, which will be treated as part of VLAN 1.
What does VLAN 4095 mean?
VLAN 4095 in the ESXi universe is like a backstage pass for your virtual machines, letting them mingle with all the other VLANs. It’s your go-to setting if you want your VMs to handle the tagging chores.
Let’s decode this number:
- Setting VLAN 4095 on a port group flips your VMs into Virtual Guest Tagging (VGT) mode.
- In VGT mode, the virtual machine’s network adapter driver applies the correct VLAN tags.
- The physical switch must be set to trunk all VLANs because it won’t filter traffic based on VLAN IDs.
Expert Tip: If setting a port group to VLAN 4095, double-check that your virtual machine OS has the right network adapter driver for VLAN tagging. Not all operating systems sip the same coffee; some might need an extra configuration shot to tag right. With VLAN 4095, you’re giving your VMs a VIP networking ticket, so make sure they’re dressed up with the appropriate drivers to enjoy the VLAN party!
Setting the management network to VLAN 4095 in VMware ESXi is generally not a good idea. Here’s why:
Reasons Against Using VLAN 4095 for Configure Management Network:
- Security Risks: VLAN 4095 allows a port group to handle traffic from all VLANs. Using it for the management network can expose the management traffic to all VLANs, increasing the risk of unauthorized access or interception. Management traffic should be isolated and protected to ensure the security of the ESXi host.
- Network Segmentation: The management network should be kept separate from other types of traffic to ensure that it remains isolated and secure. Using VLAN 4095 breaks this isolation, as it would expose management traffic to potentially all other VLANs.
- Performance Issues: Allowing a management network to handle all VLANs might introduce unnecessary traffic on the management interface, potentially impacting performance and making it harder to troubleshoot network issues.
- Best Practices: VMware best practices recommend isolating management traffic on a dedicated VLAN. This approach ensures that management operations are not affected by other network activities and that the management plane is protected.
Conclusion
Summarizing the VLAN Essentials for Robust VMware Infrastructure
VLANs are more than just network segments; they’re building blocks for a robust and dynamic virtual node infrastructure. Wrapping everything up, remember that VLANs provide crucial network isolation while managing and optimizing traffic.
Here’s the cheat sheet for VLAN essentials:
- VST (Virtual Switch Tagging): The virtual switch tags traffic with VLAN IDs before it leaves the host. It’s perfect for those wanting the ESXi to manage things.
- VGT (Virtual Guest Tagging) Lets VMs apply their own VLAN tags, ideal for multi-VLAN network-savvy virtual machines.
- EST (External Switch Tagging): The external physical switch does all the tagging based on port configurations. If you prefer external management, go for it.
- VLAN 0: Indicates no tagging from the virtual switch; it’s EST mode in disguise.
- VLAN 4095: A wildcard that enables VGT, letting VMs see all the VLANs.
I’d love to hear from you — was this article helpful? Share your thoughts in the comments below. If you prefer, you can also reach me by email or connect with me on Reddit at Navigatetech.
Before you go …
Before you go, if you’re interested in setting up a home lab for VMware ESXi, you might find the guide on creating a VMware ESXi Barebone Homelab very useful. It provides detailed steps for building a cost-effective and efficient lab environment, which complements your knowledge of configuring VLANs on ESXi. This setup can be an excellent way to further experiment and enhance your skills. Happy lab building!
About the author
Hi, I’m Edy Werder. I write hands-on guides about Proxmox, homelab servers, NAS, and WordPress, based on real setups I run and document.
No sponsors, no fluff—just real configs and results.
Enjoying the content?
