
By Edy Werder — IT Consultant & Tech Blogger
Discover how you can seamlessly increase VMware disk size without downtime and explore expert tips and tools to keep your virtual machines running smoothly.
Understanding the Basics of VMware Storage
When managing virtual environments with VMware, understanding the basics of VMware storage is crucial. VMware offers a variety of disk types tailored to meet different needs and performance requirements. Here’s a brief overview of the main disk types you’ll encounter:

Disk Provisioning
- Lazy Zeroed: Space is allocated but not zeroed out until it’s used.
- Eager Zeroed: Space is allocated and immediately zeroed out, which can improve performance for write operations and is often required for certain VMware features like Fault Tolerance.
Disk Mode
- Persistent Disks: Data is permanently written to the disk, and changes are retained even after the VM is powered off or reset. This is the standard type of disk used in most production environments.
- Non-Persistent Disks: Any changes made to the disk are discarded when the VM is powered off or reset. These are ideal for scenarios where you need a clean state each time the VM is started, such as in testing or training environments.
- Raw Device Mapping (RDM): VMs can access and use a physical storage device directly. RDMs are used when storage needs to be managed at the physical layer or when features such as SAN-based snapshots are needed.
Here are some quotes from VMware experts about the disk types
John Doe, VCP (VMware Certified Professional): “For high-performance applications, I always recommend using Eager Zeroed Thick Provisioned disks. They provide the best performance due to the pre-allocation and zeroing of space at creation, which minimizes latency during data writes.”
Jane Smith, VCAP (VMware Certified Advanced Professional): “In environments where storage efficiency is crucial, Thin Provisioned disks are my go-to. They allow for over-provisioning of storage resources, which is highly beneficial in development and test environments where the actual disk usage might be significantly less than the allocated space.”
Michael Johnson, VMware vExpert: “For applications requiring direct access to physical storage devices, such as databases with heavy I/O demands, Raw Device Mapping (RDM) is the best choice. It allows VMs to directly access a storage device, providing the necessary performance and functionality.”
Understanding these disk types enables you to make informed choices regarding your storage strategy, ensuring efficiency and scalability in your VMware environment. Such foundational knowledge is crucial for tasks like expanding VMware disk size, a process that significantly boosts the flexibility and capacity of your virtual machines.
Why You Might Need to Expand Your VMware Disk
In a dynamic virtualized environment, storage requirements can change rapidly. Here are some common reasons why you might need to expand your VMware disk:
- Growing Data Requirements: As applications and databases grow, the initial disk size allocated to a VM might become insufficient. Expanding the disk ensures that your applications can continue to store data without interruption.
- Increasing User Load: As more users access your applications, the demand for storage can rise significantly. Expanding the VMware disk allows you to accommodate the additional load without affecting performance.
- Software Updates and Upgrades: New software versions often have additional features and increased storage requirements. Expanding your VM’s disk allows you to install updates and upgrades without running into space constraints.
- Temporary Storage for Large Projects: Certain projects may require large amounts of temporary storage. Instead of creating new VMs, expanding the existing disk can be a more efficient solution.
By proactively managing your storage needs and expanding VMware disks as necessary, you can ensure that your virtual environment remains robust, responsive, and ready to meet the evolving demands of your business.
Preparing for Disk Expansion
Before expanding your VMware disk, preparing adequately is essential to ensure a smooth and successful process. Here are some key steps to take:
Backing Up Your Data Before Making Changes
One of the most critical steps before making any changes to your VMware disk is to back up your data. This precaution ensures that you have a restore point in case anything goes wrong during the expansion process. VMware offers various backup solutions to help you create full backups or snapshots of your virtual machines. Having a reliable backup can safeguard your data and minimize downtime if issues arise.
Use a separate disk for each partition
Using separate disks for each guest partition is a good practice when managing virtual machines. This method offers several advantages, particularly when expanding partitions later on. Here’s why:
- Ease of Expansion: When each partition resides on a separate disk, expanding a specific partition becomes more straightforward. Managing and resizing partitions in both Windows and Linux environments is less complex when they are isolated.
- Performance Optimization: Using separate disks can help distribute I/O loads more efficiently, leading to better performance. It prevents a single disk from becoming a bottleneck, especially in high-demand scenarios.
- Simplified Management: Keeping partitions on separate disks simplifies disk management tasks. You can easily identify, resize, and manage partitions without affecting others, reducing the risk of accidental data loss.
- Flexibility: This approach provides greater flexibility in managing disk space. If a particular partition needs to be expanded, it can be done without impacting other partitions or requiring extensive reconfiguration.
- Windows-Specific Issues: In Windows, partitions are often created automatically during installation, and the C: drive (system partition) is not always the last partition on the disk. This setup can make it problematic to increase the size of the C: drive later, especially when other partitions exist on the same disk. Using a separate disk for the C: drive and other partitions can avoid these complications and ensure that expanding the system partition remains straightforward.
- Disaster Recovery: In the event of a disk failure, having partitions on separate disks can aid in quicker recovery. You only need to restore the affected disk rather than deal with a single, larger disk that holds multiple partitions.
By preparing thoroughly and following these best practices, you can ensure a smooth and efficient process when expanding your VMware disk. This preparation protects your data and enhances your virtual environment’s overall performance and manageability.
Guide to increase Vmware disk size disk for Windows
Expanding the disk size of a VM Guest Windows system involves a few key steps, which can be broadly categorized into using vCenter settings to increase the disk size and then verifying and applying the new disk size within the Windows Guest operating system. Here’s a step-by-step guide to help you through the process:
Using Vcenter setting to increase disk size
Log in to vCenter: Open your vCenter client and log in with your administrative credentials.
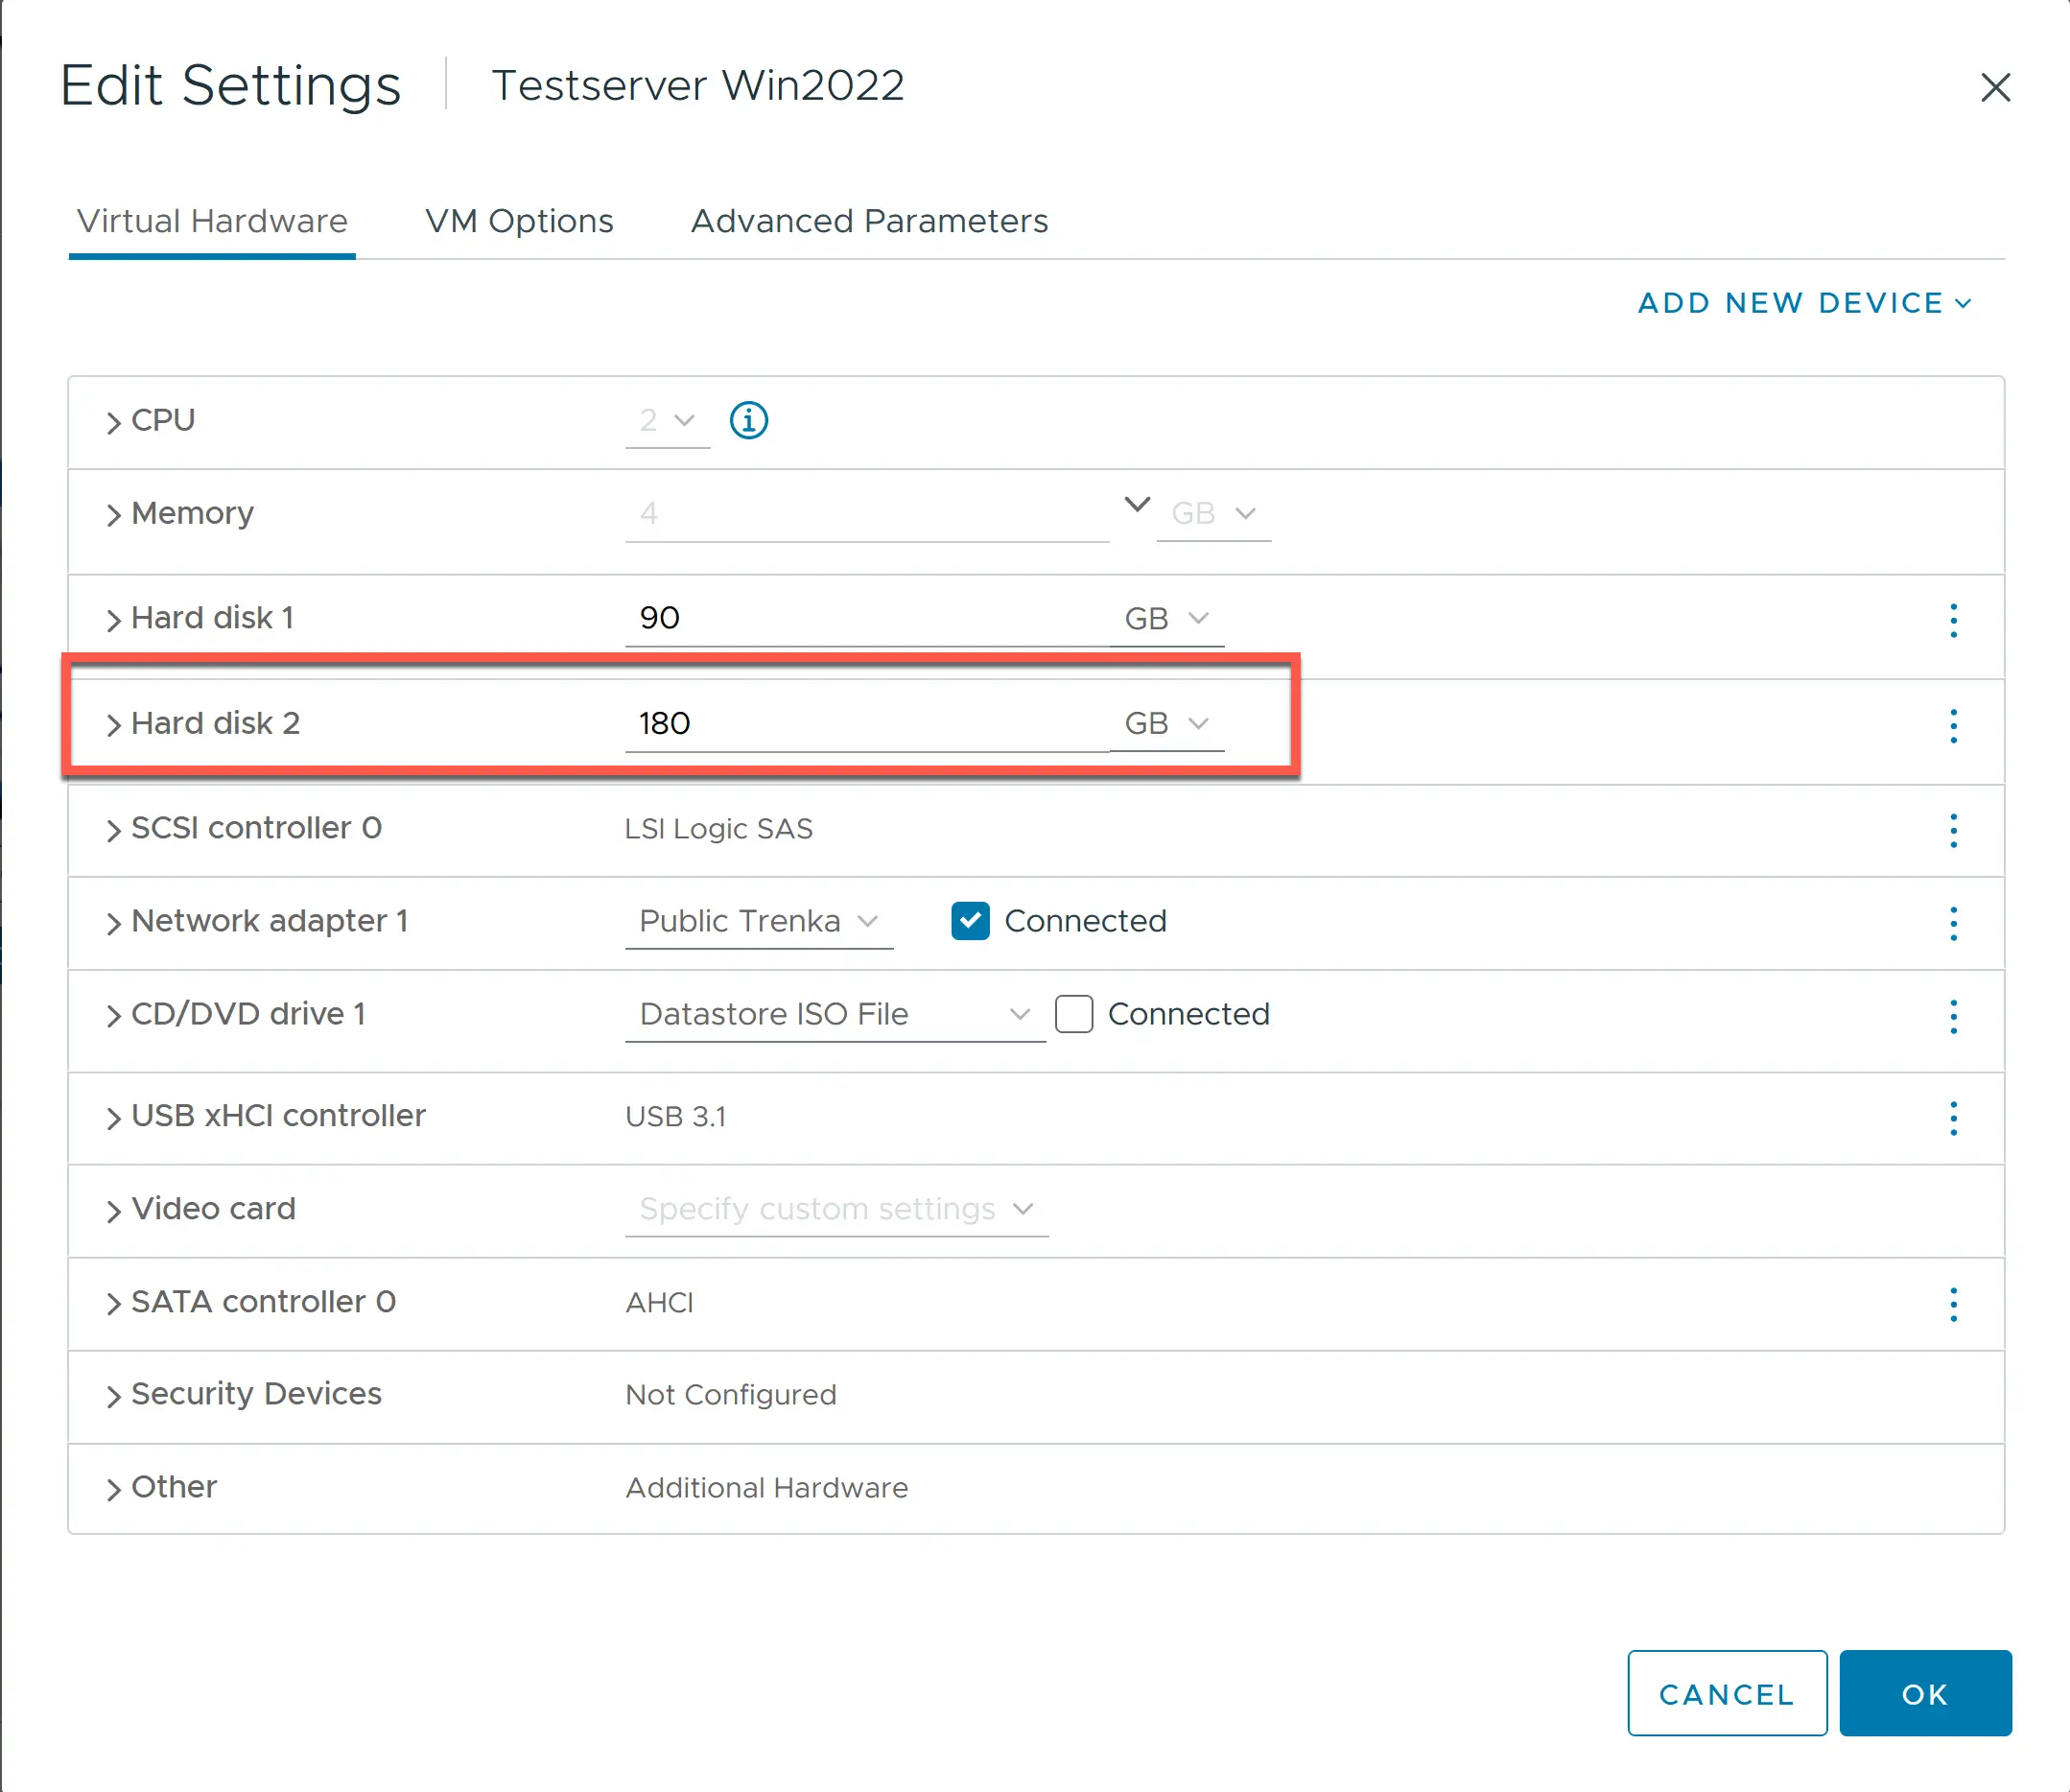
Locate the Virtual Machine: In the vCenter inventory, find the virtual machine whose disk size you need to increase. Right-click on the VM and select Edit Settings.
Modify the Disk Size:
- In the Edit Settings window, find the Hard disk section.
- Select the hard disk you want to resize. In this case we want to increase the Disk size for Hard Drive 2
- In the Provisioned Size field, enter the new disk size, ensuring that it is larger than the current size. For Hard Drive 2 we want to increase the disk size from 180 to 360.
- Click OK to apply the changes.
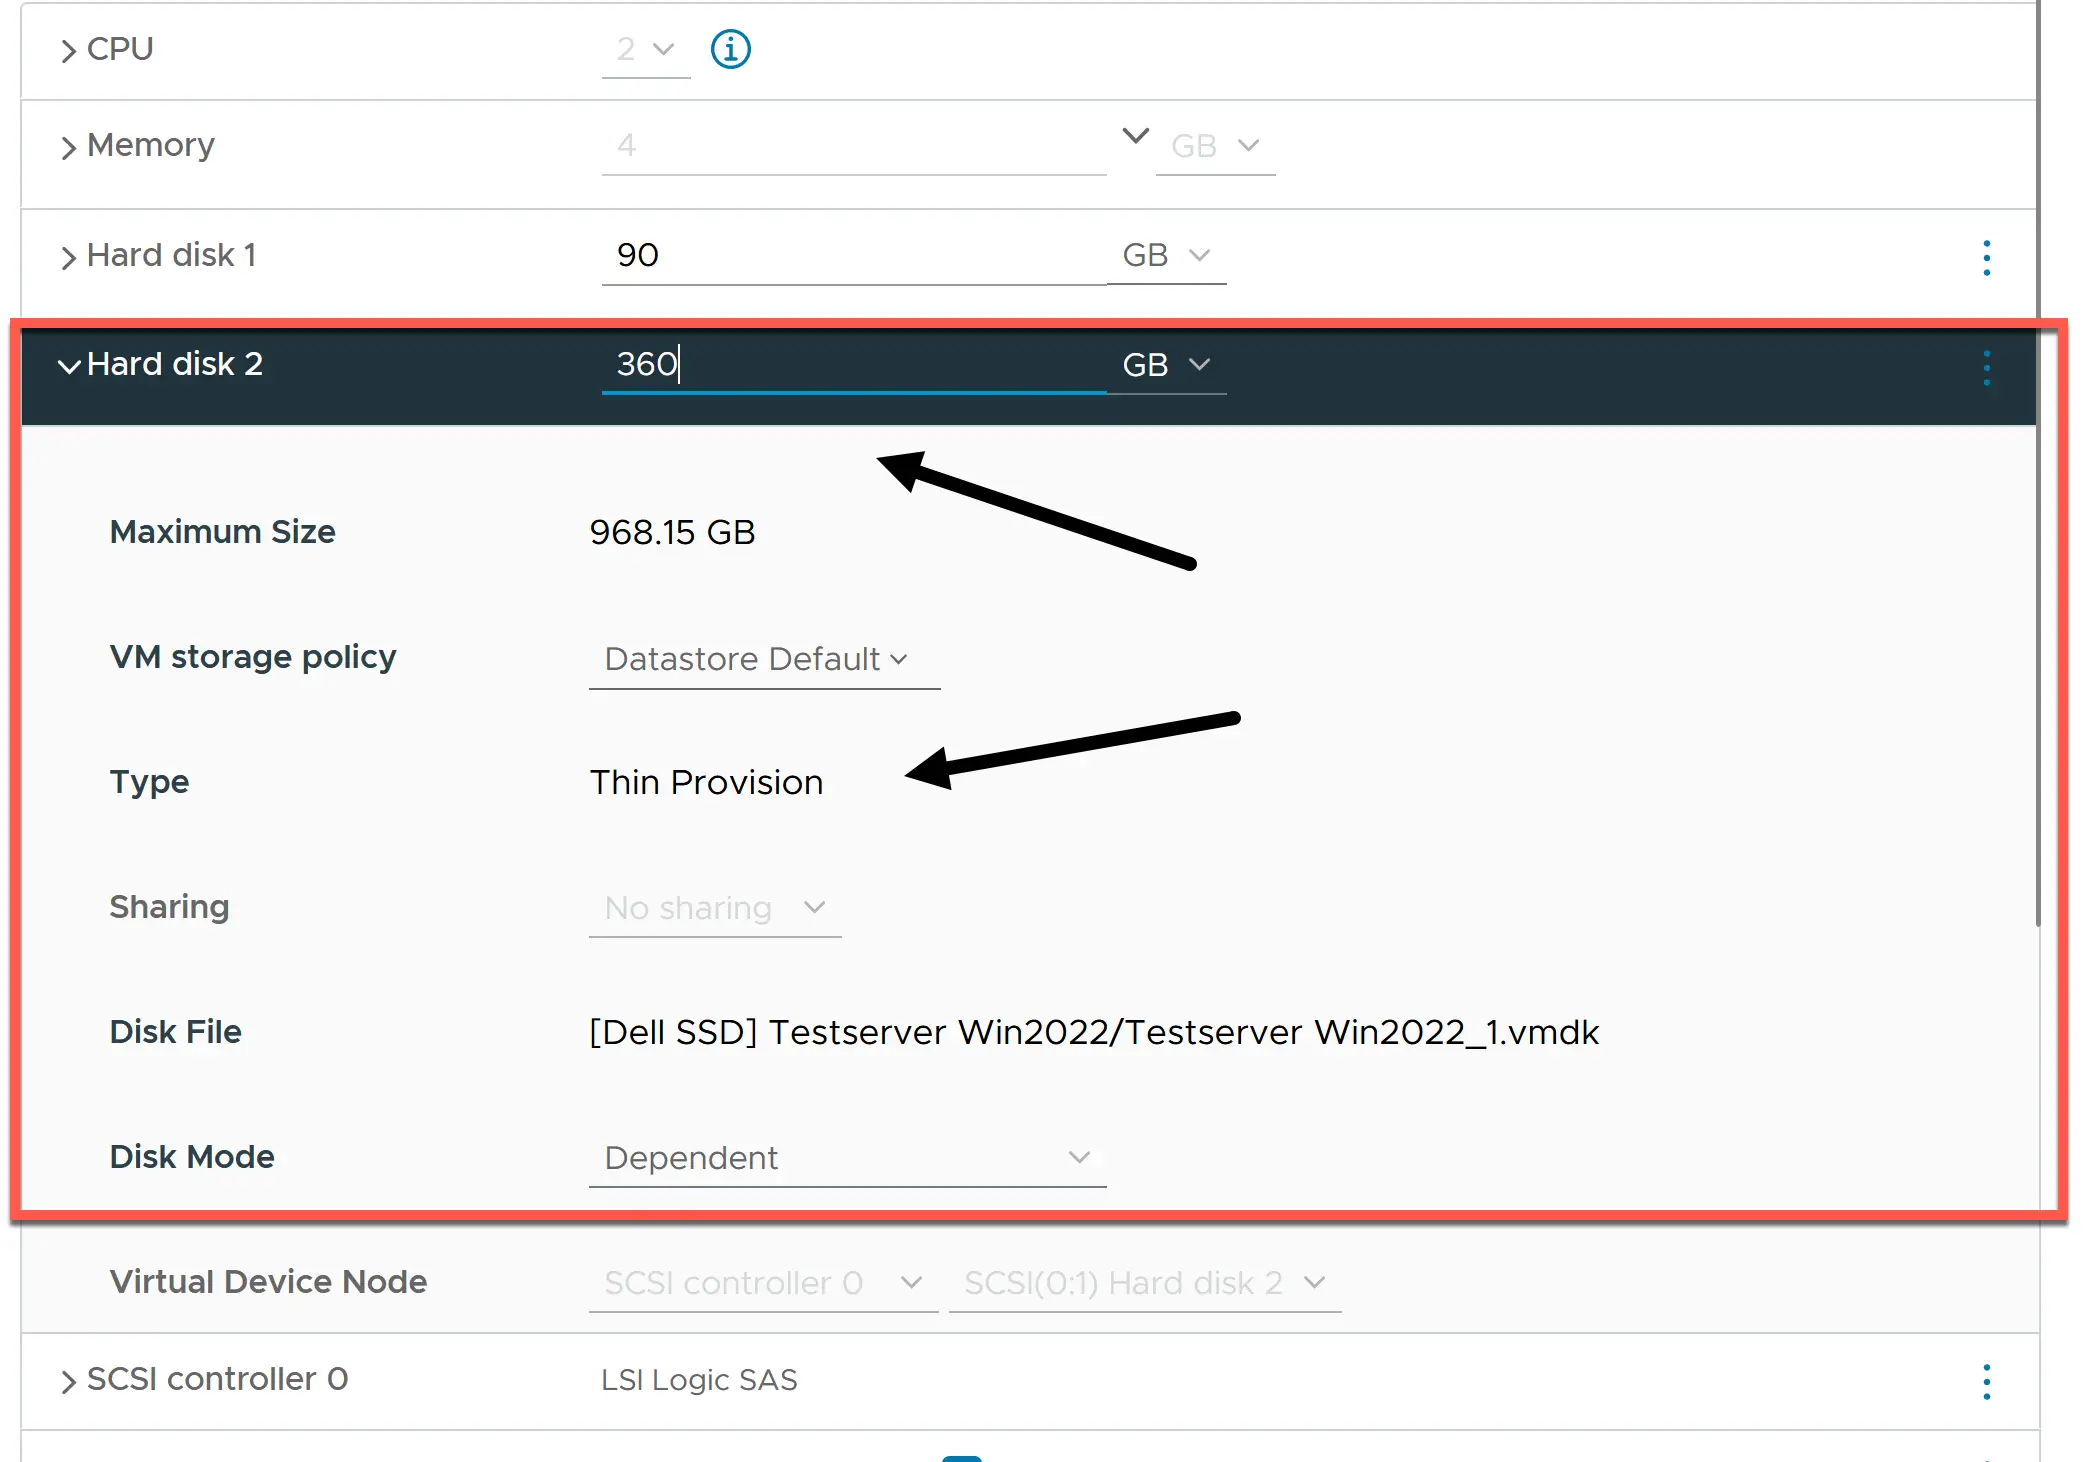
Please note the disk type in this example is Thin Provision. The physical VMDK file will use only the space needed.
Power on the VM: If the VM was powered off during this process, power it back on. The disk size has now been increased at the VMware level, but this change needs to be recognized and applied within the Windows guest OS.
Verifying the new Disk in Windows Guest
- Press Windows + R to open the Run dialog.
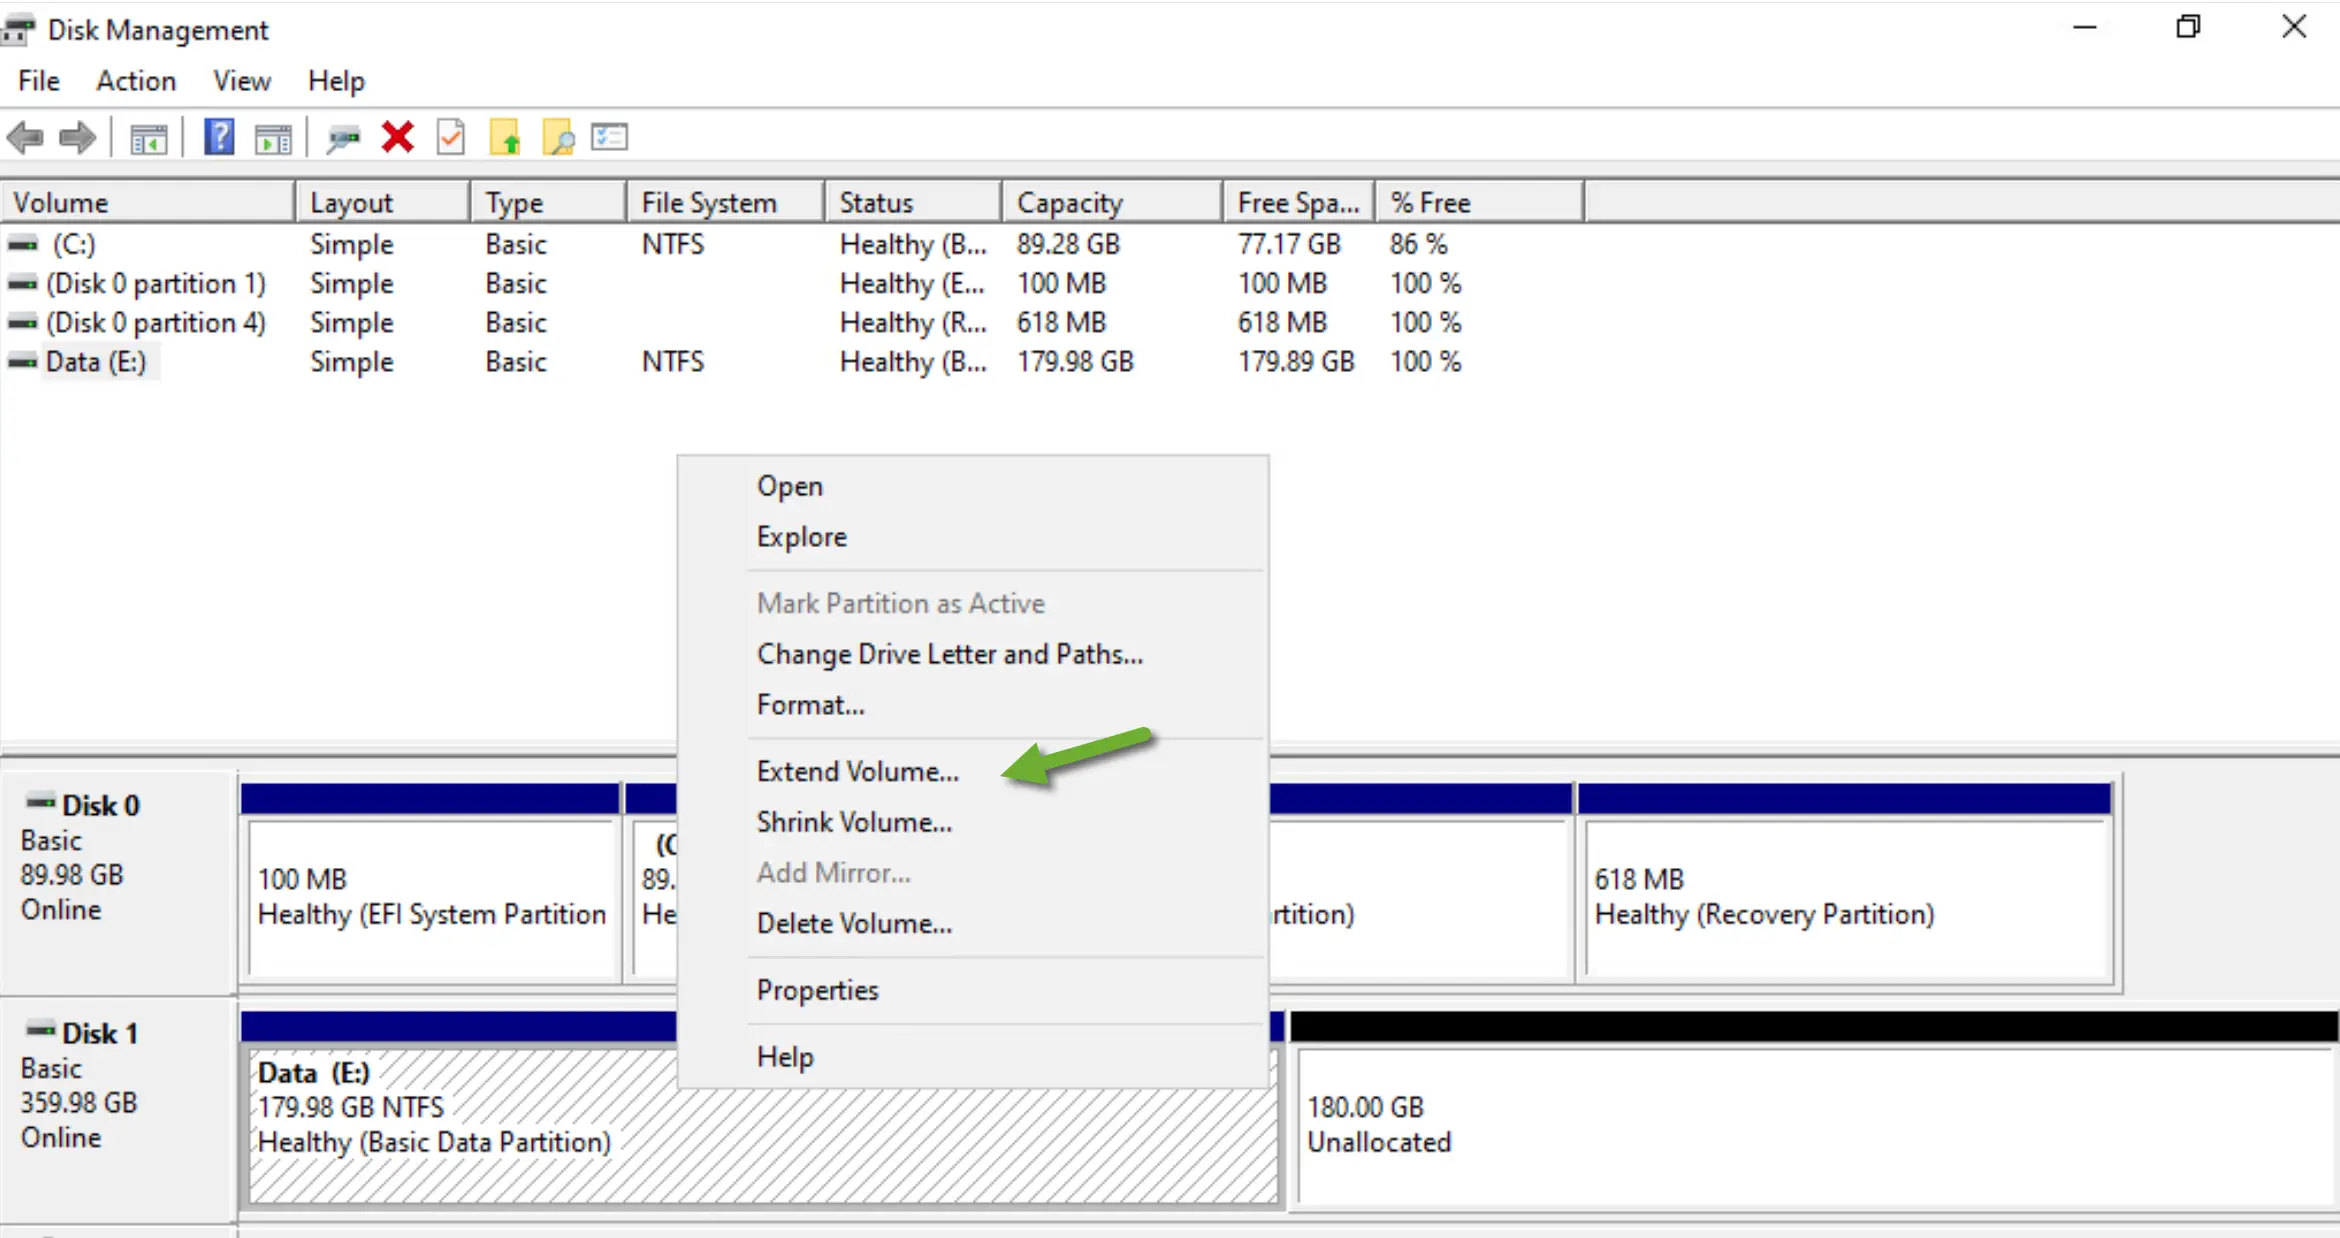
- Type diskmgmt.msc and press Enter. This will open the Disk Management tool.
- In the Disk Management window, Rescan the Disks first
- Select Menu, Action, Rescan Disks, to refresh the disk information.

- Locate the partition you want to extend – in this exampe (see screenshot above) Disk 1 has unallocated space, it’s exact space we increased.
- Right-click on the partition and select Extend Volume.
- The Extend Volume Wizard will open. Click Next.
- Select the amount of space to add to the volume (by default, it will select all available space).
- Click Next, then Finish to apply the changes.
- Once the extension is complete, the partition will show the increased size in the Disk Management window.
- You can also verify the new size by checking the partition properties in File Explorer.
By following these steps, you can successfully resize the disk for a VM Guest Windows system, ensuring that your virtual machine has the necessary storage space to meet its operational demands.
You can use the same procedure to shrink a volume, too.
Guide to increase Vmware disk size disk for Linux
Expanding the disk size of a VM Guest running Ubuntu involves steps similar to those in vCenter as with a Windows VM, but the process within the Linux guest is different. Here’s a detailed guide:
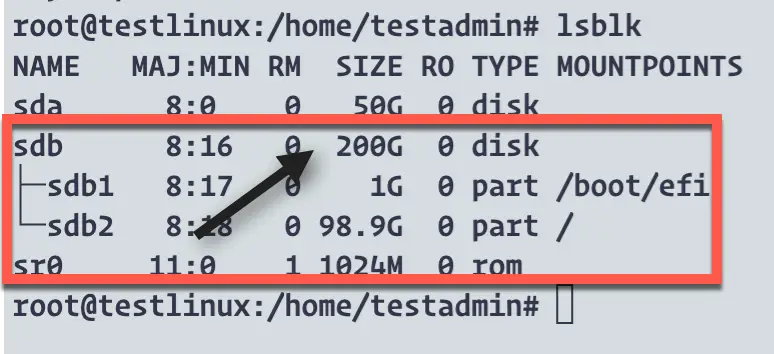
Here is the disk information using the command lsblk before resizing the disk
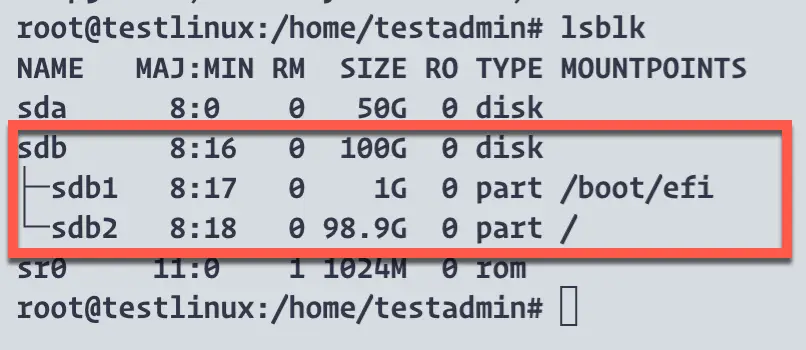
In our case, we want to resize disk sdb from 100GB to 200GB
Using Vcenter settings to resize the disk
The procedure for a Linux guest is the same as that for a Windows Guest, so I will not repeat it.
Verifying the new Disk in Linux Guest
I’m using Ubuntu 24.04 Server to show you how to resize a disk in Linux
- Log in to Ubuntu: Log in to the Ubuntu guest operating system with sudo right.
- Open a terminal window.
- Run the command
sudo partprobeTo notify the operating system of partition table changes. Sometimes it is necessary to rescan the SCSI bus. If possible, I recommend a quick reboot of the VM - Use the
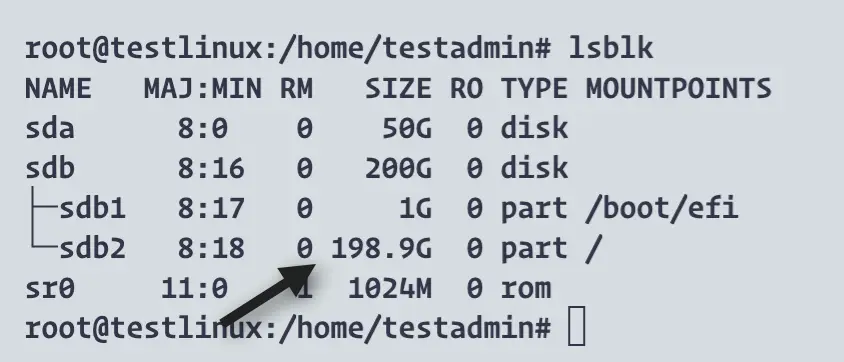
lsblkcommand to list the block devices and check the new disk size.
In the screenshot above we see sdb has a new disk size 200G.
- Identify the partition you want to resize (e.g.,
/dev/sdb2).in our example - Use
growpartTo resize the partition:
sudo growpart /dev/sdb 2- Here,
/dev/sdbis the disk, and 2 Is the partition number. - After resizing the partition, you must resize the filesystem to use the new space. For an ext4 filesystem, use:
sudo resize2fs /dev/sdb2- For other filesystems like XFS, you would use:
sudo xfs_growfs /dev/sdb2- Check the new size of the partition by running:
lsblk- Ensure that the filesystem now reflects the increased size.
Following these steps, you can resize the disk for a VM Guest running Ubuntu to ensure your virtual machine has the necessary storage space to meet its operational demands.
Advanced Considerations
When expanding disk sizes in a VMware environment, there are advanced considerations to keep in mind to ensure a smooth and efficient process. Properly addressing potential issues and utilizing powerful tools like GParted can help you manage your disk partitions effectively in both Windows and Linux environments.
Addressing Potential Issues During Expansion
Expanding disk sizes is generally straightforward, but several issues can arise. Being aware of these potential problems can help you troubleshoot effectively.
- Symptom: After increasing the disk size in vCenter, the guest OS does not recognize the new size.
- Solution: Ensure you have rescanned the SCSI bus using:
echo 1 | sudo tee /sys/class/scsi_device/*/device/rescan- Verify the disk size with
lsblkandfdisk -lin Linux, or use Disk Management in Windows. - Symptom: Errors or warnings about partition overlap or misalignment.
- Solution: When using
fdiskin Linux or Disk Management in Windows, carefully note the start sector of existing partitions. When recreating partitions, ensure the start sector matches exactly to avoid overlap. - Symptom: Filesystem errors after resizing partitions.
- Solution: Before resizing, always back up your data. Use filesystem-specific tools to check and repair filesystems:
- For ext4 in Linux:
sudo e2fsck -f /dev/sdb1- For XFS in Linux:
sudo xfs_repair /dev/sdb1- For NTFS in Windows, use the
chkdskUtility:
cmd
chkdsk C: /f- Symptom: Changes to the partition table are not recognized by the kernel.
- Solution: Use
partprobein Linux to inform the kernel of partition table changes:
sudo partprobeUse GParted to Arrange the Partition
GParted is a powerful graphical tool for managing disk partitions. It provides a user-friendly interface for handling complex disk management tasks. For more flexibility, it is available as a GUI application and also as a live CD.
- If not already installed, install GParted using the following command:
sudo apt-get install gparted- Open GParted with root privileges:
sudo gparted- In GParted, select the disk you want to manage (e.g.,
/dev/sdb). - Right-click on the partition you want to resize (e.g.,
/dev/sdb1) and select Resize/Move. - In the resize window, adjust the size by dragging the slider or entering the new size manually.
- Click Resize/Move to apply the changes.
- Once all desired changes are made, click the green checkmark button to apply all operations.
- Review the pending operations and click Apply to confirm.
- After GParted completes the operations, verify the changes in the terminal (Linux):
sudo lsblk
sudo df -h- In Windows, use Disk Management to verify the new partition size.
Using GParted Live CD
You can use the GParted Live CD for more complex scenarios or if you cannot install GParted on your system. This is particularly useful when dealing with system partitions or when the OS cannot handle partition resizing due to being in use.
- Download the GParted Live CD ISO from the official GParted website.
- Burn the ISO to a CD or create a bootable USB drive using tools like Rufus or UNetbootin.
- Insert the CD or USB drive and boot from it. You may need to change the boot order in your BIOS or UEFI settings.
- Once booted, GParted will start automatically. To resize or rearrange your partitions, follow the same steps mentioned above.
Using GParted simplifies arranging and resizing partitions, providing a visual interface that reduces the risk of errors. It’s particularly useful for complex partitioning tasks and helps ensure that all changes are accurately applied.
Leveraging Tools and Resources
Helpful Software for Monitoring Disk Space
Keeping track of disk space usage is crucial for maintaining the performance and efficiency of your virtual machines. Here are two free software options that can help you monitor disk space effectively:
1. WinDirStat (Windows Directory Statistics)
Platform: Windows
Description: WinDirStat is a free disk usage statistics viewer and cleanup tool for Windows. It provides a visual representation of disk usage through treemaps, making it easy to see which files and directories are consuming the most space. It also offers the ability to clean up unwanted files directly from the interface.
Features:
- Visual treemaps for disk usage.
- Detailed statistics for each directory and file.
- Cleanup options to remove unnecessary files.
- Easy navigation and user-friendly interface.
Website: WinDirStat
2. ncdu (NCurses Disk Usage)
Platform: Linux
Description: ncdu is a disk usage analyzer with an ncurses interface, designed to find space hogs on a remote server where you don’t have an entire graphical setup available. It provides a fast and easy-to-navigate interface for identifying large files and directories, making it ideal for use on Linux servers and desktops.
Features:
- Lightweight and fast disk usage analyzer.
- User-friendly ncurses interface for easy navigation.
- Detailed breakdown of disk usage by directory.
- Easy to install and run on any Linux system.
Installation:
Website: ncdu GitHub
These tools are both highly effective for monitoring disk space and providing clear and actionable insights into your disk usage. By regularly using these tools, you can proactively manage your disk space, avoid running out of storage, and maintain optimal system performance.
FAQ
I’d love to hear from you — was this article helpful? Share your thoughts in the comments below. If you prefer, you can also reach me by email or connect with me on Reddit at Navigatetech.
Before you go …
Before you go, if you’re interested in exploring alternatives to VMware, you might want to check out Proxmox vs. ESXi. This comparison will give you a detailed overview of the strengths and weaknesses of both platforms, helping you make an informed decision for your virtualization needs. Understanding these differences can be crucial for optimizing your infrastructure. Happy reading!
About the author
Hi, I’m Edy Werder. I write hands-on guides about Proxmox, homelab servers, NAS, and WordPress, based on real setups I run and document.
No sponsors, no fluff—just real configs and results.
Enjoying the content?
