
By Edy Werder — IT Consultant & Tech Blogger
How do I upload an ISO to Proxmox—and where is the Proxmox ISO location?
This Proxmox upload ISO guide shows both methods: the web GUI for quick uploads and the command line for fast, reliable transfers. I’ll point you to exactly where ISO files are stored (the proxmox iso location), explain how Proxmox handles ISO storage, and share simple ways to manage ISO storage cleanly.
Who is this for?
Anyone getting started with Proxmox or spinning up a new virtual machine who wants a clear, repeatable workflow.
Before uploading anything, it’s useful to know where ISO files are stored. By default, Proxmox stores ISO images in this directory:
/var/lib/vz/template/iso/This is the ISO location used when you upload files via the web GUI. If you have multiple storage locations defined in your Proxmox setup, you can also store ISO files in other storage pools like ZFS or NFS-based storage—just make sure it’s marked as “ISO image” compatible in the storage configuration.

This is the easiest method and recommended for most users.

Note: Uploading an ISO file can take some time, especially if it’s large or your network connection is slow. For example, a 2GB ISO on a slow Wi-Fi connection might take several minutes.
Important: The web interface currently allows uploading one ISO file at a time. If you want to upload multiple ISOs in bulk, you’ll need to use an FTP client or the command line method (see below).
Size Limit Tip: Some Proxmox setups may impose a default upload size limit (~2 GB). This can be changed by editing the pveproxy settings in /etc/default/pveproxy and increasing MAX_BODY_SIZE.
Tip: If you run into problems uploading an ISO—such as failed uploads or disappearing files—it’s often due to storage space issues or misconfigured storage. Here’s a helpful forum thread where a user resolved such a problem
If you’d prefer to avoid the parts hunt, here are reliable, power-efficient servers for Proxmox that I recommend—quiet (ish) and tested in battle. Choose your region below.
| Brand | Model | Buy in US | Buy in UK | Kaufe in Deutschland |
|---|---|---|---|---|
| Dell | Poweredge R710 | View on Amazon | View on Amazon | Gehe zu Amazon |
| Dell | Poweredge R630 | View on Amazon | View on Amazon | Gehe zu Amazon |
| HPE | ProLiant DL360 Gen10 | View on Amazon | View on Amazon | Gehe zu Amazon |
| HPE | Proliant DL380 Gen 9 | View on Amazon | View on Amazon | Gehe zu Amazon |
| HPE | Proliant ML350 Gen10 | View on Amazon | View on Amazon | Gehe zu Amazon |
| Supermicro | E300 | View on Amazon | View on Amazon | Gehe zu Amazon |
If you prefer working in the terminal or want to automate the process, you can upload ISO files using scp or rsync.
From your local machine:
scp /path/to/your.iso root@your-proxmox-ip:/var/lib/vz/template/iso/You’ll be prompted for the Proxmox root password. Once transferred, the ISO will appear in the web interface under the appropriate storage.
rsync -avz /path/to/your.iso root@your-proxmox-ip:/var/lib/vz/template/iso/You can also script this method to upload multiple ISOs in one go.
Once the ISO image is uploaded, it becomes available when you create a new virtual machine in Proxmox.
During the VM creation wizard:
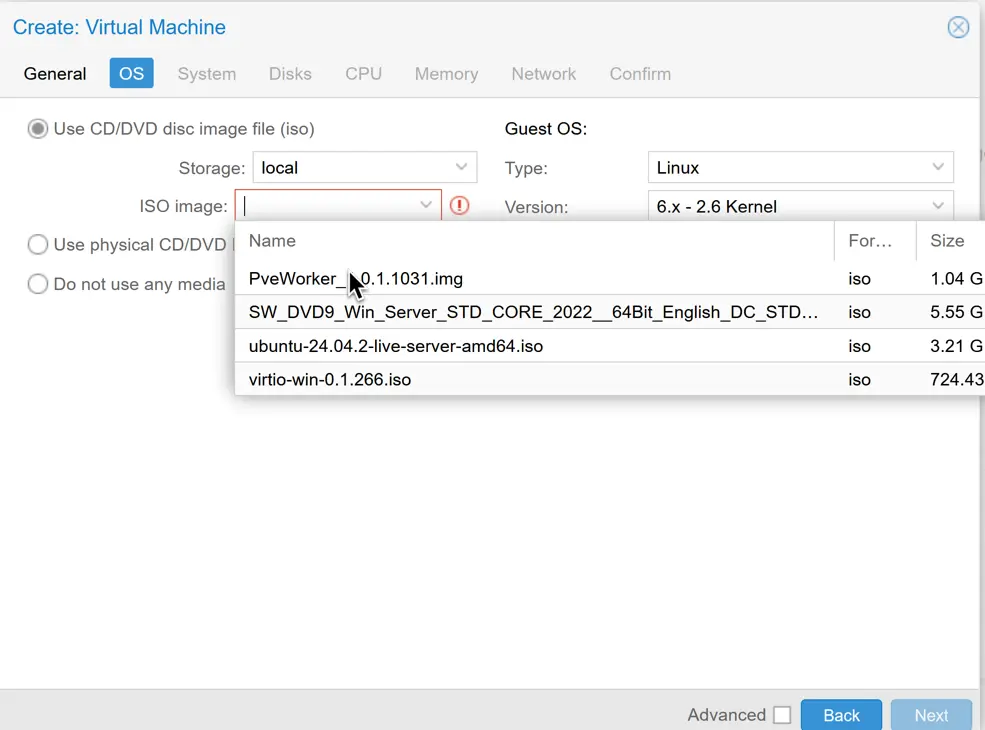
That’s it—your ISO is ready to be used for deploying the operating system on your virtual machine.
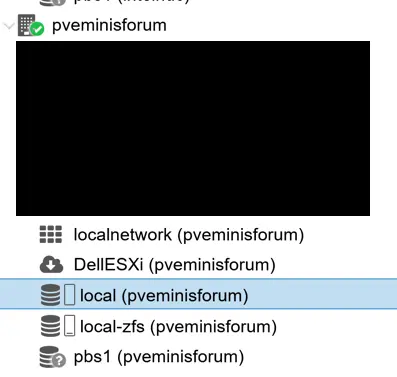
If you want to organize ISO files or use a dedicated disk or NFS share, you can add another storage location.
The new storage will now show up under your node and will accept ISO uploads.
Important: ISO images uploaded to local storage are only available on that specific node. If you’re working with a Proxmox cluster and want to access the same ISO images from multiple nodes, you’ll need to add the storage using a shared backend like NFS, Ceph, or iSCSI—so that all nodes can access the same files.

Uploading ISOs in Proxmox is simple once you know where the files go and which method suits your workflow. For quick uploads, I stick with the GUI. For bulk or scripted setups, command line tools like scp or rsync are my go-to.
If you’re working with Proxmox often, keeping your ISO library organized and backed up is a good habit—especially when dealing with custom or older OS installers.
Got any Proxmox ISO tips of your own? Let me know in the comments or on my subreddit r/navigatetech.
Before you go, if you’ve just finished uploading an ISO to Proxmox and are ready to put it to use, I recommend checking out how to install Nextcloud on Proxmox with Ubuntu. This guide walks you through setting up a secure and private cloud solution using the ISO you’ve uploaded, making it a perfect next step.
Hi, I’m Edy Werder. I write hands-on guides about Proxmox, homelab servers, NAS, and WordPress, based on real setups I run and document.
No sponsors, no fluff—just real configs and results.
Enjoying the content?
