By Edy Werder — IT Consultant & Tech Blogger
Did you know I can do more than store data with my Synology NAS? It offers a powerful DNS server package for free. This feature speeds up my internet and lets me access all my internal devices by name. No more trying to remember or deal with IP address changes.
Join me as I set up my Synology NAS to become a master DNS server.
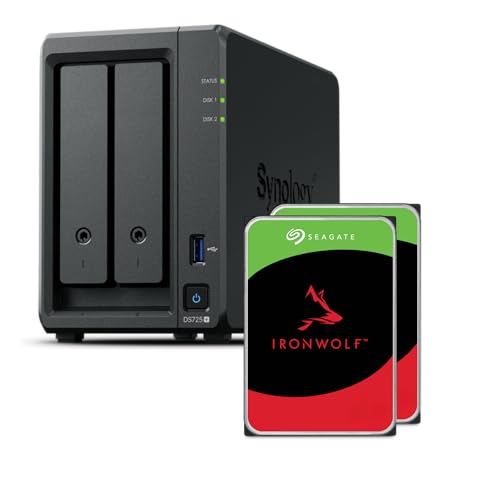
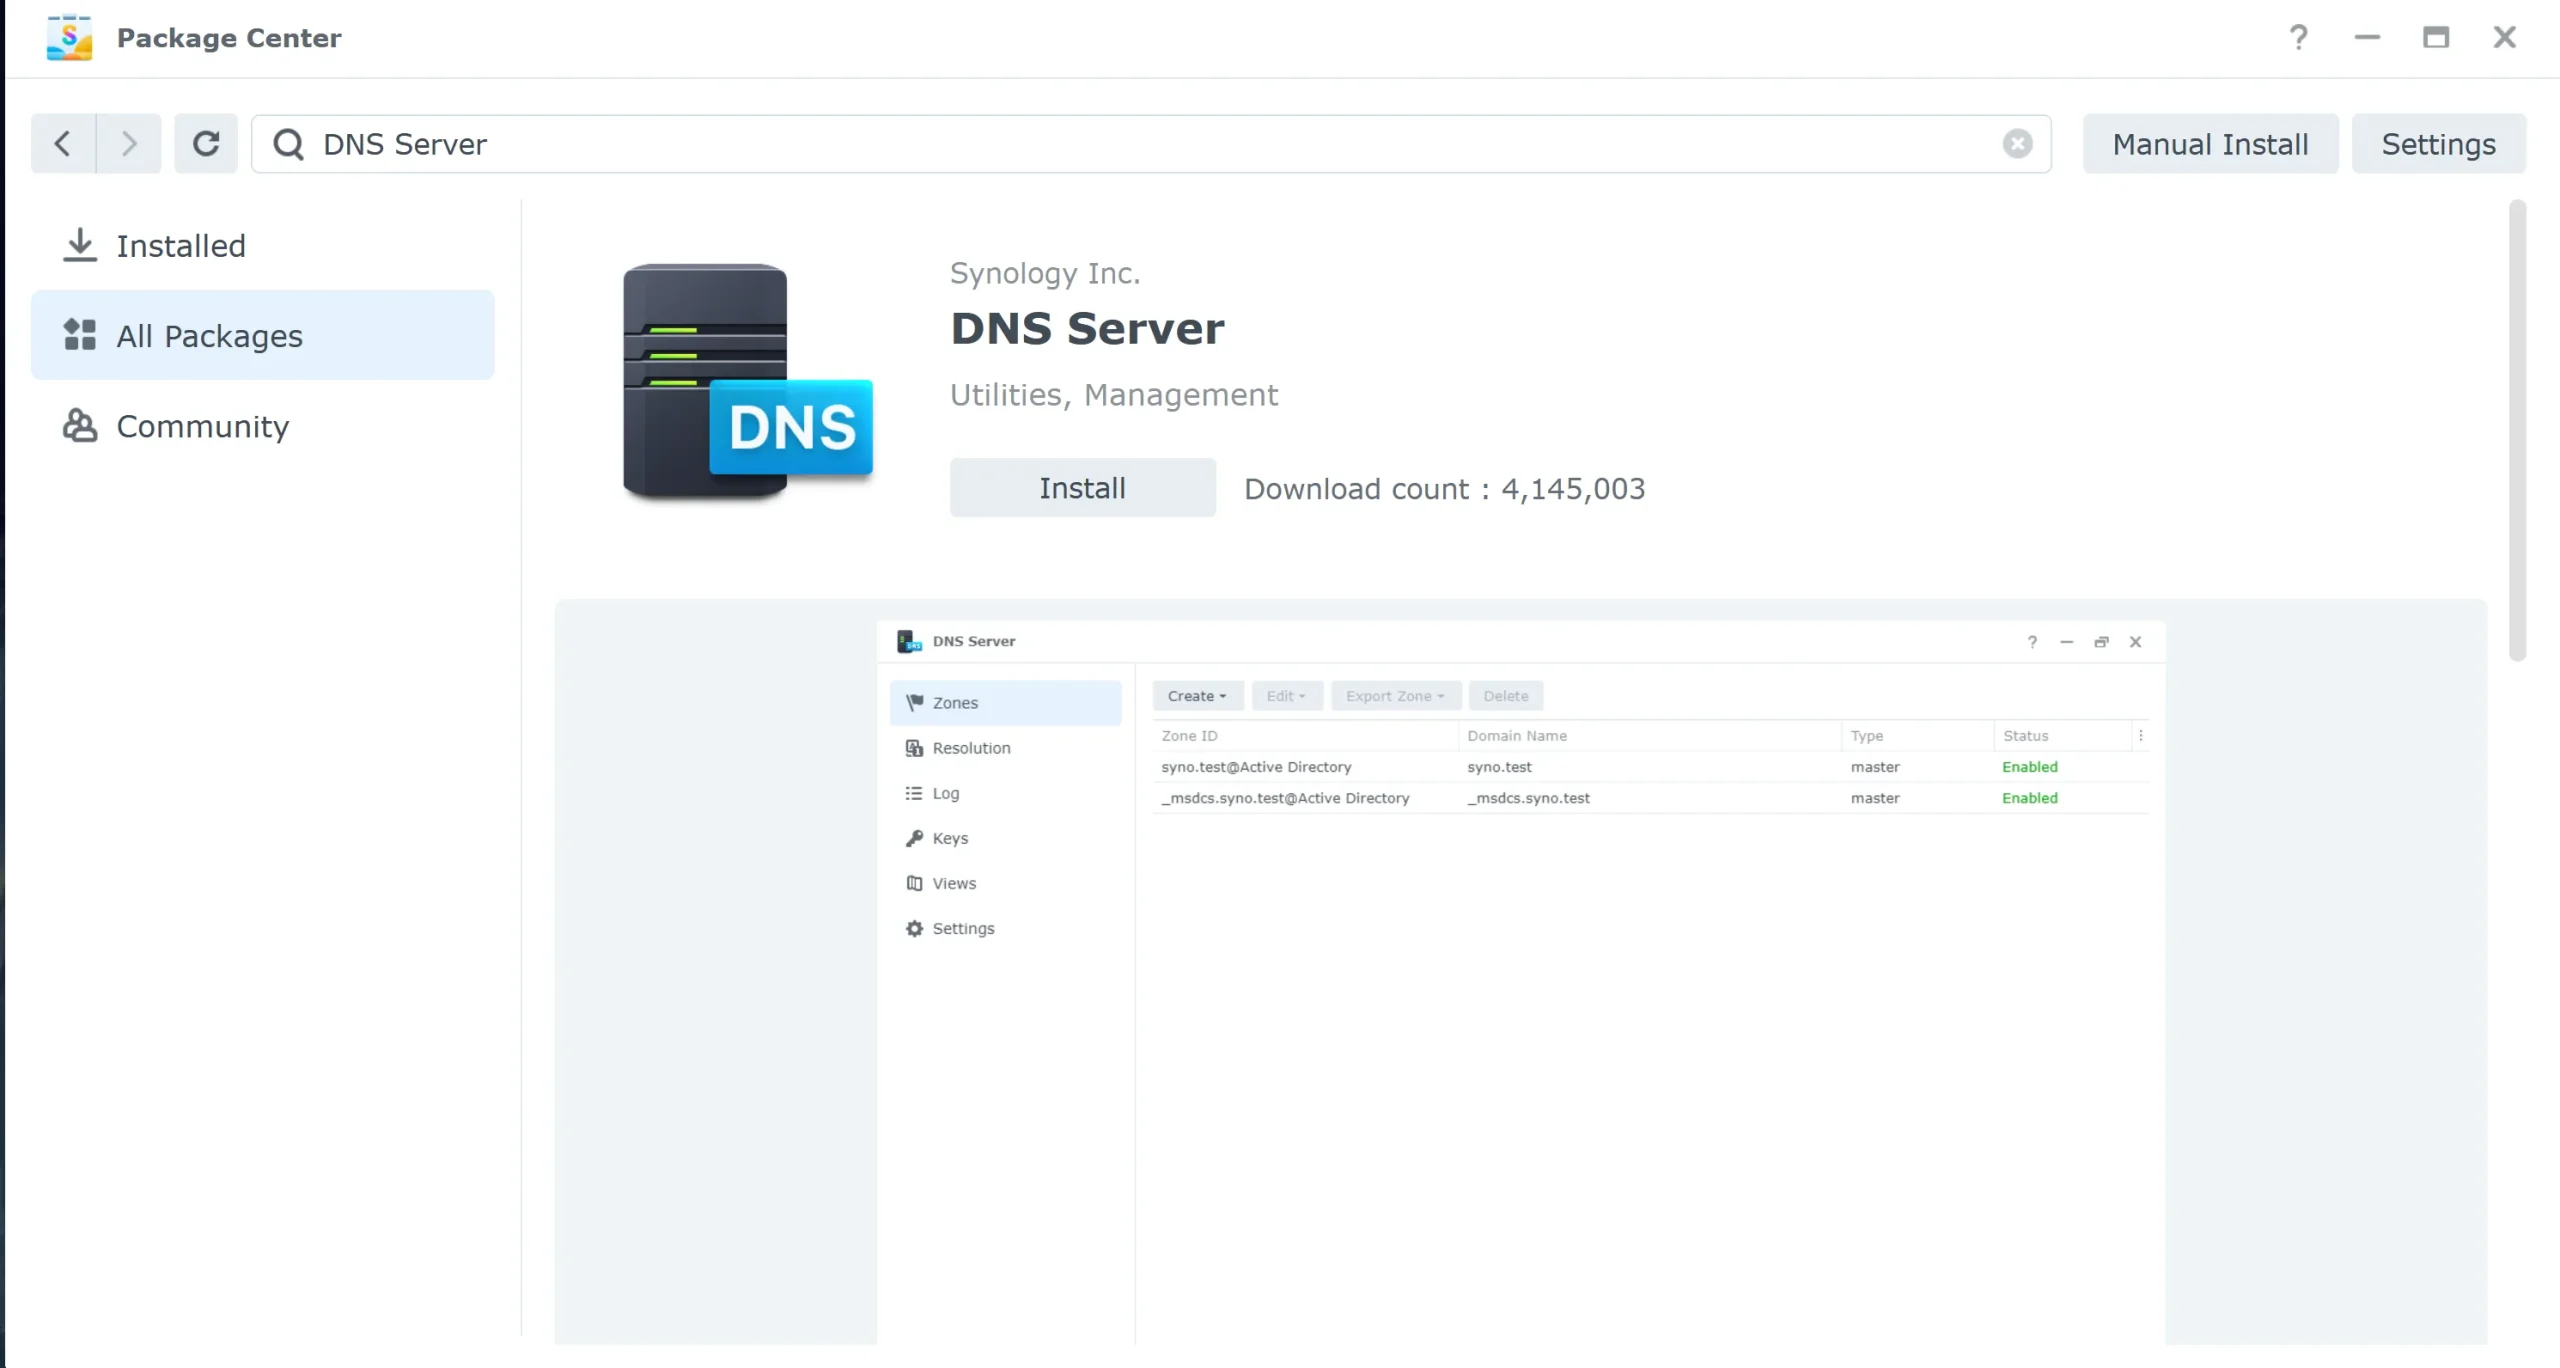
The Synology DNS Server is a free package you install from the DSM Package Center. It turns your NAS into a local DNS server, translating domain names into IP addresses for every device on your network. It handles forward zones (name-to-IP) and supports DNS forwarding to external resolvers such as Cloudflare or Google for anything outside your local network.
DNS queries remain within your network, improving privacy and potentially reducing latency. You need a Synology NAS running DSM, a static local IP for the NAS, and about 10 minutes.
When I first explored my Synology NAS, I discovered a game-changer for my home network: the Synology DNS Server. This tool was a revelation, promising to simplify how I connect to my devices at home or in my small business.”
To get started, let’s break down what DNS means. DNS stands for Domain Name System. It’s like the phonebook of the internet, translating website names we understand, like google.com, into IP addresses that computers use to identify each other. But DNS domains aren’t just for the internet. Inside my local network, DNS helps me access devices like my computer, printer, or NAS by name instead of by complex IP addresses. This simplicity was exactly what I needed.
Most ISP routers do not let you change DNS settings at all. You get what they give you, and that is it.
Running the DNS Server package on my Synology NAS solves that. It is free, it runs on hardware I already own, and it gives me full control over my local zones. I can assign friendly hostnames to every device on my network, use a privacy-focused resolver like Cloudflare for external queries, and block specific domains network-wide without installing anything extra.
The practical difference is noticeable. I access my NAS, my home server, and my printer by name instead of remembering IP addresses that change. Any device on the network gets that automatically once you point your router’s DHCP to the Synology
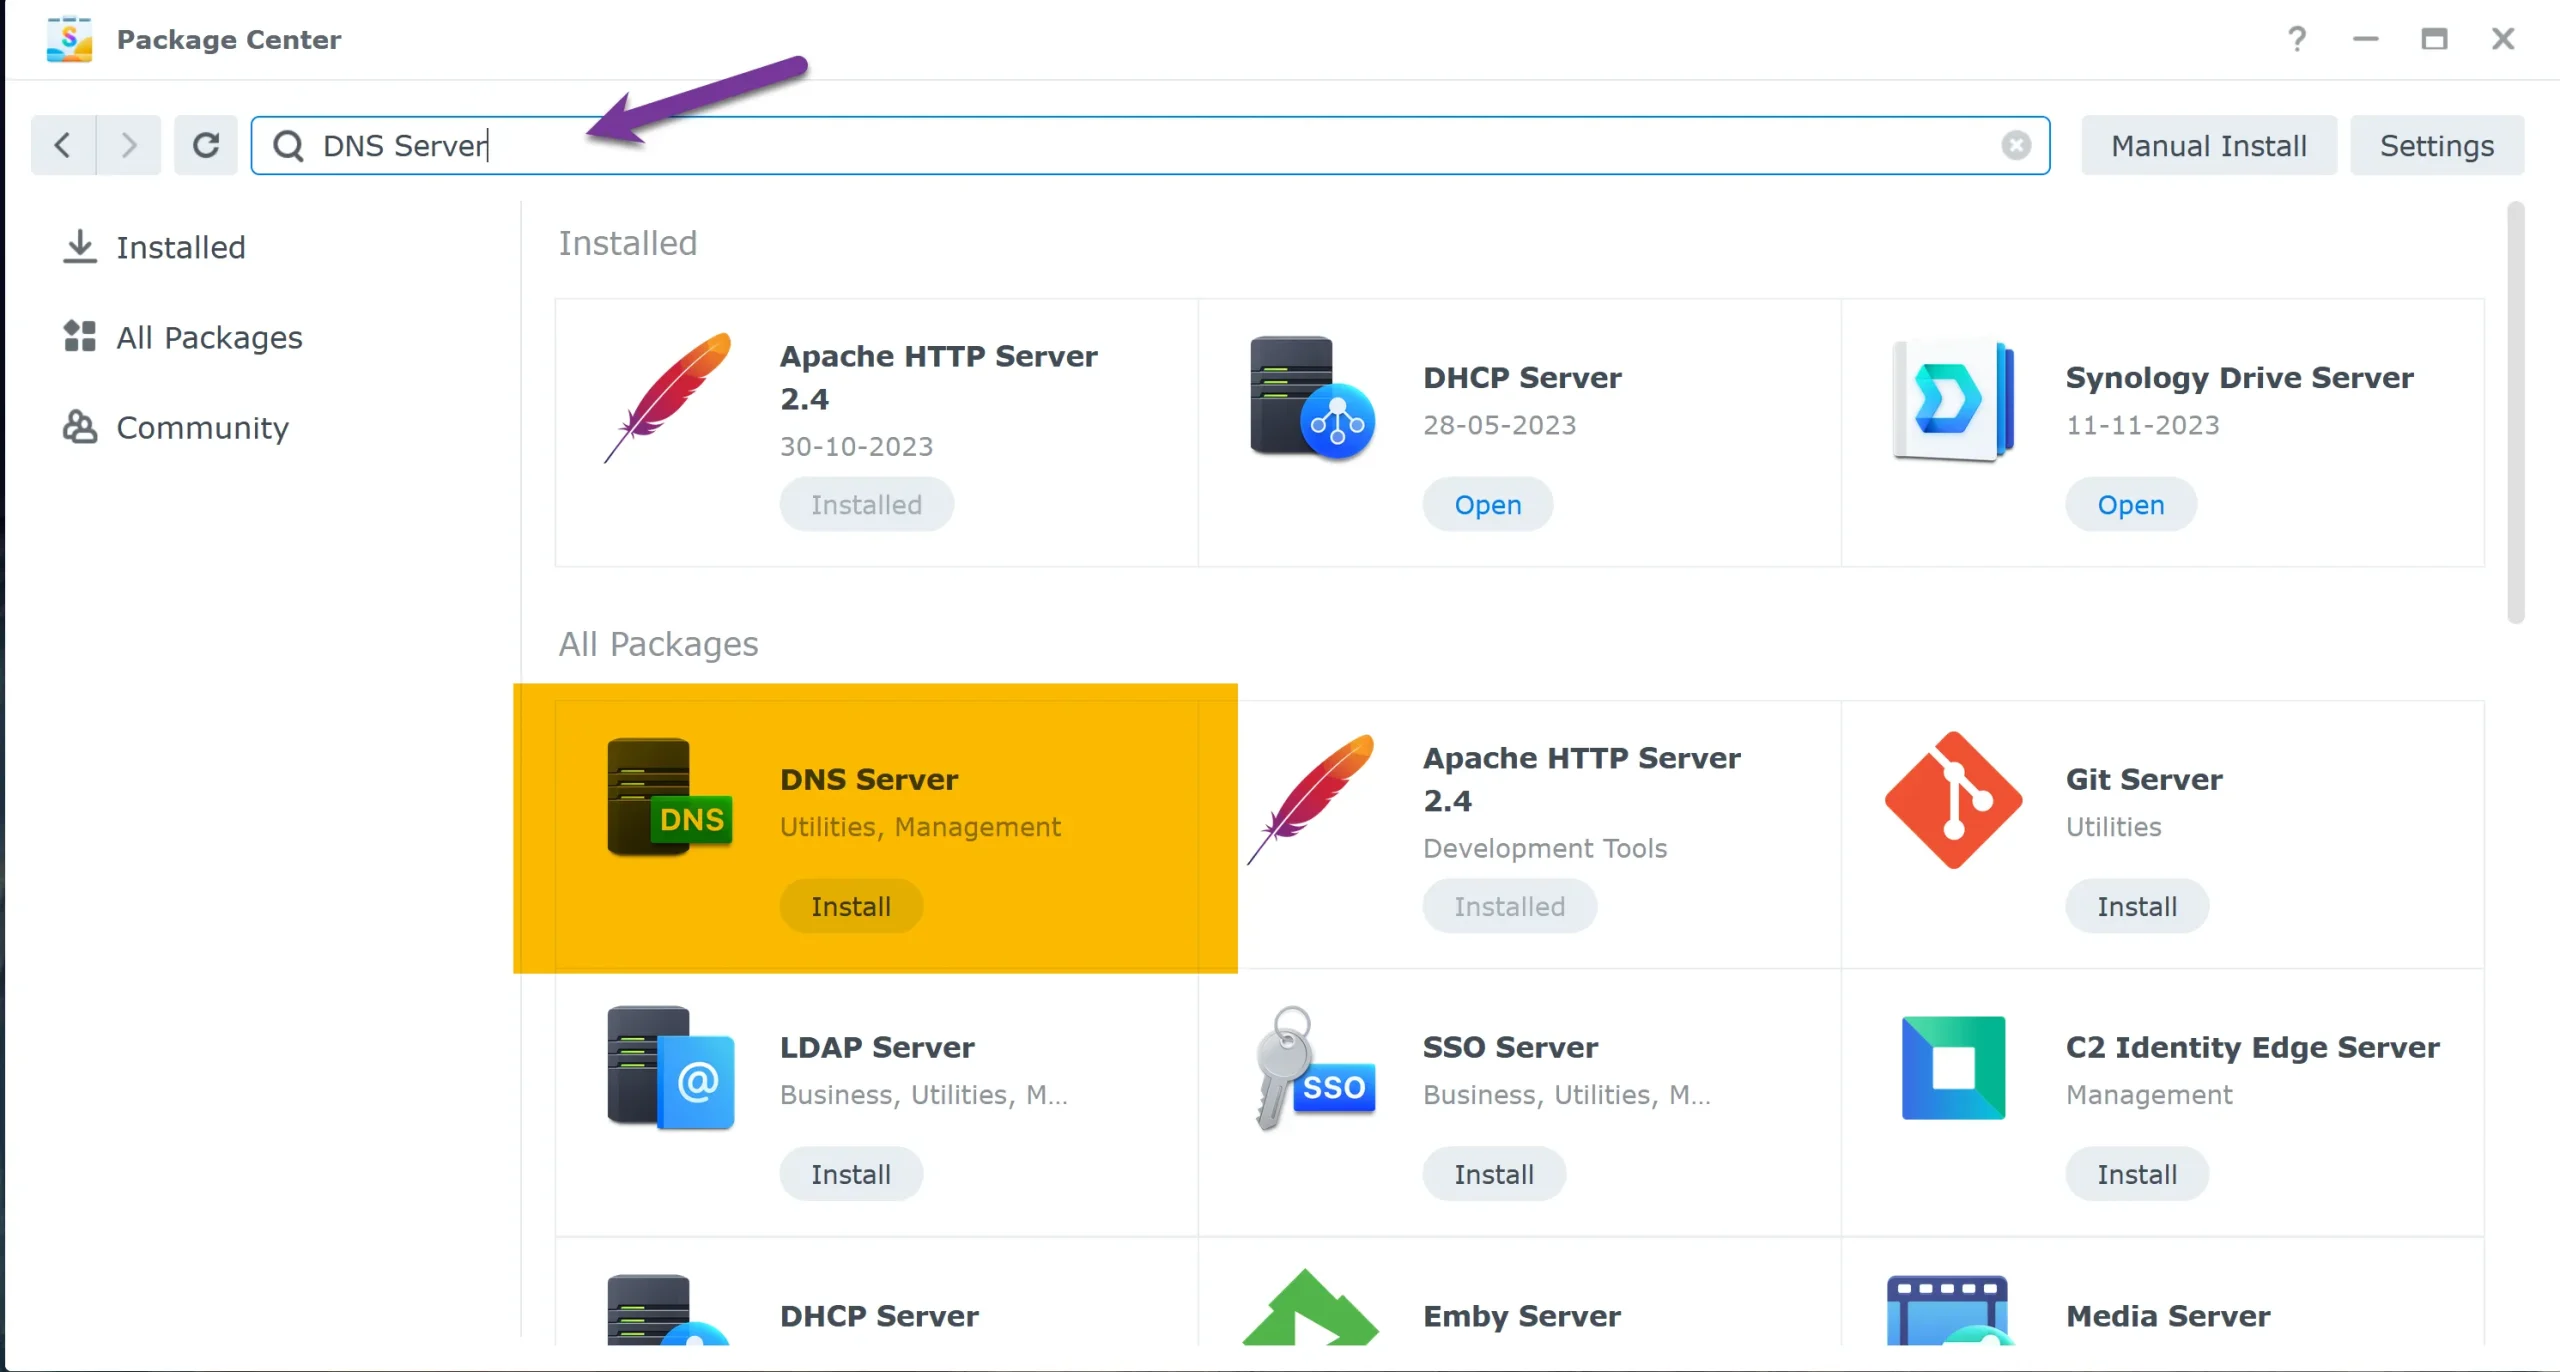
Getting your Synology DNS Server up and running involves two main steps: installing the DNS package and then setting up zones and records. Here’s how I did it:
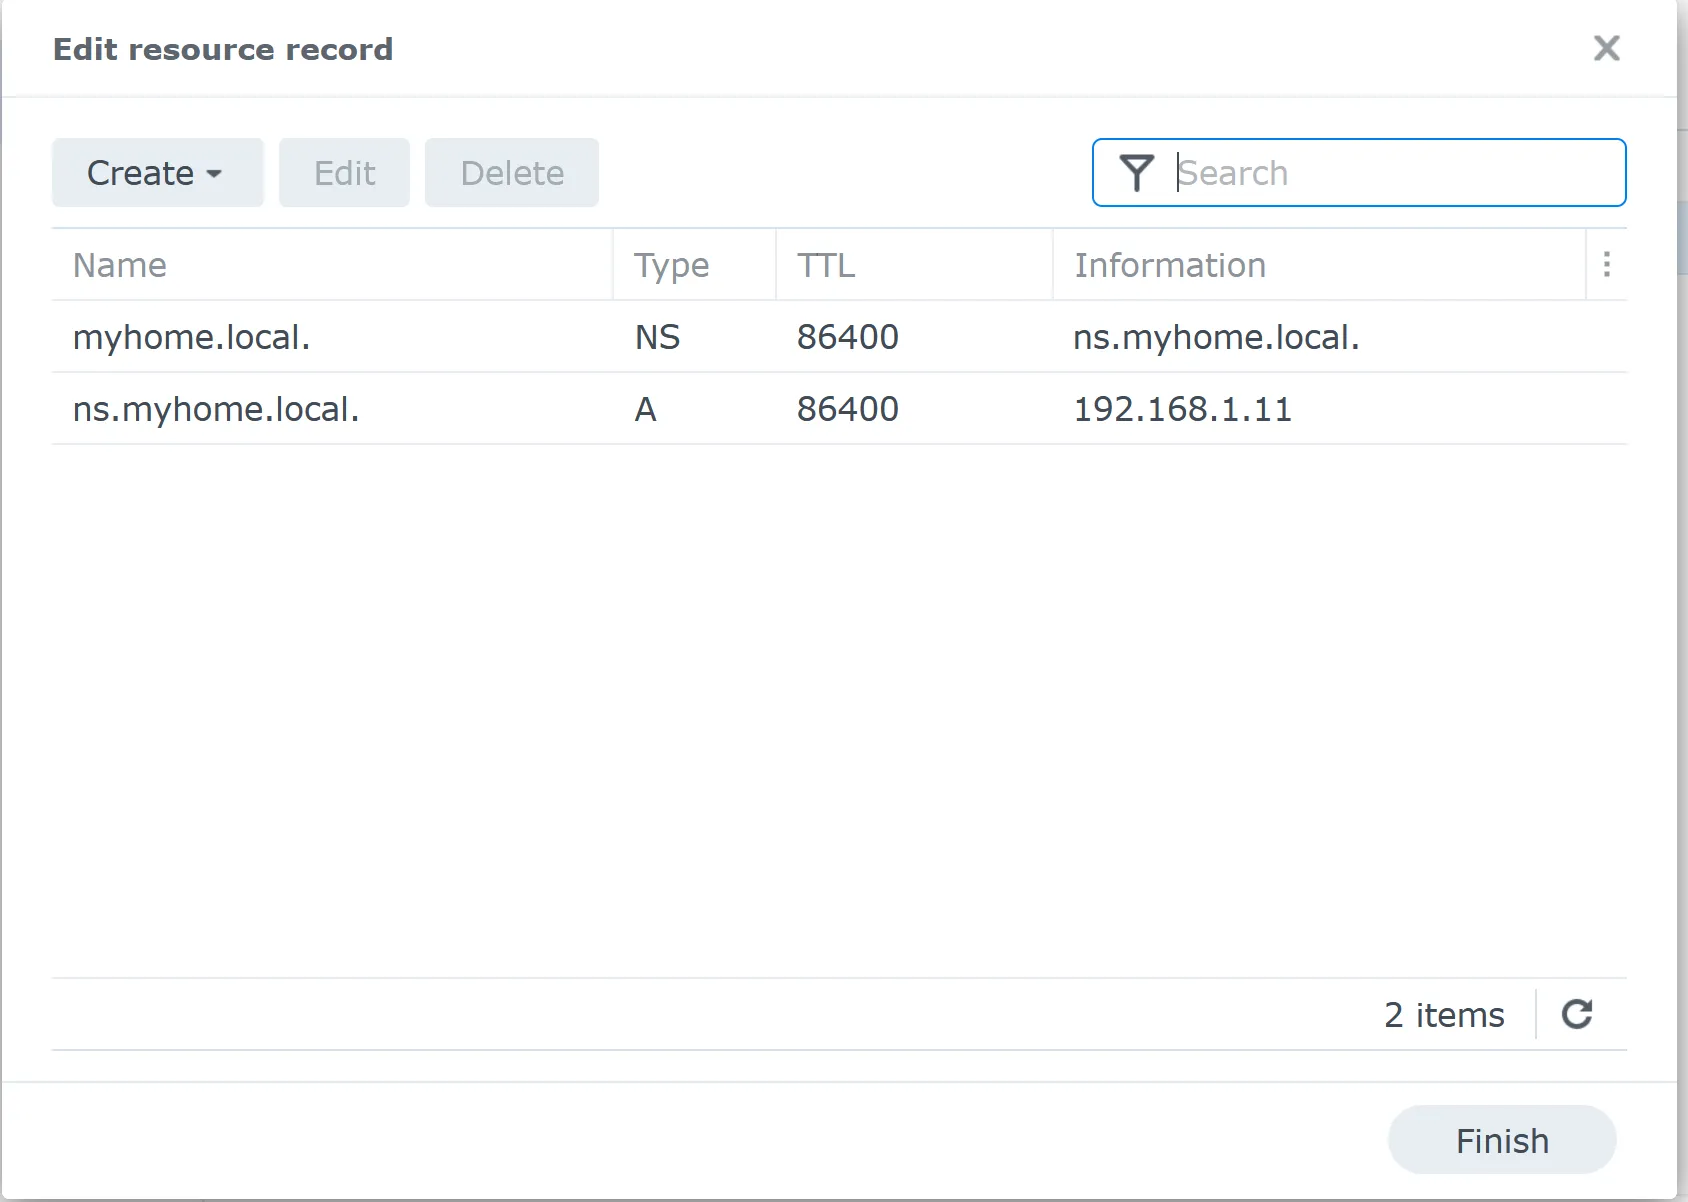
The picture above shows that the Synology DNS Server automatically added two records. NS stands for Nameserver and there is an A zone records for ns.myhome.local too.
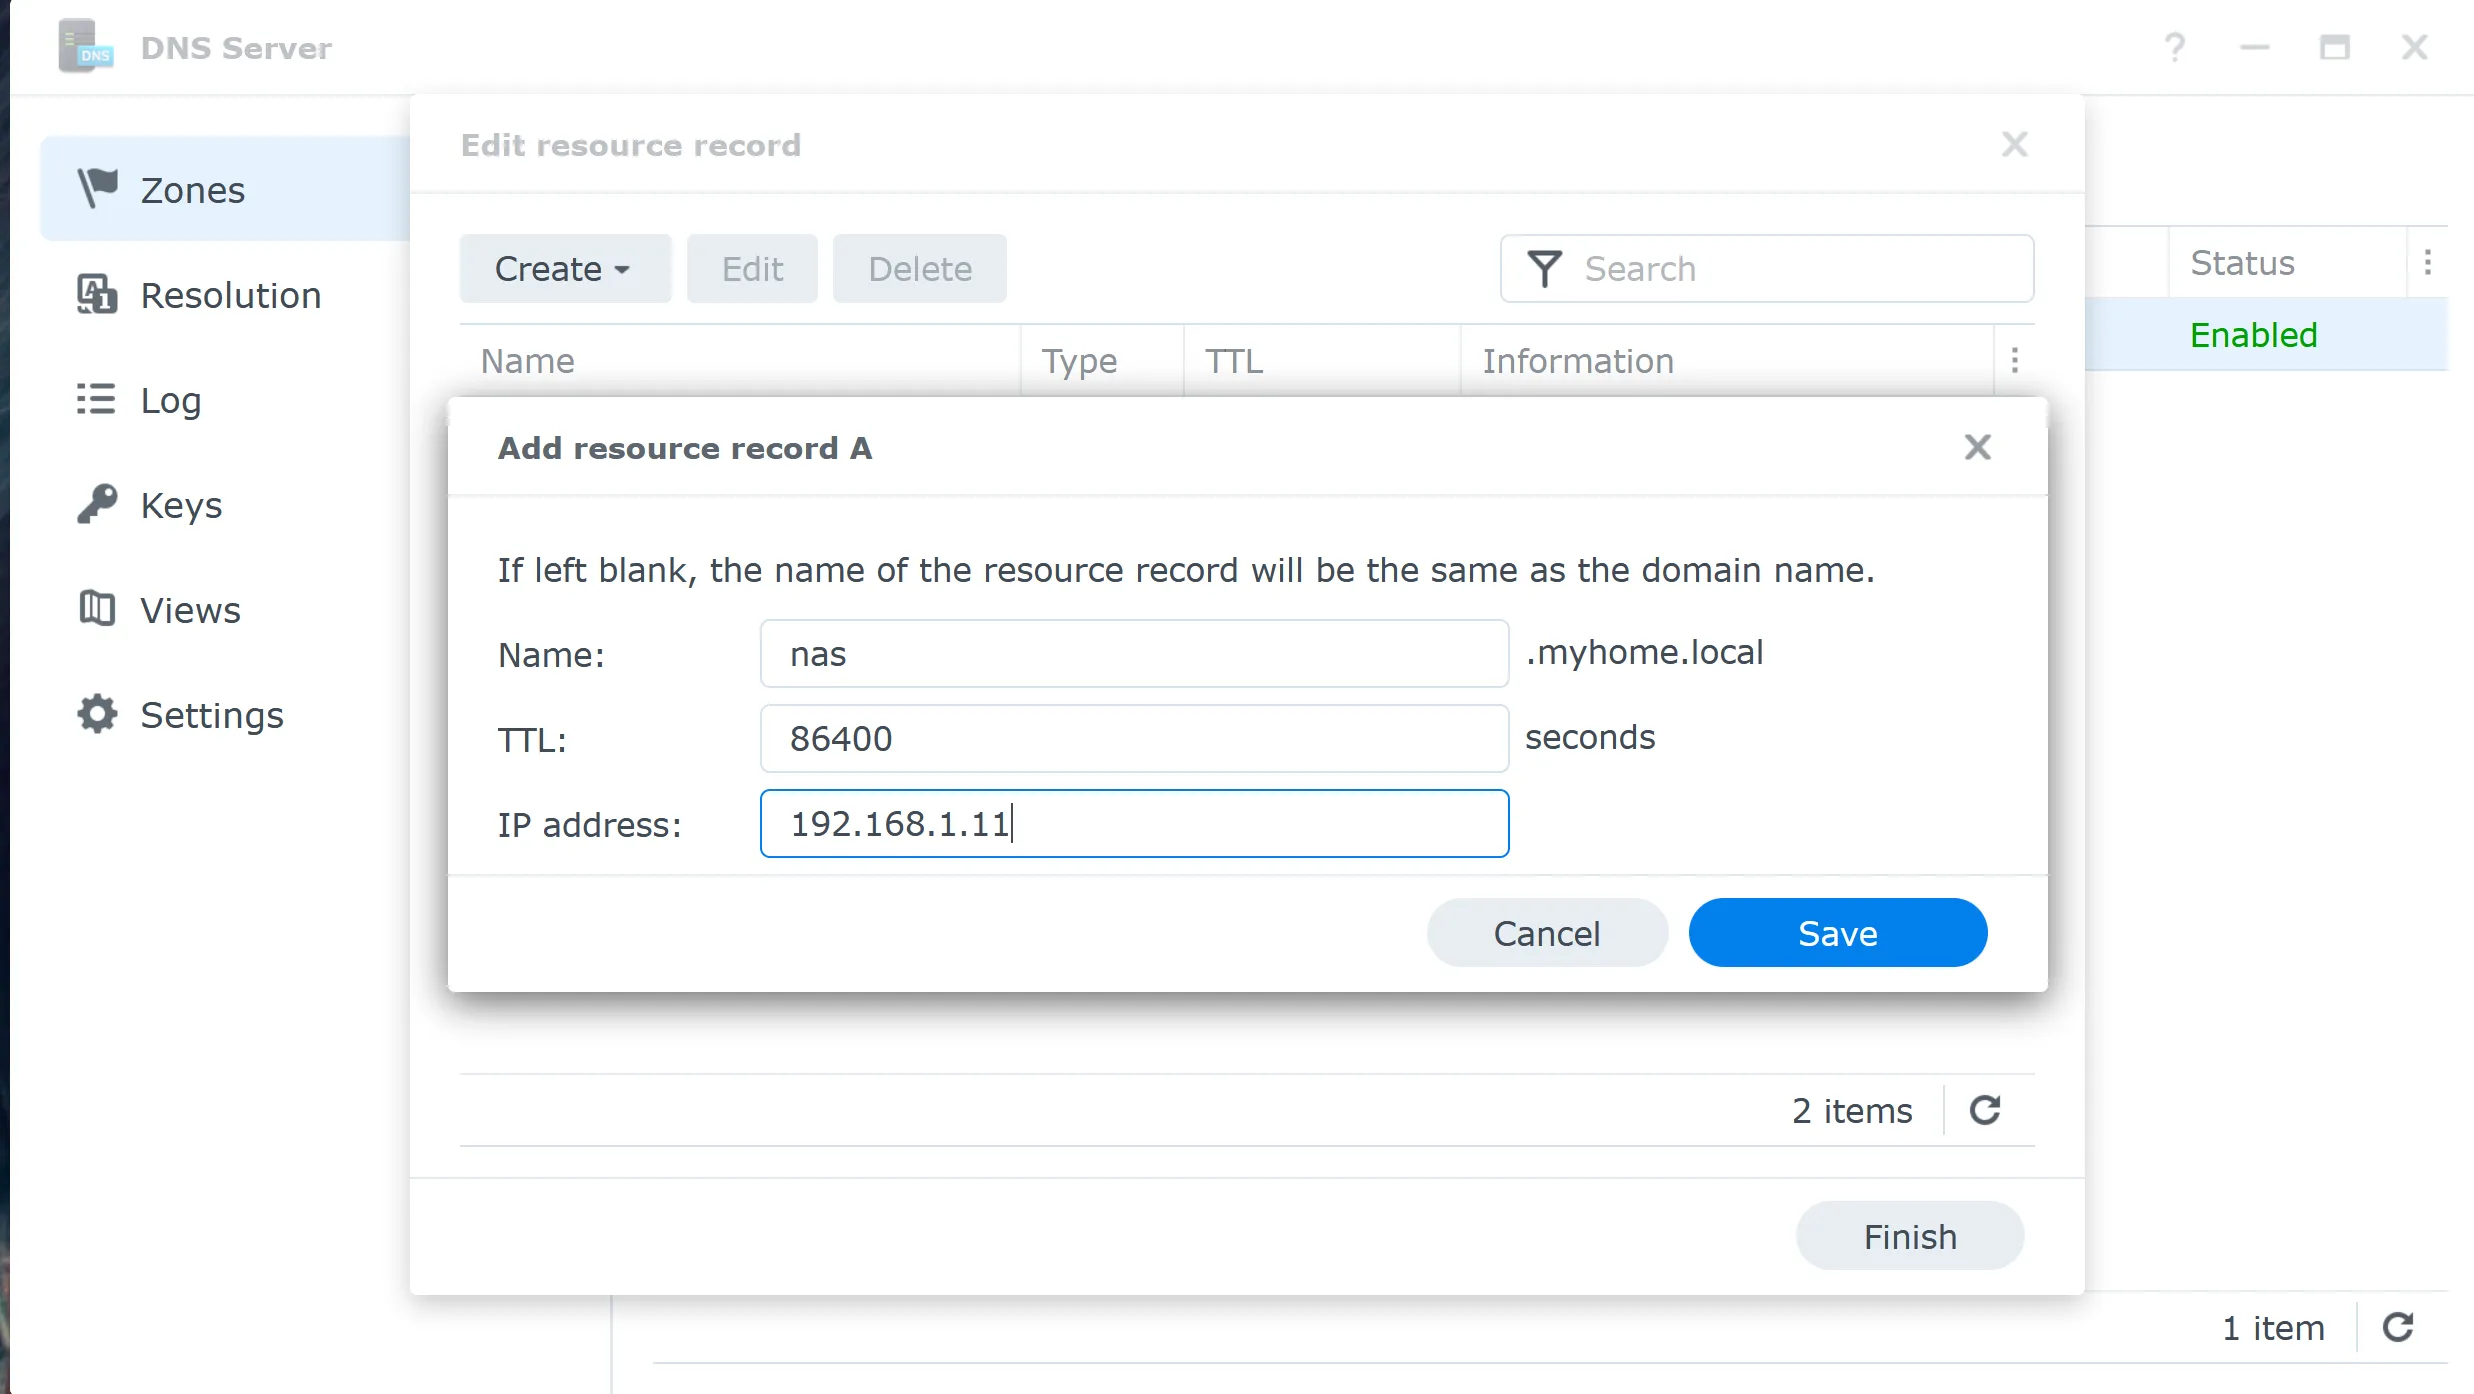
I added another A record for the same IP with another name, ‘nas’. Adding more than one A record for the same IP is possible.
Now, you can add more A records for your devices in the local network.
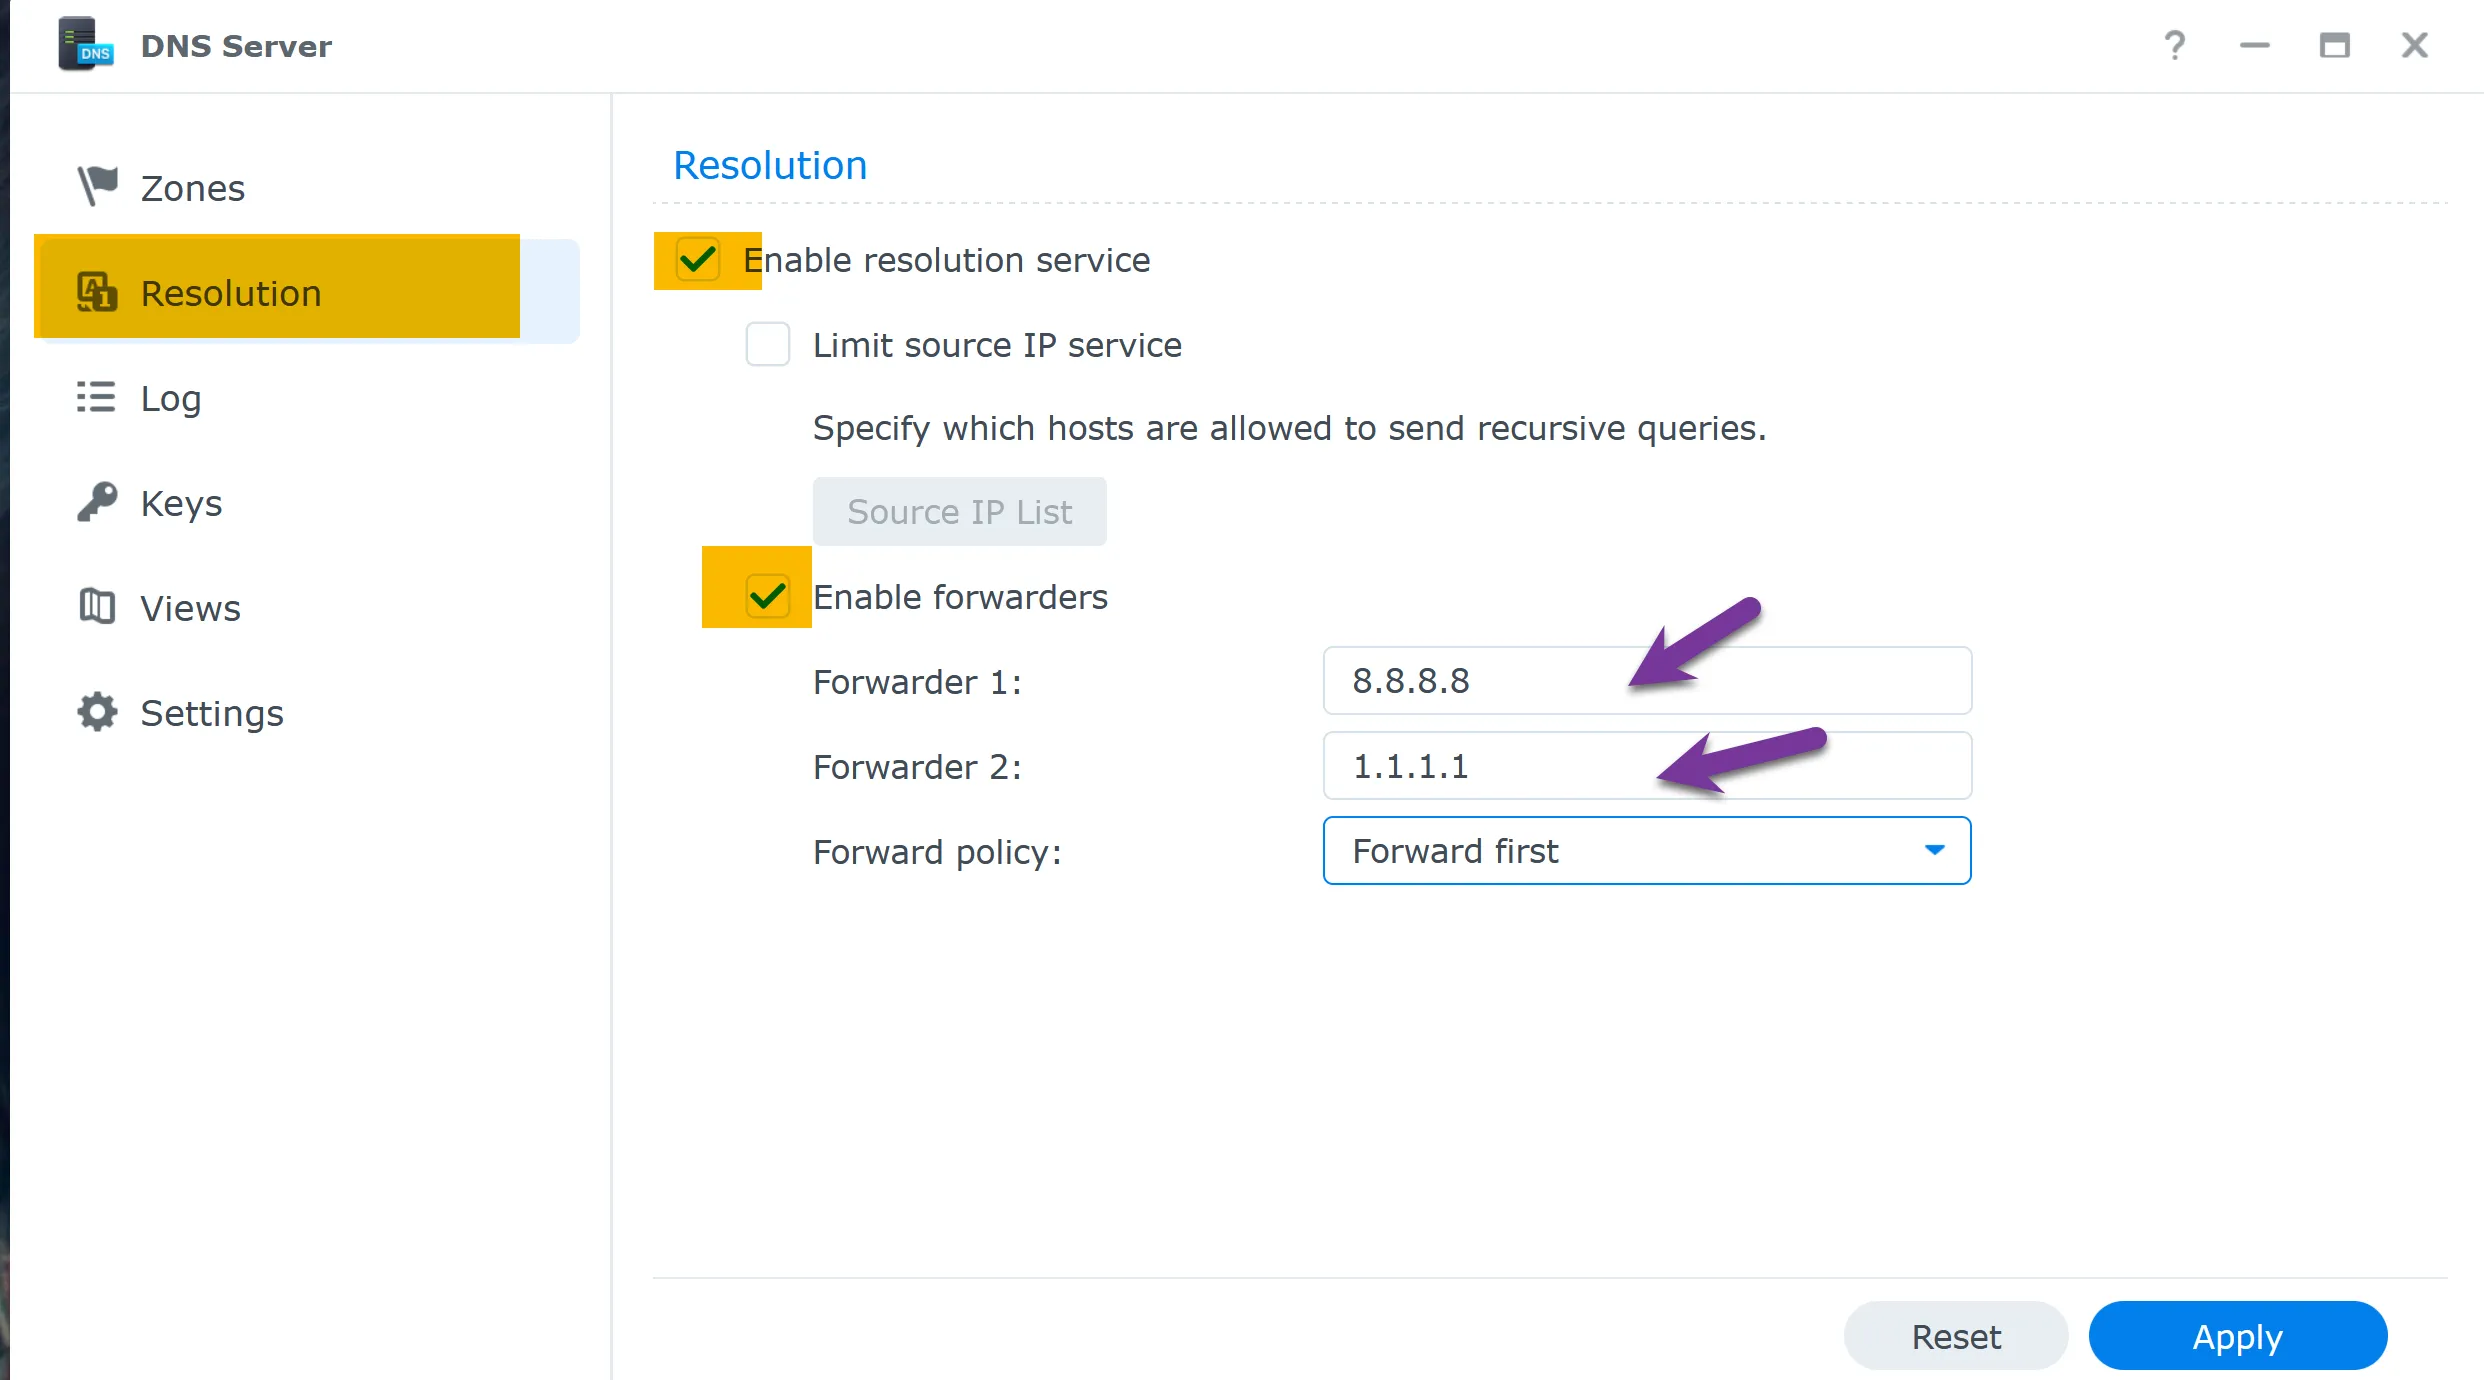
After installing the DNS package and setting up zones and records, there’s one more critical step to ensure your Synology DNS Server manages your local network efficiently and provides seamless internet access: DNS forwarding. Here’s how I configured DNS forwarding on my Synology NAS, using the example where the DNS server IP is 192.168.1.11:
DNS forwarding is like having a personal assistant for your network. When a device asks for the address of a website, the Synology DNS Server checks if it’s something within your local network. If not, it forwards the DNS requests to another DNS server on the internet, which knows how to find all those websites you and your network want to access.
My pick
Now that you’ve set up the Synology DNS Server let’s ensure your devices use it for DNS resolution. We’ll use the example where your Synology DNS Server has the IP address 192.168.1.11.
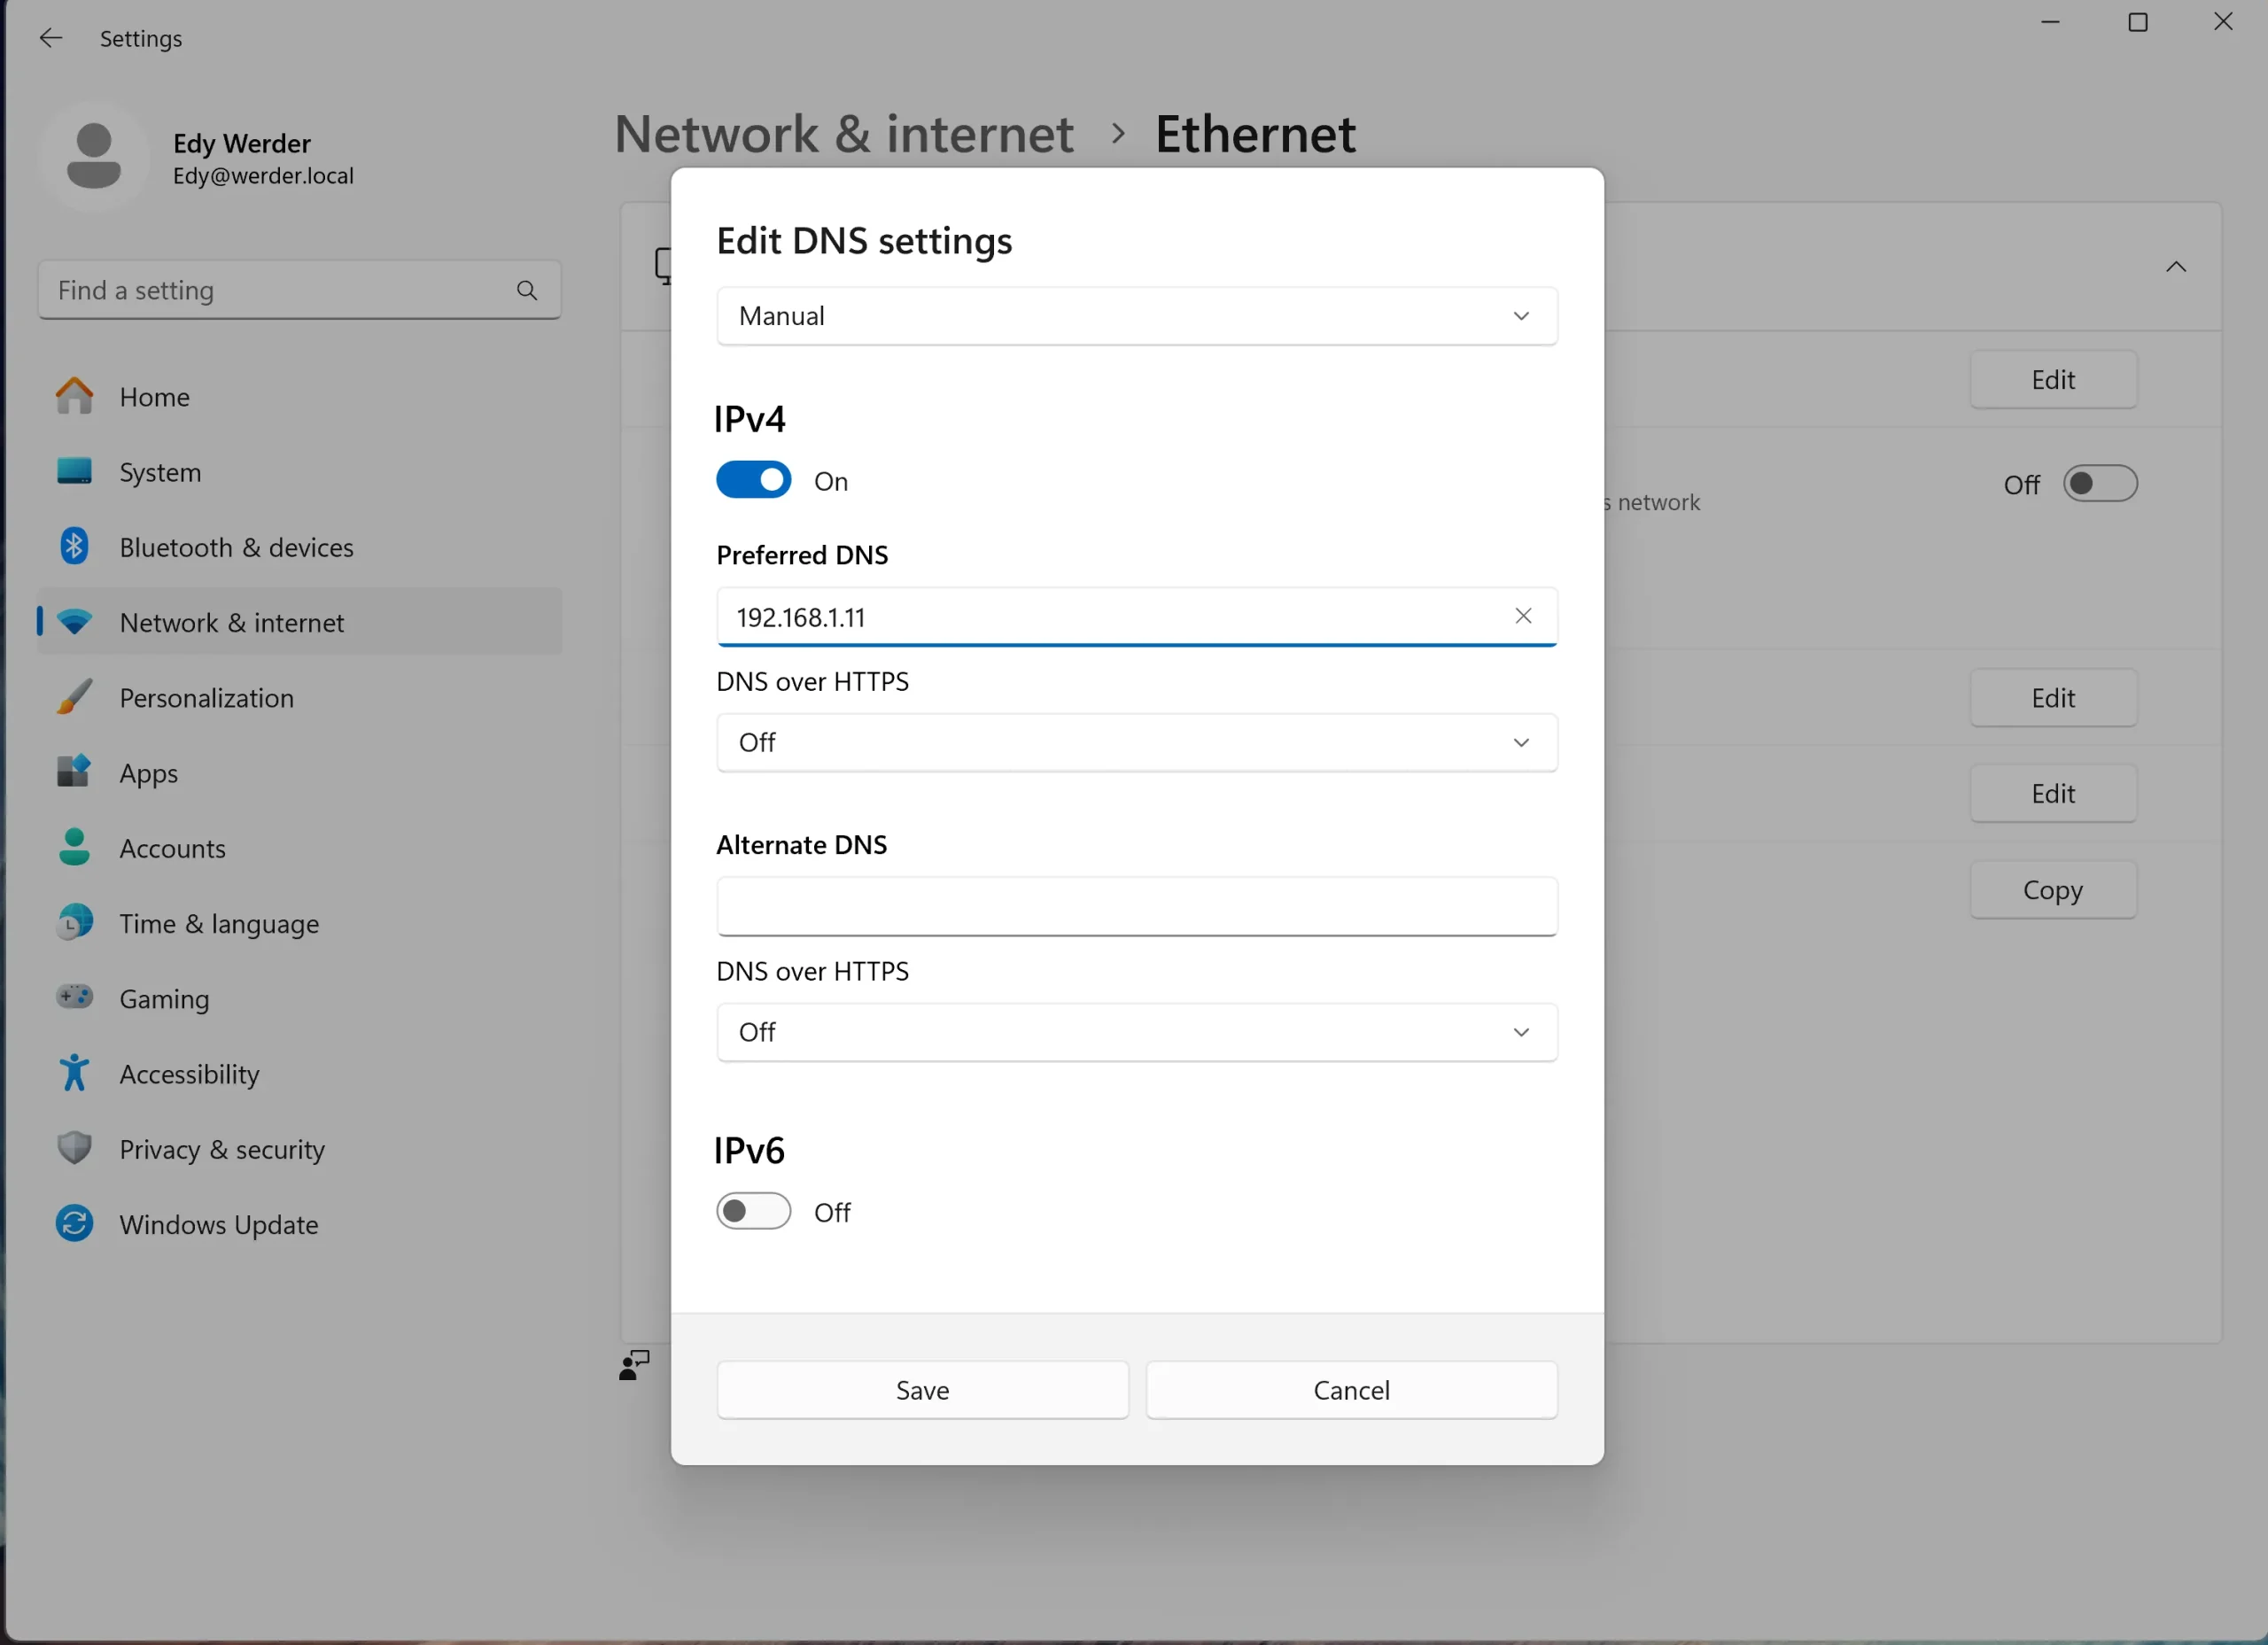
To make sure all devices on your network automatically use the Synology DNS Server, you’ll need to update the DNS settings in your router’s DHCP configuration:
I recommend changing DNS settings at your router and not on your device.
Your NAS is now doing double duty as a DNS server. My homelab guide shows how the rest of the network, storage, and hardware fit around it.
To verify that your DHCP settings, specifically the DNS server change to your Synology NAS (192.168.1.11), have been successfully applied across your network, you can use the ipconfig /all command on a Windows machine. This command provides detailed information about your network configuration, including the DNS servers your device is using. Here’s how you can test your DHCP settings:
Windows key + R to open the Run dialog box. Type cmd and press Enter to launch the Command Prompt.ipconfig /all and press Enter. This command displays all your network configuration details.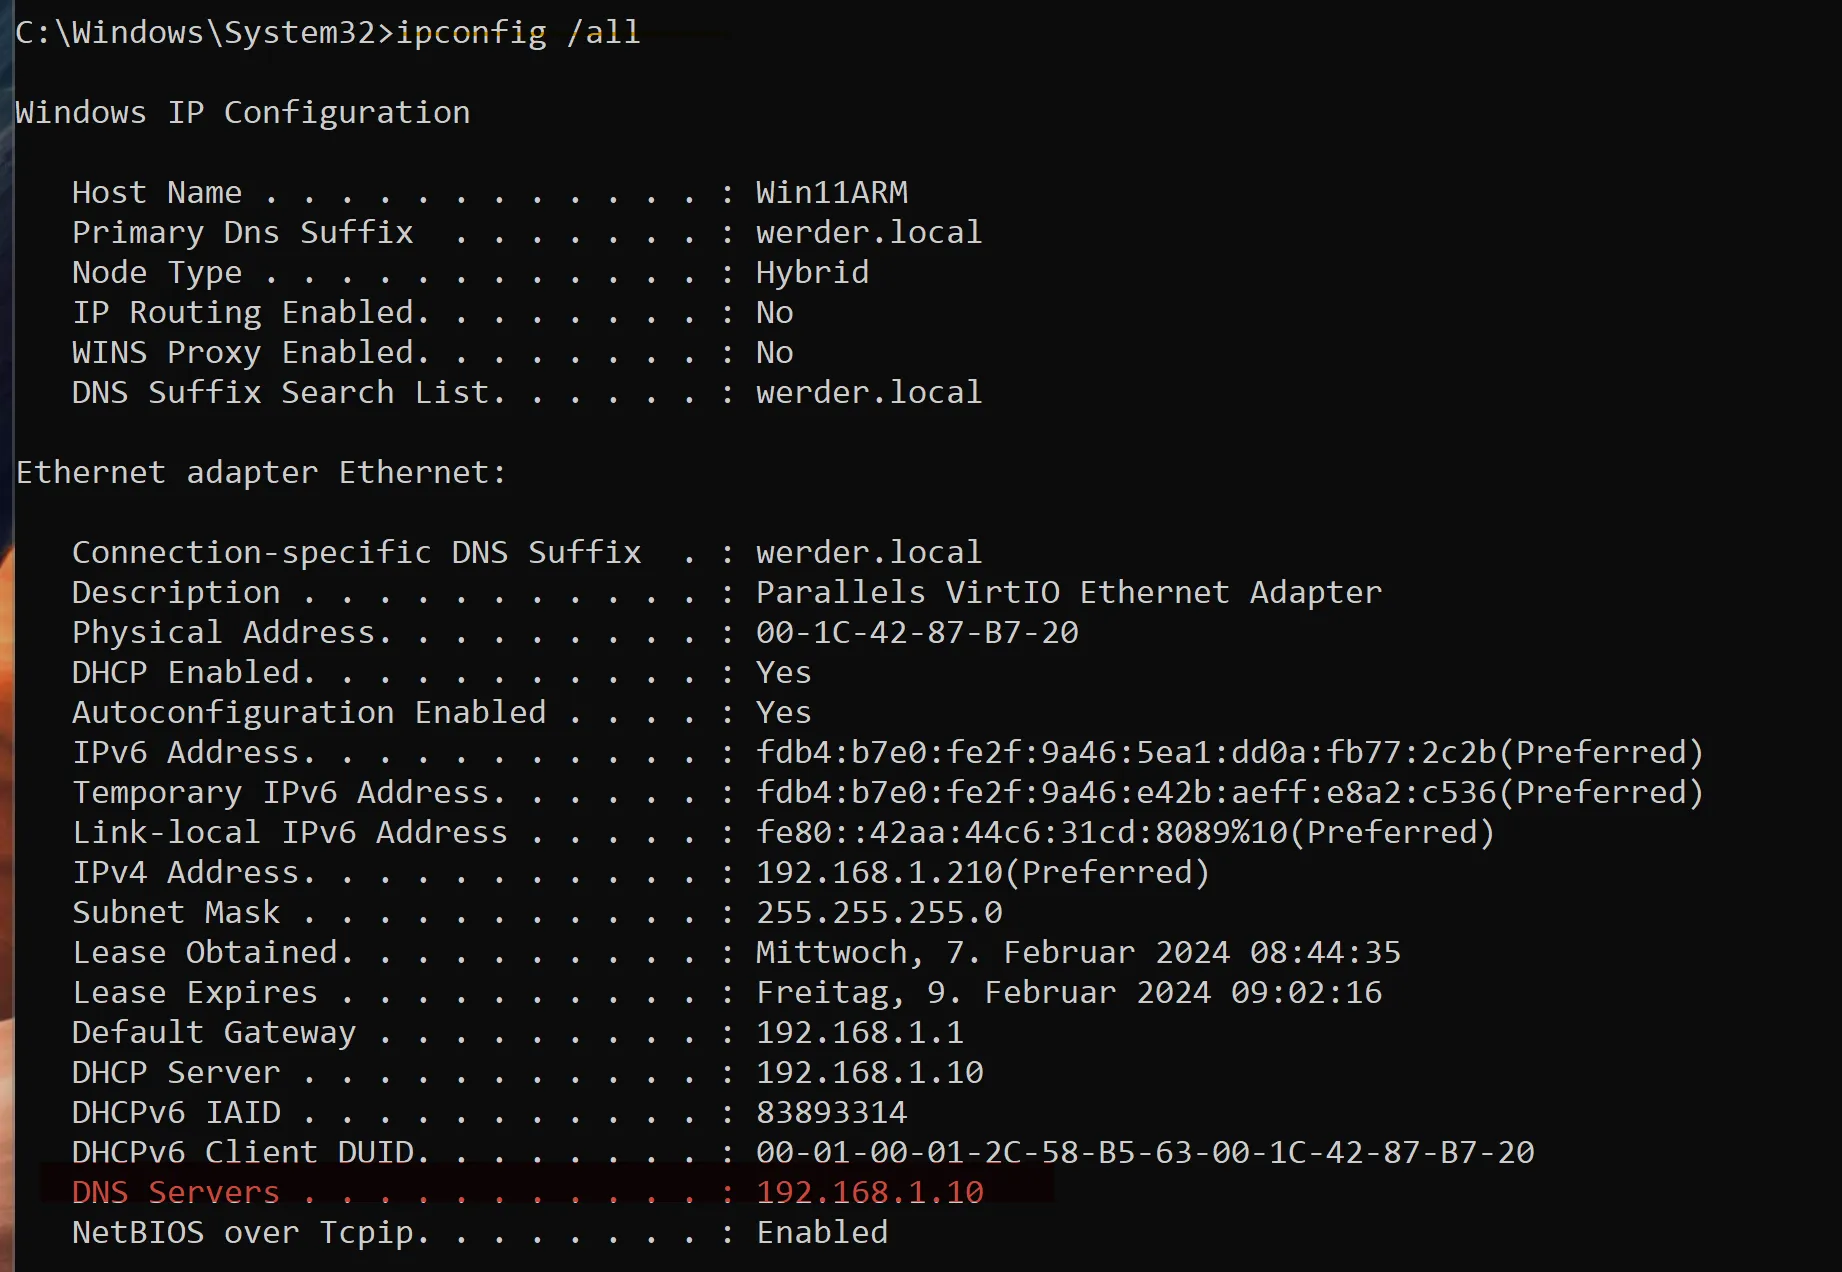
This test is a straightforward way to confirm that your network devices are correctly using the new DNS settings provided by your router’s DHCP configuration. It ensures that all DNS queries from your device are being routed through your Synology NAS, leveraging its DNS server capabilities for name resolution.
If your NAS goes offline and it is the only DNS server on your network, devices will lose DNS resolution, and internet access will effectively stop working. The fix is simple: always add a secondary DNS server in your router’s DHCP settings. I use 1.1.1.1 (Cloudflare) as a fallback. If the NAS becomes unreachable, devices automatically switch to the secondary and keep working.
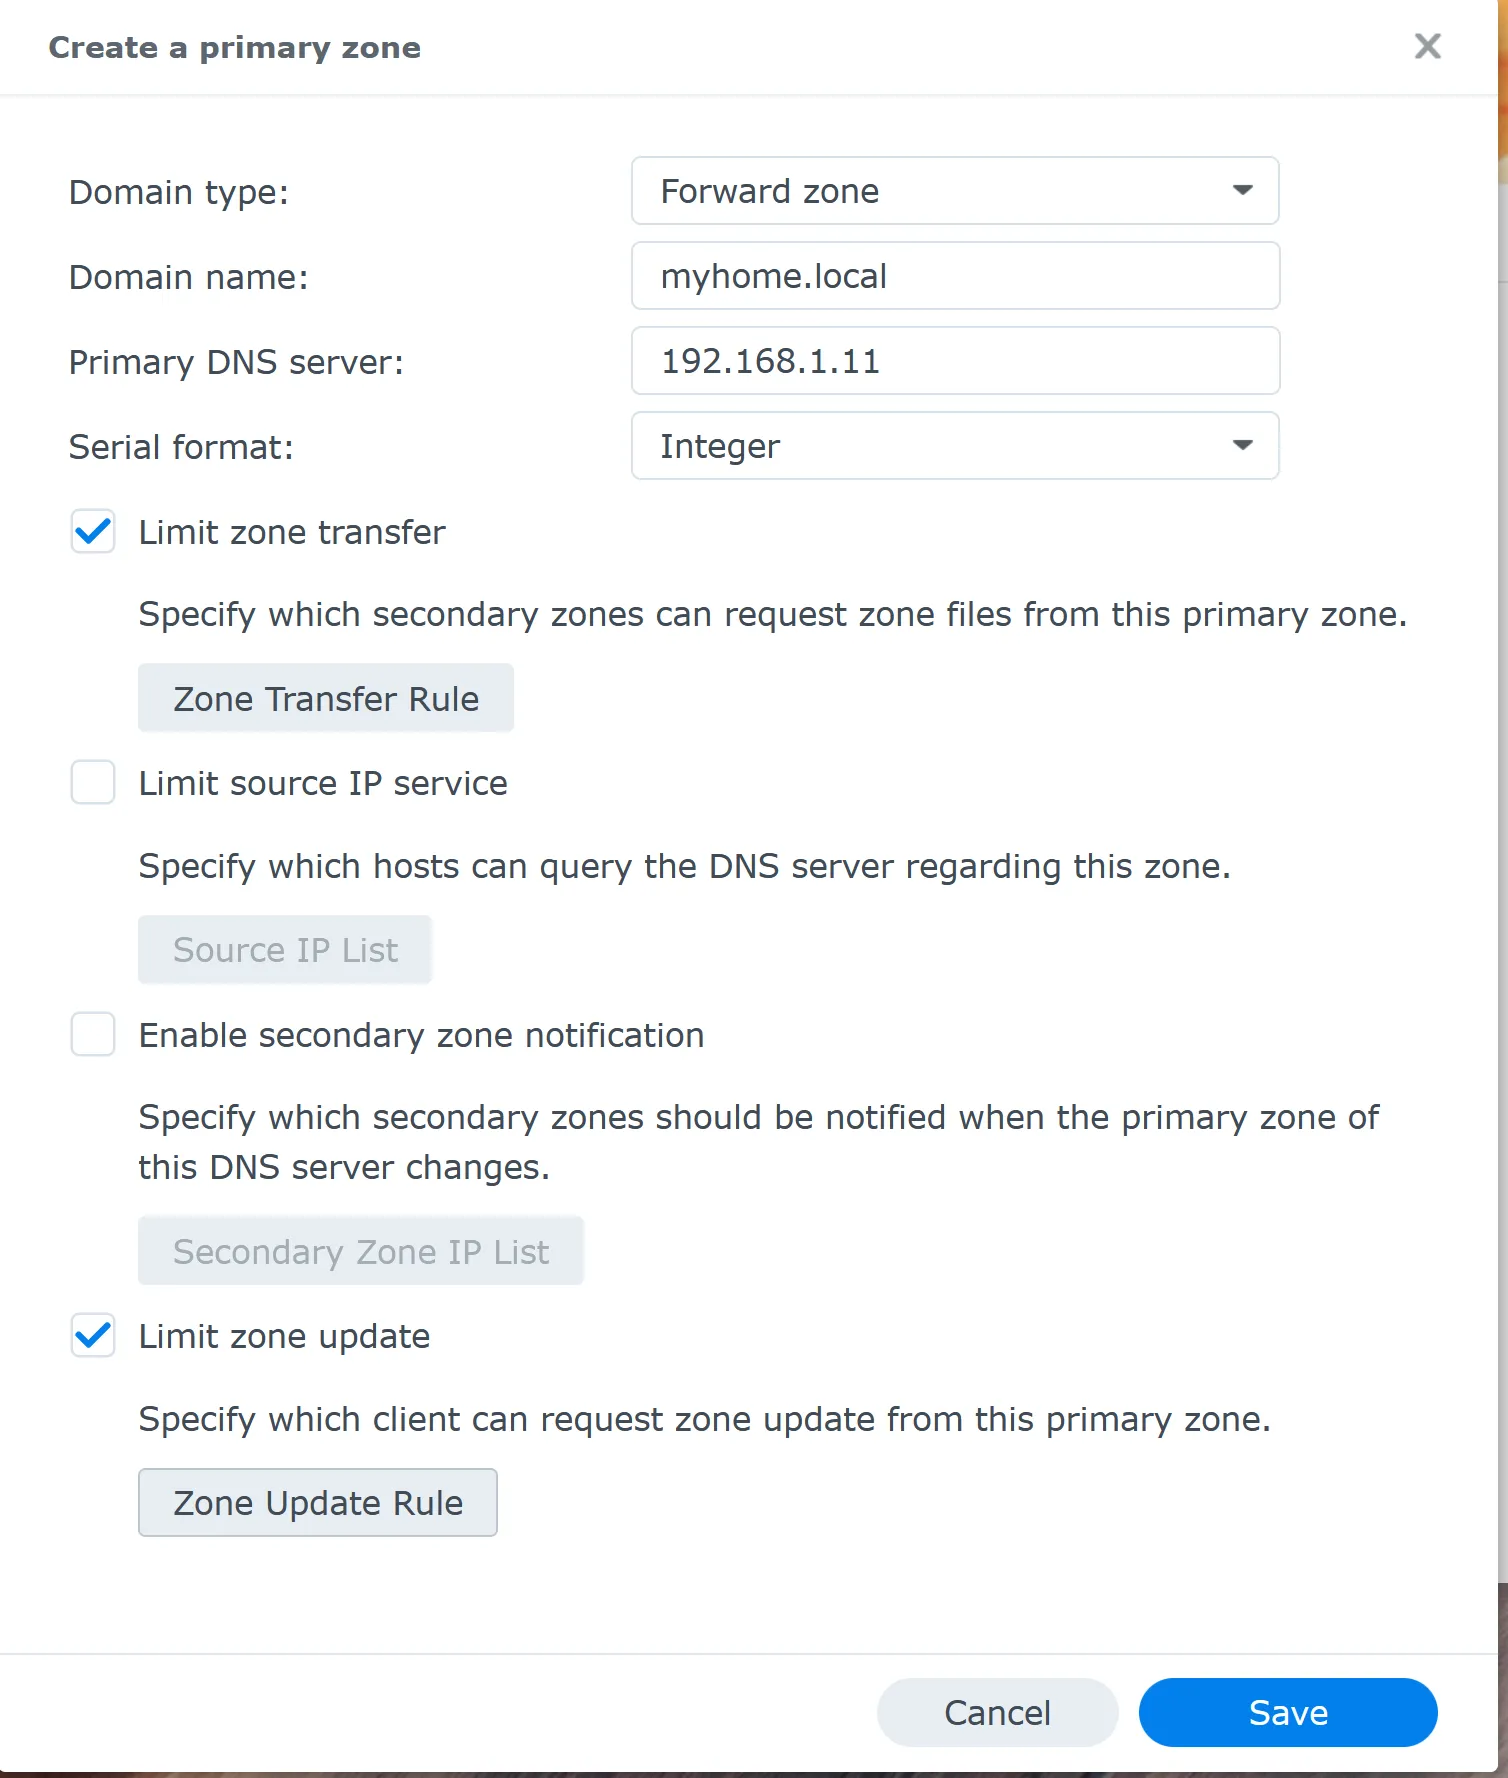
When you create a Master Zone, the Synology DNS Server automatically generates three resource records: an SOA (Start of Authority) record, an NS (Nameserver) record, and an A record for the nameserver. The SOA record defines the zone’s authority and contains a serial number that increments with each change. You only need to add your own A records on top of those.
A reverse zone does the opposite of a forward zone. Instead of translating a name to an IP address, it translates an IP address back to a fully qualified domain name (FQDN) using PTR records. On a Synology DNS Server, a reverse zone only works for your internal private IP range, such as 192.168.x.x. For public IP addresses, reverse DNS is controlled by your ISP and cannot be managed from your own DNS server unless they explicitly delegate it to you. For most home and small business setups, an internal reverse zone is optional.
It does. When your Synology NAS handles DNS, queries for local devices never leave your network. Only requests for external domains get forwarded to your chosen resolver, such as Cloudflare or Google. Your ISP no longer sees every DNS query your devices make, and your browsing history stays local. Switching your forwarder to a privacy-focused resolver, such as 1.1.1.1, takes this a step further.
Yes. You can create a Master Zone for any domain you want to block and point the A record to 0.0.0.0. Any device on your network using the Synology DNS Server as its resolver will fail to reach that domain. Keep in mind it only blocks the exact domain, not subdomains, unless you add wildcard records. It is a lightweight approach to network-wide content filtering, though a dedicated tool like Pi-hole gives you more control.
One more option worth knowing: you can use your Synology as a public authoritative DNS server and point a registered domain name to it as the primary zone. If you want to go deeper on hosting your own public nameserver, my DNS Server at Home guide covers that using ISPConfig. And if you plan to implement Active Directory in your environment, my Synology Directory Server guide is a good next step.


Hi, I’m Edy Werder. I write hands-on guides about Proxmox, homelab servers, NAS, and WordPress, based on real setups I run and document.
No sponsors, no fluff—just real configs and results.
Enjoying the content?