
By Edy Werder — IT Consultant & Tech Blogger
Introduction: What are Proxmox Snapshots and Why They Matter
A Proxmox snapshot is a point-in-time capture of a virtual machine or container’s complete state, including data, configuration files, and optionally memory (RAM). This powerful feature allows system administrators to create instant restore points before making changes, ensuring they can quickly revert to a known good state if something goes wrong.
Proxmox VE supports snapshots for both KVM virtual machines and LXC containers, making it an essential tool for testing, system updates, and development workflows. Unlike traditional backups that can take significant time to restore, snapshots enable rollback in minutes rather than hours.
This guide covers everything you need to know about Proxmox snapshots: core concepts, creation and restoration procedures, performance considerations, best practices, and the critical differences between snapshots and backups. You’ll learn when to use snapshots, how to implement them effectively, and how to avoid common limitations that could impact your virtualization environment.
Understanding Proxmox Snapshots: Key Concepts and Definitions
Core Snapshot Concepts
A snapshot in Proxmox represents a frozen moment of your VM or container’s complete state. When you create a snapshot, the system captures:
- Disk state: All data stored on virtual drives
- Configuration files: VM settings, allocated resources, and system parameters
- Memory state (optional): RAM contents for running VMs, preserving active processes
The terminology can be confusing, so here are the key types:
- Live snapshots: Created while the VM is running, can include memory state
- Memory snapshots: Include RAM contents, allowing exact state restoration
- Disk-only snapshots: Capture storage and configuration but not memory state
Proxmox uses different snapshot mechanisms depending on your storage backend. QCOW2-based snapshots work with file storage, while storage-level snapshots leverage ZFS, Ceph RBD, or LVM-thin capabilities.
How Snapshots Work in Proxmox VE
Snapshots operate using a copy-on-write mechanism. When you create a snapshot, the hypervisor stops writing new data to the original disk image and creates a new ‘child disk’ for all future write operations. Proxmox then marks the current state as the snapshot baseline and tracks any changes made afterward. Only modified blocks require additional storage space.
For running VMs, the process differs significantly from powered-off VMs:
- Running VM snapshots: Can include memory state, capturing active processes, network connections, and system state
- Powered-off VM snapshots: Only capture disk and configuration data, requiring a cold boot upon restoration
Storage requirements vary depending on your configuration. Memory snapshots need additional space equal to the VM’s allocated RAM, while disk-only snapshots initially consume minimal space but grow as data changes.

Why Proxmox Snapshots are Essential for Virtualization
Snapshots provide critical advantages for modern virtualization environments:
Primary use cases include pre-update testing, where administrators create snapshots before installing patches or software updates. This approach allows safe rollback if updates cause system instability or data corruption.
Development environments benefit enormously from snapshots. Developers can create branching points for testing different code paths, comparing performance, or reverting to clean states for repeated testing scenarios.
Risk mitigation represents perhaps the most valuable benefit. Snapshots enable safe experimentation with system changes, configuration modifications, and security updates without fear of permanent damage to production systems.
The speed advantage over traditional backups cannot be overstated. While full backup restoration might take 30-60 minutes, snapshot rollback typically completes in 2-5 minutes, minimizing downtime and improving operational efficiency.
Snapshots vs Backups: Key Differences Comparison
Aspect | Snapshots | Backups |
|---|---|---|
Storage Location | Same storage as VM/container | Separate storage or remote location |
Recovery Time | 2-5 minutes | 30-60 minutes |
Data Protection Level | Short-term, same-host protection | Long-term, disaster recovery |
Use Cases | Testing, quick rollback, development | Data archival, disaster recovery |
Storage Requirements | Incremental space usage | Full VM/container size |
Hardware Failure Protection | No (stored locally) | Yes (stored separately) |
Understanding when to use each solution is crucial for proper data protection strategy. Use snapshots for short-term protection before system changes, testing scenarios, and development work. Rely on backups for long-term data security, compliance requirements, and protection against hardware failures.
Consistent snapshots require the QEMU Guest Agent installed inside the VM.
Snapshots depend entirely on the host storage system. If the underlying storage fails, both the VM and its snapshots are lost. Backups stored on separate systems or remote locations provide protection against catastrophic failures.
Step-by-Step Guide to Managing Proxmox Snapshots
Creating Snapshots via Web Interface
- Access the Proxmox web interface and navigate to your target VM or container
- Click the “Snapshots” tab in the left navigation panel
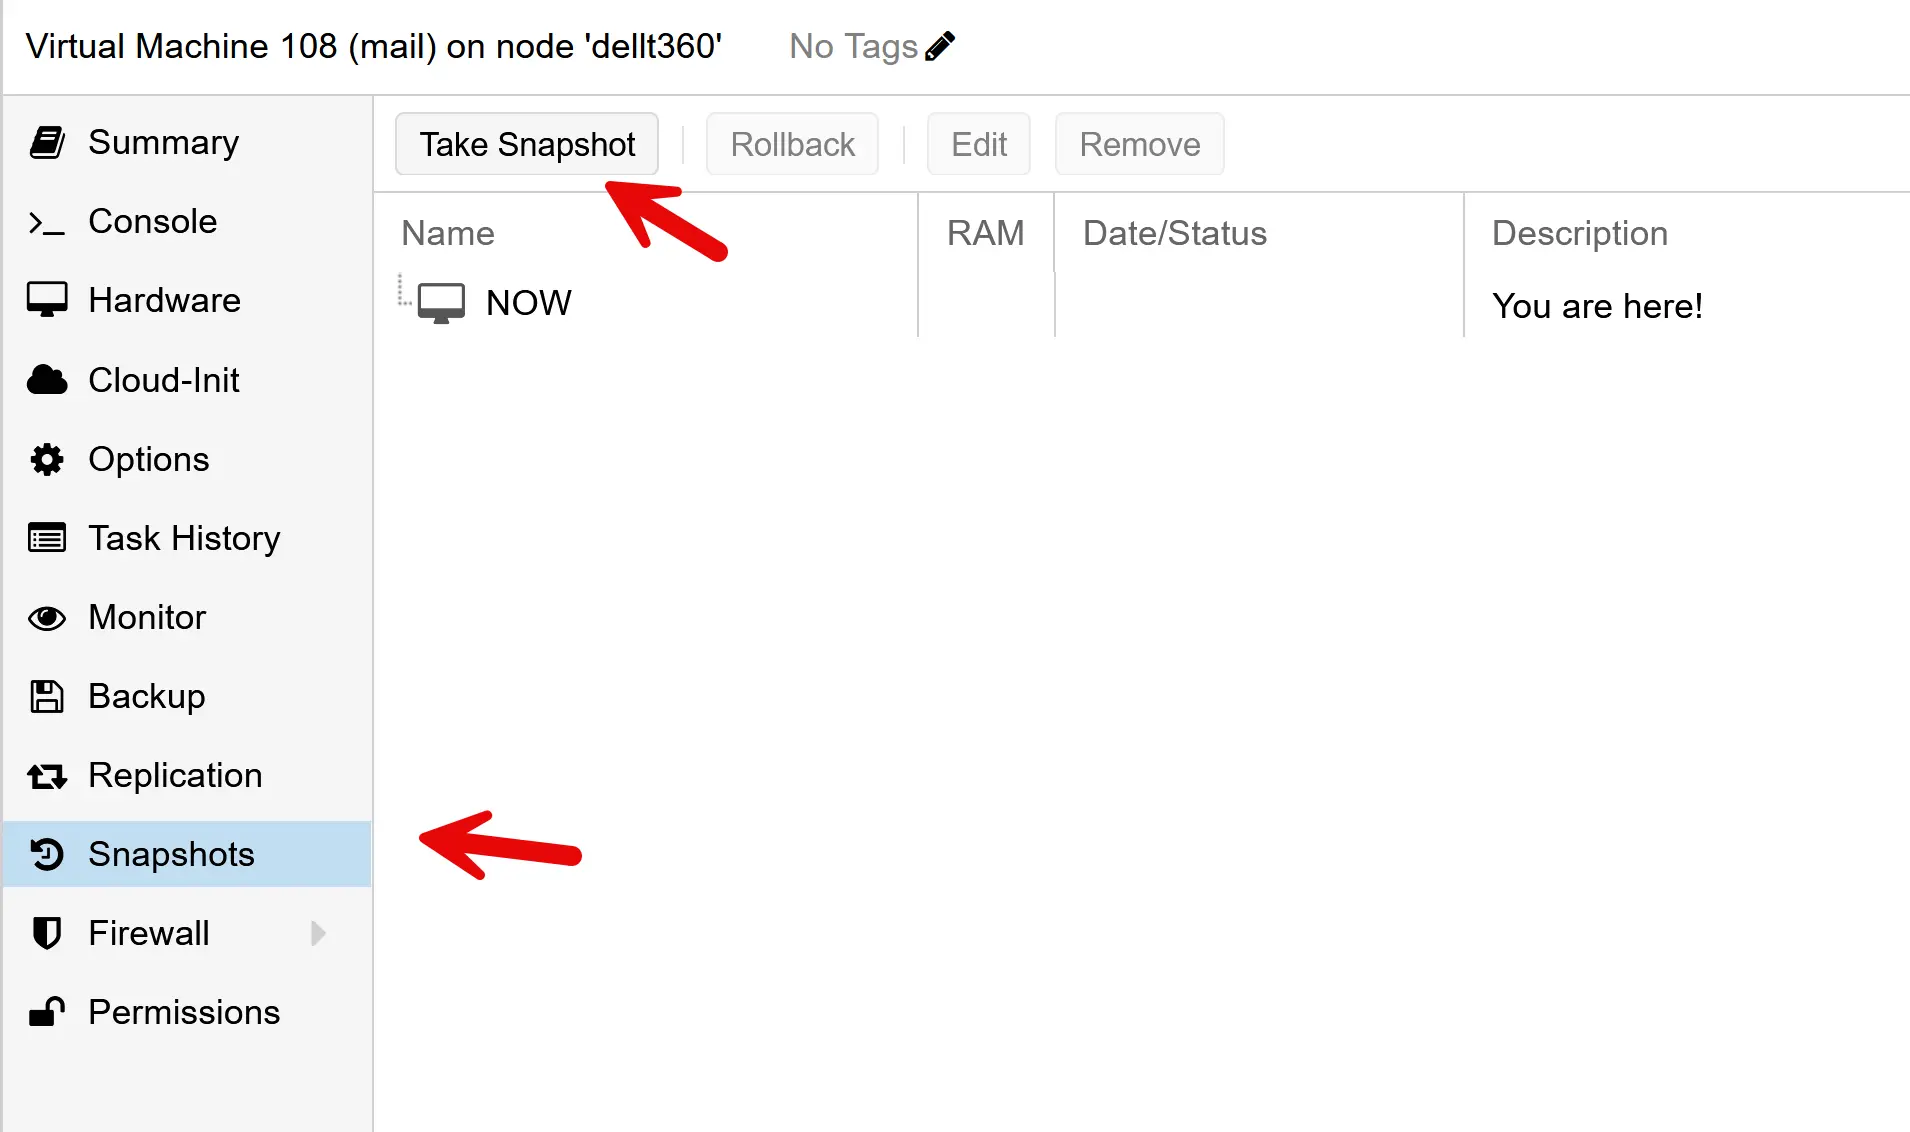
- Select “Take Snapshot” button to open the snapshot configuration dialog
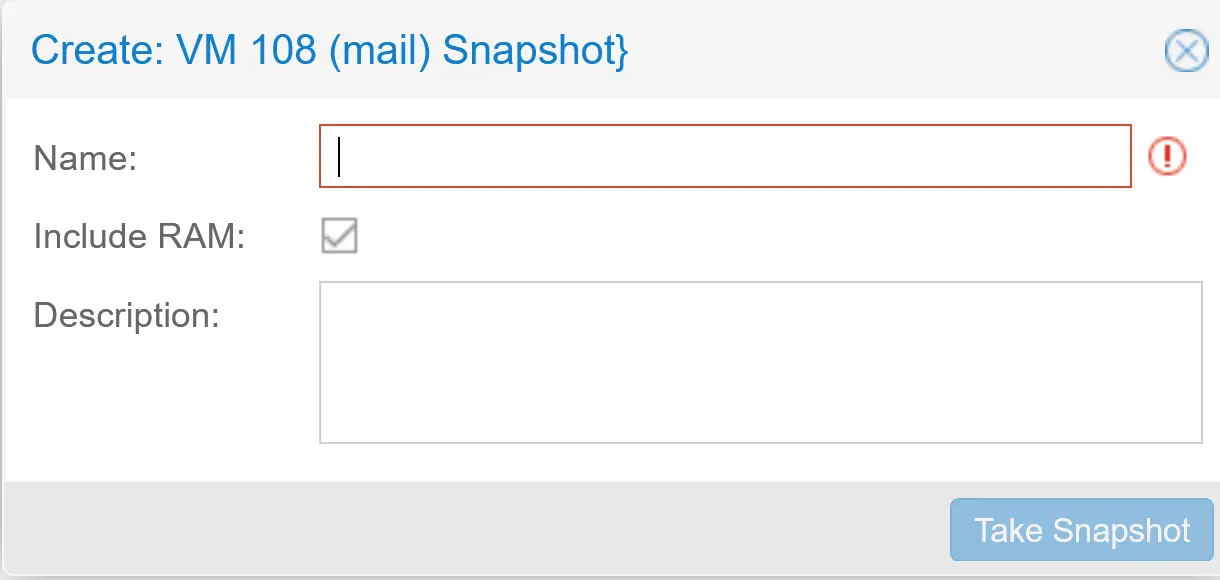
- Configure snapshot settings:
- Enter a meaningful name (e.g., “pre-ubuntu-upgrade”)
- Add a description explaining the snapshot purpose
- Choose whether to include memory state for running VMs
- Enter a meaningful name (e.g., “pre-ubuntu-upgrade”)
- Add a description explaining the snapshot purpose
- Choose whether to include memory state for running VMs
- Click “Take Snapshot” to initiate the snapshot process
The web interface provides the most user-friendly approach for occasional snapshot management and is ideal for administrators who prefer visual workflows.
Snapshot creation in Proxmox is just as simple as other basic tasks, like uploading an ISO for a new VM.
Creating Snapshots via Command Line
For automated workflows and scripted operations, use the command line interface:
For virtual machines (using VM ID 100 as an example):
# Create disk-only snapshot
qm snapshot 100 pre-update --description "Before system update"
# Create snapshot with memory state
qm snapshot 100 pre-upgrade --description "Before major upgrade" --vmstate 1
# List all snapshots for a VM
qm listsnapshot 100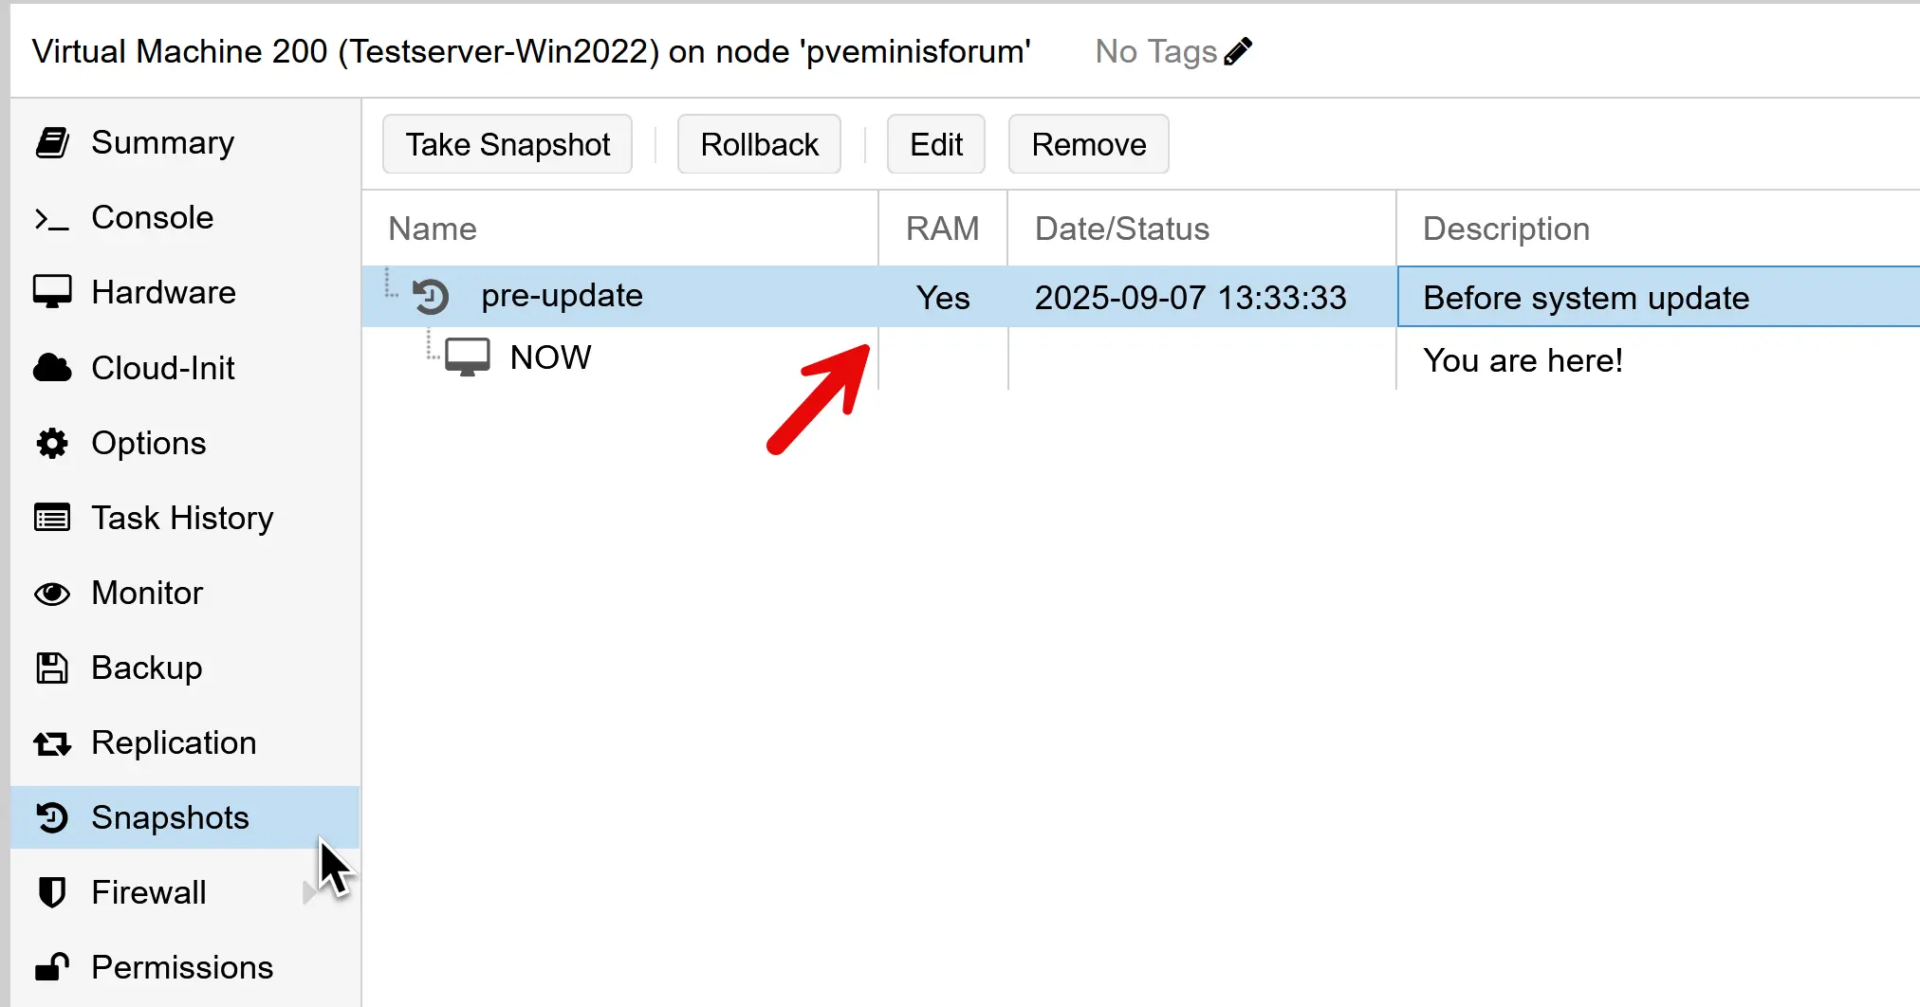
For containers:
# Create container snapshot
pct snapshot 100 pre-config-change --description "Before configuration changes"
# List container snapshots
pct listsnapshot 100
The CLI approach enables automation through scripts and integration with configuration management systems.
Restoring and Deleting Snapshots
Restoration via GUI:
- Navigate to the VM/container’s Snapshots tab
- Select the target snapshot from the list
- Click “Rollback” and confirm the operation
- The system will revert to the snapshot state
Restoration via CLI:
# Restore VM to snapshot
qm rollback 100 pre-update
# Restore container to snapshot
pct rollback 100 pre-config-change
Safe deletion procedures:
- Delete snapshots through the GUI by selecting and clicking “Delete”
- Use CLI commands: qm delsnapshot 100 snapshot-name or pct delsnapshot 100 snapshot-name
- Always delete snapshots in reverse chronological order to maintain chain integrity
Snapshots can grow quickly, so having fast SSD or NVMe storage makes a real difference
-
 Buy on Amazon$570.46
We earn a commission if you make a purchase, at no additional cost to you.
02/21/2026 10:55 am GMT -
 Buy on Amazon$302.49
We earn a commission if you make a purchase, at no additional cost to you.
02/21/2026 10:55 am GMT -
 Buy on Amazon$399.99
We earn a commission if you make a purchase, at no additional cost to you.
02/21/2026 03:56 am GMT -
 Buy on Amazon$599.00
We earn a commission if you make a purchase, at no additional cost to you.
02/21/2026 10:56 am GMT
Performance and Storage Considerations
Snapshot management requires careful attention to storage and performance implications:
Storage space requirements grow over time as data diverges from the snapshot baseline. Memory snapshots immediately consume space equal to the VM’s allocated RAM. A VM with 16GB RAM will require at least 16GB additional storage for memory-inclusive snapshots.
Performance implications become apparent with long snapshot chains. Each additional snapshot layer can slow disk I/O operations, as the system must traverse multiple snapshot layers to read data. This effect becomes more pronounced with 5+ snapshots in a chain.
Storage backend selection significantly impacts snapshot efficiency:
- ZFS and Ceph RBD: Provide efficient block-level snapshots with minimal performance overhead
- QCOW2 file storage: Works well for smaller deployments but can become slower with heavy snapshot usage
- Basic LVM: Does not support true snapshots, requiring full VM clones instead
Recommended retention policies suggest keeping a maximum of 3-5 recent snapshots to maintain optimal performance. Regularly remove older snapshots to prevent storage bloat and ensure optimal performance.
Timing considerations for large VMs require planning. VMs with 32 GB or more RAM may take several minutes to create memory snapshots, during which system performance may be impacted.
In my own experience, running snapshots smoothly comes down to storage speed and server reliability. I’ve collected a few Amazon Renewed servers worth considering:
| Product Name | View on Amazon |
|---|---|
| Dell PowerEdge Dell R630 Server | 2X E5-2690 v4 = 28 Cores | 128GB RAM | 2X 1TB SSD (Renewed) | View on Amazon |
| Dell PowerEdge R730 Server 2X E5-2680v4 2.40Ghz 28-Core 128GB 8X 4TB 12G H730P (Renewed) | View on Amazon |
| ProLiant MicroServer Gen11 Tower Server w/one Intel Xeon E-2434, 3.4GHz 4-core 1P 32GB-U VROC 4LFF‑NHP 4TB HDD iLO KIT 180W External PS (HPE Smart Choice P74440-005) | View on Amazon |
| HPE ProLiant DL20 Gen11 Rack Server w/one Intel Xeon E-2436 Processor, 2.9GHz 6‑core 1P 32GB‑DR MR408i‑o 4SFF 2x500W RPS | View on Amazon |
| Dell PowerEdge R830 Server 2.20Ghz 56-Core 128GB 16x 300GB 15K H730P Rails (Renewed) | View on Amazon |
| Dell PowerEdge R440 Server 2X Gold 6126 2.60Ghz 24-Core 96GB 960GB SSD + 3.6TB (Renewed) | View on Amazon |
| HPE ProLiant DL380 Gen9 2U RackMount 64-bit Server + 2×8-Core E5-2640v3 Xeon 2.6GHz CPUs + 64GB PC4-2133P RAM + 8×600GB 10K SAS SFF HDD, P440ar RAID, 4×GigaBit NIC, 2×Power Supplies, NO OS | View on Amazon |
| HPE Proliant DL380 Gen10 8B SFF 2U Server, 2X Intel Xeon Gold 6126 2.6Ghz (24-cores Total), 192GB DDR4 RAM, 8X 1.2TB 2.5” 10K SAS 12Gbps, P408i-a SR 2GB RAID, No Operating System | View on Amazon |
Common Limitations and Gotchas to Avoid
Understanding snapshot limitations prevents unexpected issues in production environments:
Storage dependency represents the primary limitation. Snapshots share the same storage as the original VM or container. If storage hardware fails or becomes corrupted, both the system and all snapshots are lost simultaneously.
Performance degradation occurs with excessive snapshot usage. Long snapshot chains create I/O overhead as the system traverses multiple layers for read operations. Write operations may also slow due to copy-on-write mechanisms.
Memory snapshot limitations include increased storage requirements and longer creation times. Large VMs with 64 GB or more RAM can take a significant amount of time to snapshot and may require substantial storage space.
Backup exclusion is a critical consideration. Standard Proxmox VE backups do not include snapshot data. If you restore a VM from backup, all snapshots are lost, and you return only to the base system state.
Complete state rollback affects the entire VM or container. Unlike file-level restoration, snapshots cannot selectively restore individual files or configurations. Rolling back affects all system changes made since the snapshot was created.
Network state and external dependencies are not captured in snapshots. Database connections, network sessions, and external service integrations may need to be reestablished after snapshot restoration.
Community Insights: How Proxmox Users Handle Snapshots
While Proxmox snapshots are designed for short-term rollback, actual usage in the community varies widely. Here are some excerpts that show different approaches:
- “I use snapshots only as a quick way to revert a change. If nothing breaks, I delete the snapshot. If issues show up later, I restore from a backup.”
- “Stacked snapshots can cause performance issues. I once deleted a snapshot from 2022 that was still hanging around — lesson learned.”
- “I take hourly snapshots and keep the last 24, plus daily ones for a week. For anything older, I use Proxmox Backup Server.”
- “Snapshots are essential before upgrades. At work, we delete them within hours, unless there’s a strong reason to keep them longer.”
- “I automate snapshots every 6 hours with cv4pve-autosnap and keep them for 3 days. Great for testing, since I can quickly revert to a clean state.”
The takeaway: practices differ. Some admins delete snapshots quickly to avoid storage bloat and performance hits, while others schedule them programmatically but always pair them with backups. The common thread: nobody relies on snapshots alone for long-term protection.
You can also read more community experiences in this Reddit thread on Proxmox snapshots.
How do you use snapshots in your Proxmox setup? Share your approach in the comments — I’d love to hear your workflow.
Real-World Snapshot Usage Example
Let’s say you need to upgrade a production Ubuntu server from 22.04 to 24.04. Before starting, you create a memory snapshot:
qm snapshot 100 pre-ubuntu-2404-upgrade --description "Before Ubuntu 24.04 upgrade" --vmstate 1
On an 8 GB VM, the snapshot takes about two minutes and consumes 8 GB for the RAM state.
The upgrade is complete, but compatibility issues disrupt custom applications. Instead of troubleshooting for hours, you simply roll back:
qm rollback 100 pre-ubuntu-2404-upgrade
Within five minutes, the VM is restored exactly as it was before the upgrade — with all services running normally.
This example shows the real power of snapshots: fast rollback with minimal downtime, something backups alone can’t deliver in day-to-day operations.
Results comparison:
- Snapshot approach: Total downtime of 7 minutes (2 min creation + 5 min rollback)
- Backup restoration alternative: Would require 45+ minutes for full system restoration
- Business impact: Minimal service interruption vs potential hour-long outage
This kind of quick rollback is especially handy in a homelab environment. If you’re planning your own setup, see my post on what to consider when building a homelab server rack
Frequently Asked Questions about Proxmox Snapshots
What happens to snapshots during VM migration?
Conclusion: Snapshots vs Backups – Proper Usage Strategy
Proxmox provides three key benefits that make snapshots indispensable for virtualization management: rapid rollback capabilities, operational convenience, and testing safety. These features enable administrators to confidently implement changes, test configurations, and maintain system stability with minimal risk.
However, snapshots complement rather than replace comprehensive backup strategies. While snapshots excel at short-term protection and quick recovery scenarios, solutions like Proxmox Backup Server remain essential for long-term data security, disaster recovery, and protection against hardware failures.
Implement both snapshot and backup strategies for complete protection. Use snapshots before system changes, during development work, and for rapid rollback scenarios. Rely on regular backups, such as those provided by Proxmox Backup Server, for data archival, compliance requirements, and catastrophic failure recovery.
Snapshots are one of the features that make hypervisors like Proxmox so attractive compared to alternatives such as VMware. If you’re still weighing your options, see my Proxmox vs ESXi comparison
I’d love to hear from you — was this article helpful? Share your thoughts in the comments below. If you prefer, you can also reach me by email or connect with me on Reddit at Navigatetech.
Before you go …
If you’re exploring Proxmox snapshots, you’re likely aiming for efficient VM management and backup strategies. But what if you want to take things further by integrating containerization into your infrastructure? I recommend checking out Proxmox Docker – 3 solutions, where I walk through different ways to run Docker on Proxmox. It’s a great next step if you’re considering lightweight workloads or want to optimize resource usage. The article breaks down each method with pros and cons, so you can choose what fits your setup best.
About the author
Hi, I’m Edy Werder. I write hands-on guides about Proxmox, homelab servers, NAS, and WordPress, based on real setups I run and document.
No sponsors, no fluff—just real configs and results.
Enjoying the content?
