
By Edy Werder — IT Consultant & Tech Blogger
If you want an off-site backup destination you control, using Synology Hyper Backup to an rsync server can work very well. I recently set this up with an Ubuntu server and learned that the process is not quite as simple as creating a folder and testing SSH access.
At first, I assumed Hyper Backup would connect as soon as the Linux user and target folder were ready. SSH worked right away, but Hyper Backup still failed. The missing piece was that Hyper Backup expected a proper rsync-compatible server with a valid backup module and the right firewall access.

To use Synology Hyper Backup with an Ubuntu rsync server, I had to create a dedicated backup path, create a user with access to that folder, and configure an rsync module in rsyncd.conf, enable the rsync service, open port 873 on the firewall, and then connect from Hyper Backup using the server type “rsync-compatible server.” SSH access alone was not enough in my case.
Why I set up Hyper Backup to a Linux rsync server
I was using Synology Hyper Backup for off-site protection to AWS S3 and later to Wasabi S3. This time, I wanted to create my own backup destination on a remote Ubuntu 24.04 server. For that, I could use a VPS server on a Proxmox cluster, where I could assign disks and resources as needed.
If you are still deciding on hardware, I also wrote a guide on Which is the best Synology NAS.
What I like about this setup is the control it offers. I can decide where the data is stored, how much disk space I assign, and how the destination is protected. But I also quickly noticed that a Linux server needs to be properly configured before Hyper Backup will accept it as an rsync-compatible server.
Synology rsync supports incremental backups, meaning only changes made since the last backup are transferred. Using rsync with Synology devices provides a powerful, efficient, and flexible way to sync shared folders.
My setup
Here is the setup I used for this guide:
- Synology NAS with Hyper Backup
- Remote Ubuntu 24.04 VM
- Separate 1 TB disk for the backup target
- Dedicated mount point at /mnt/hyperbackup
- Dedicated user for the backup job
- rsync service configured on Ubuntu
- Firewall rule allowing only my own public IP to connect to the rsync port
I strongly recommend using a separate path or even a separate disk for this. It makes the backup destination much easier to manage later.
Why SSH alone did not work
This was the part that confused me at first.
I could connect to the Linux server over SSH without any issue. The user worked, the password was fine, and I had access to the target folder. But in Hyper Backup, the task still failed.
The reason is simple. Hyper Backup was not just looking for shell access. It wanted an rsync-compatible server with a valid backup module.
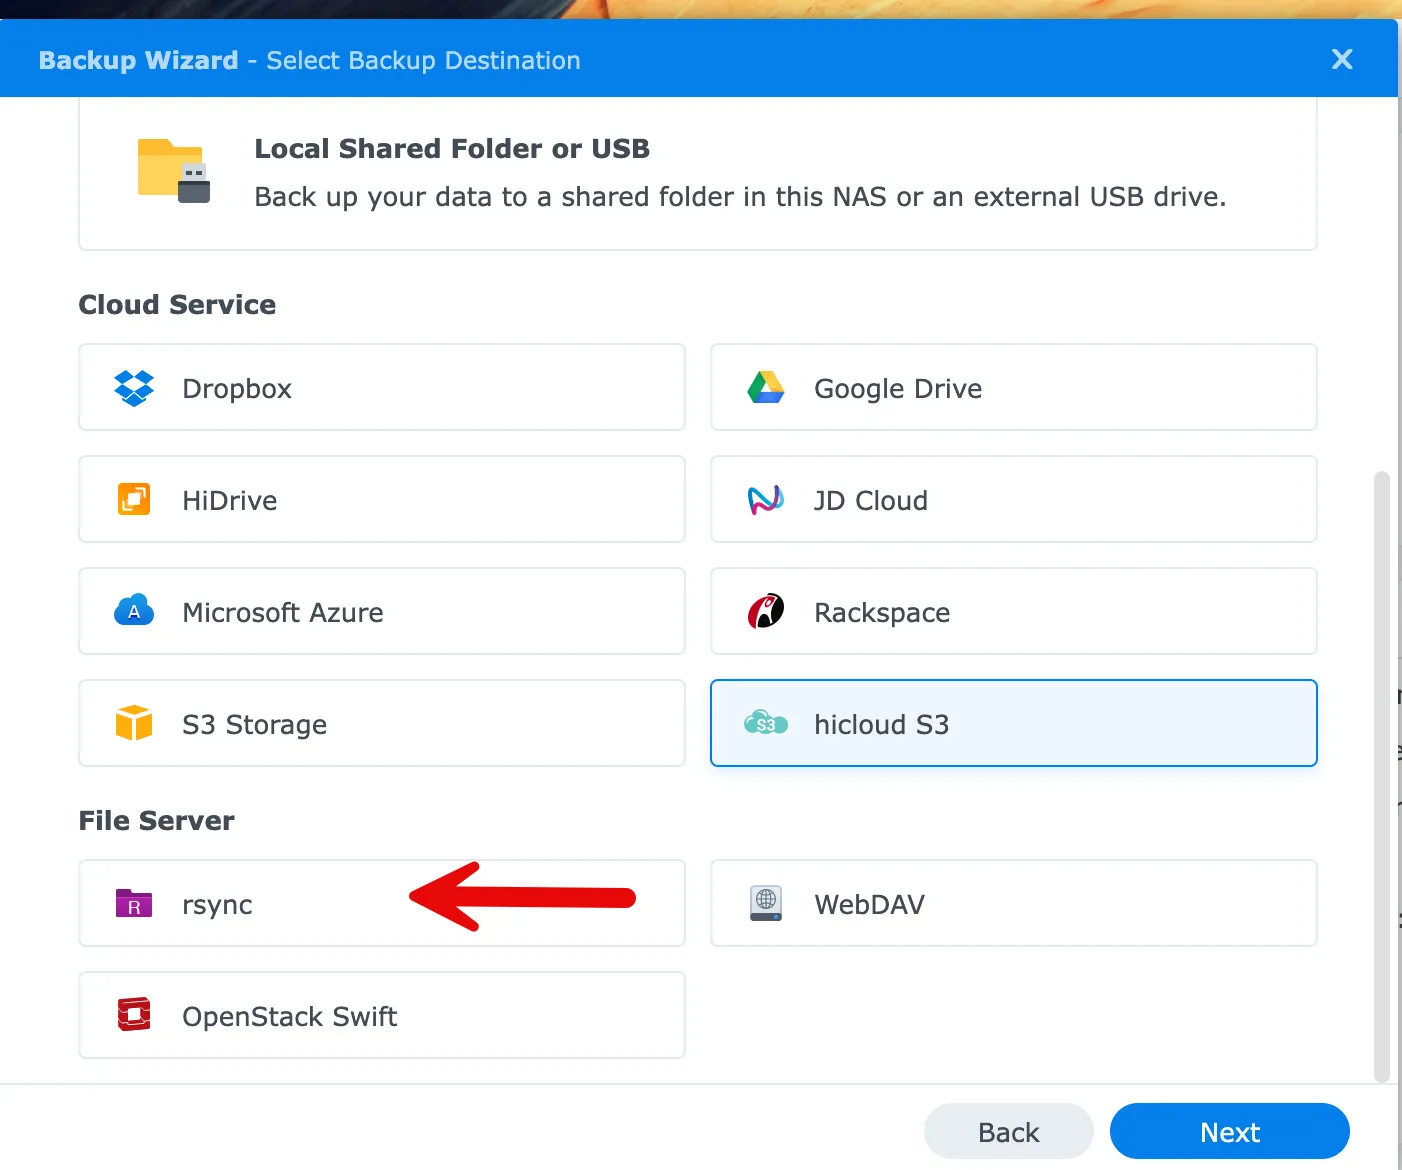
That is why the Backup Destination Settings screen matters so much. When you choose a server type, a rsync-compatible server, Hyper Backup expects the destination to provide a module it can use. A plain SSH login is not enough.
If you can log in via SSH but Hyper Backup still does not connect, check the destination type again. In my case, the missing piece was the rsync configuration.
Setup: Synology Hyper Backup rsync Server on Ubuntu
Before jumping into the configuration, here is a quick overview of the steps I followed to make Hyper Backup work with an Ubuntu rsync server.
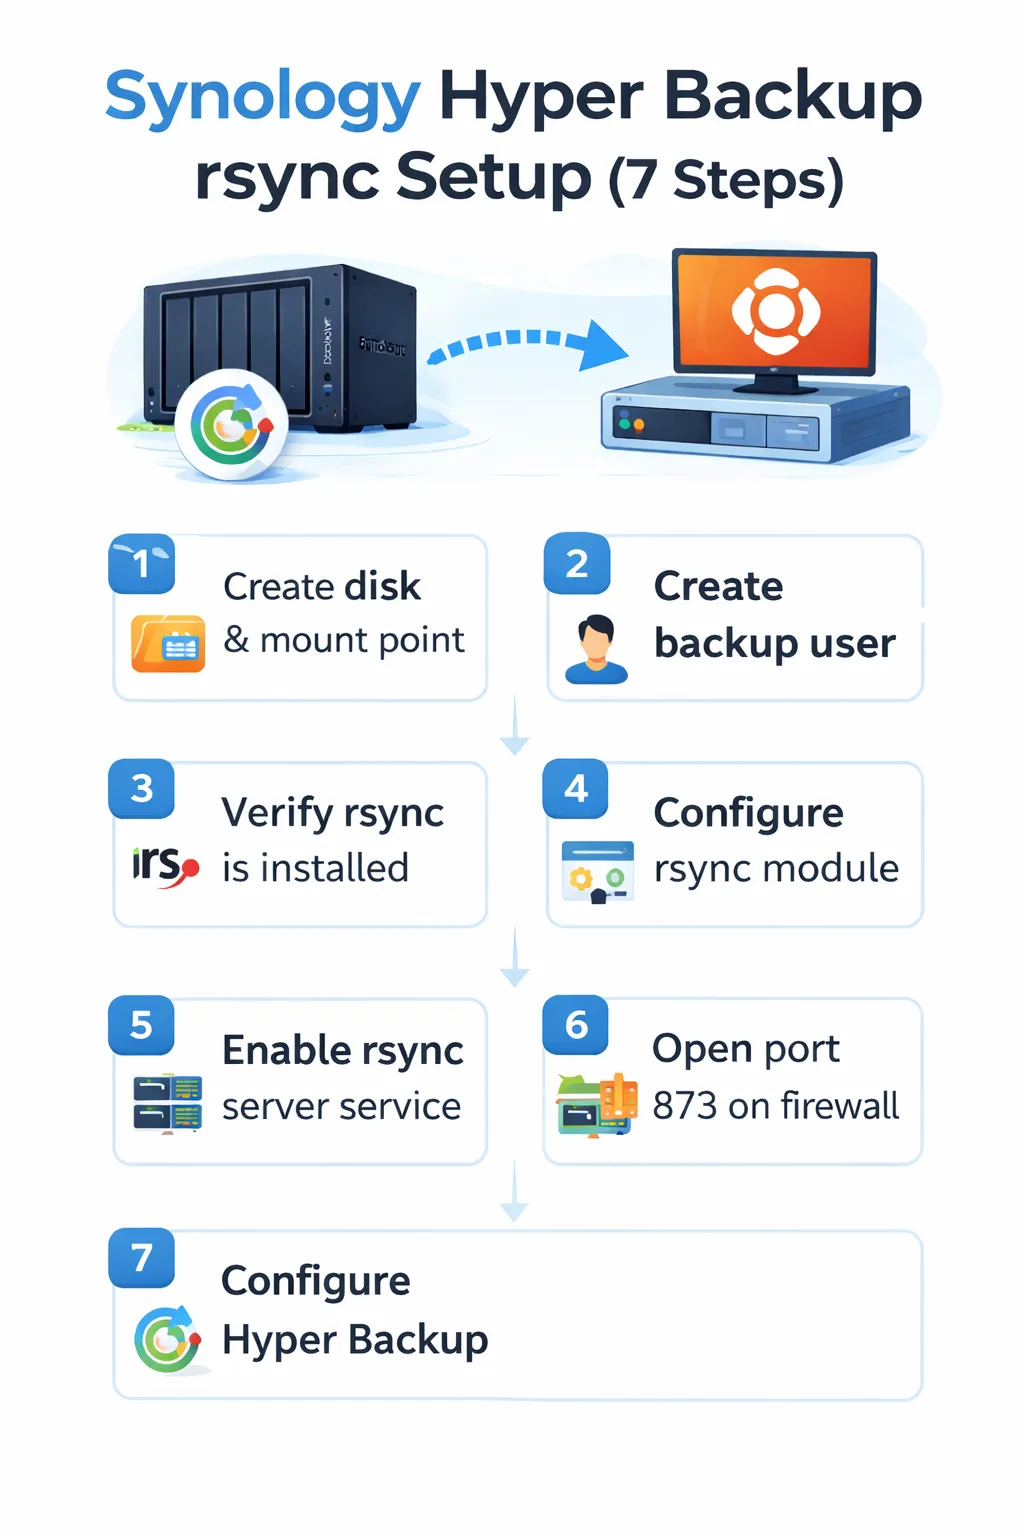
Step 1: Create a dedicated disk and mount point on Ubuntu
I decided to use a separate disk for this backup target. I first created a 500 GB virtual disk, but after the first backup attempt, I realized the real storage usage was much higher than expected, so I later expanded it to 1 TB.
After adding the new disk to the Ubuntu VM, I created an ext4 filesystem and mounted it to
/mnt/hyperbackupThat gives you a clean backup destination that is separate from the rest of the server. I also added the mount to /etc/fstab so the disk would come back automatically after a reboot.
Step 2: Create a dedicated backup user and permission
Next, I created a dedicated user for the backup task. In my case, I used synoadmin.
sudo adduser synoadminThen I assigned ownership of the mount point to that user with these commands:
sudo chown -R synoadmin:synoadmin /mnt/hyperbackup
sudo chmod 700 /mnt/hyperbackup
This way, the user could access the backup path, and I kept the permissions simple.
I also tested SSH to make sure the user could log in and create a test file in the target directory. That part worked right away, but Hyper Backup still needed the underlying rsync service.
Step 3: Verify rsync is installed
In my case, rsync was already installed on Ubuntu, so I did not need to add it manually. Still, it is worth checking before you continue.
You can verify it with:
rsync --version
If rsync is not installed on your server, install it with:
sudo apt update
sudo apt install rsync -y
Step 4: Configure the rsync module
This was the real fix.
To make Hyper Backup communicate with the Linux server, I had to set up a proper rsync configuration with a backup module. I used /etc/rsyncd.conf and defined a module called hyperbackup.
Use this to open the rsync config file on Ubuntu:
sudo nano /etc/rsyncd.confExample configuration of the rsync command:
uid = synoadmin
gid = synoadmin
use chroot = no
max connections = 4
log file = /var/log/rsyncd.log
pid file = /var/run/rsyncd.pid
timeout = 300

[hyperbackup]
    path = /mnt/hyperbackup
    comment = Synology Hyper Backup
    read only = no
    list = yes
    auth users = synoadmin
    secrets file = /etc/rsyncd.secrets
Then I created the credentials file at /etc/rsyncd.secrets
sudo nano /etc/rsyncd.secretsIts content looked like this:
synoadmin:YourStrongPasswordHereThen I locked it down with:
sudo chmod 600 /etc/rsyncd.secrets
sudo chown root:root /etc/rsyncd.secrets
Without the module, Hyper Backup will not see a usable backup destination.
Step 5: Enable the rsync server service
After saving the config, I had to enable and start the rsync service:
At first, the service was inactive, so Hyper Backup could not connect. Once I enabled it, the service was listening correctly on port 873.
You can check that with:
ss -tlnp | grep 873If you see rsync listening on 0.0.0.0:873, that is a good sign.
I also tested the module locally from Ubuntu itself:
rsync rsync://synoadmin@localhost/hyperbackup
That confirmed the backup module worked before I returned to the Synology side.
Step 6: Open port 873 on the firewall
This was another important lesson.
On the Ubuntu server, everything looked good. The rsync daemon was running, and the module worked locally. But Hyper Backup still could not connect from the outside.
The missing piece was the firewall.
In my case, I had to open TCP port 873 on the firewall and allow only my own public IP address. Once that rule was in place, the connection worked immediately.
That is worth repeating. Even if SSH on port 22 works, Hyper Backup may still fail if the rsync port is not open.
So if you want to use Synology Hyper Backup to rsync server, do not only check Ubuntu. Also check the network path between the Synology NAS and the Linux destination.
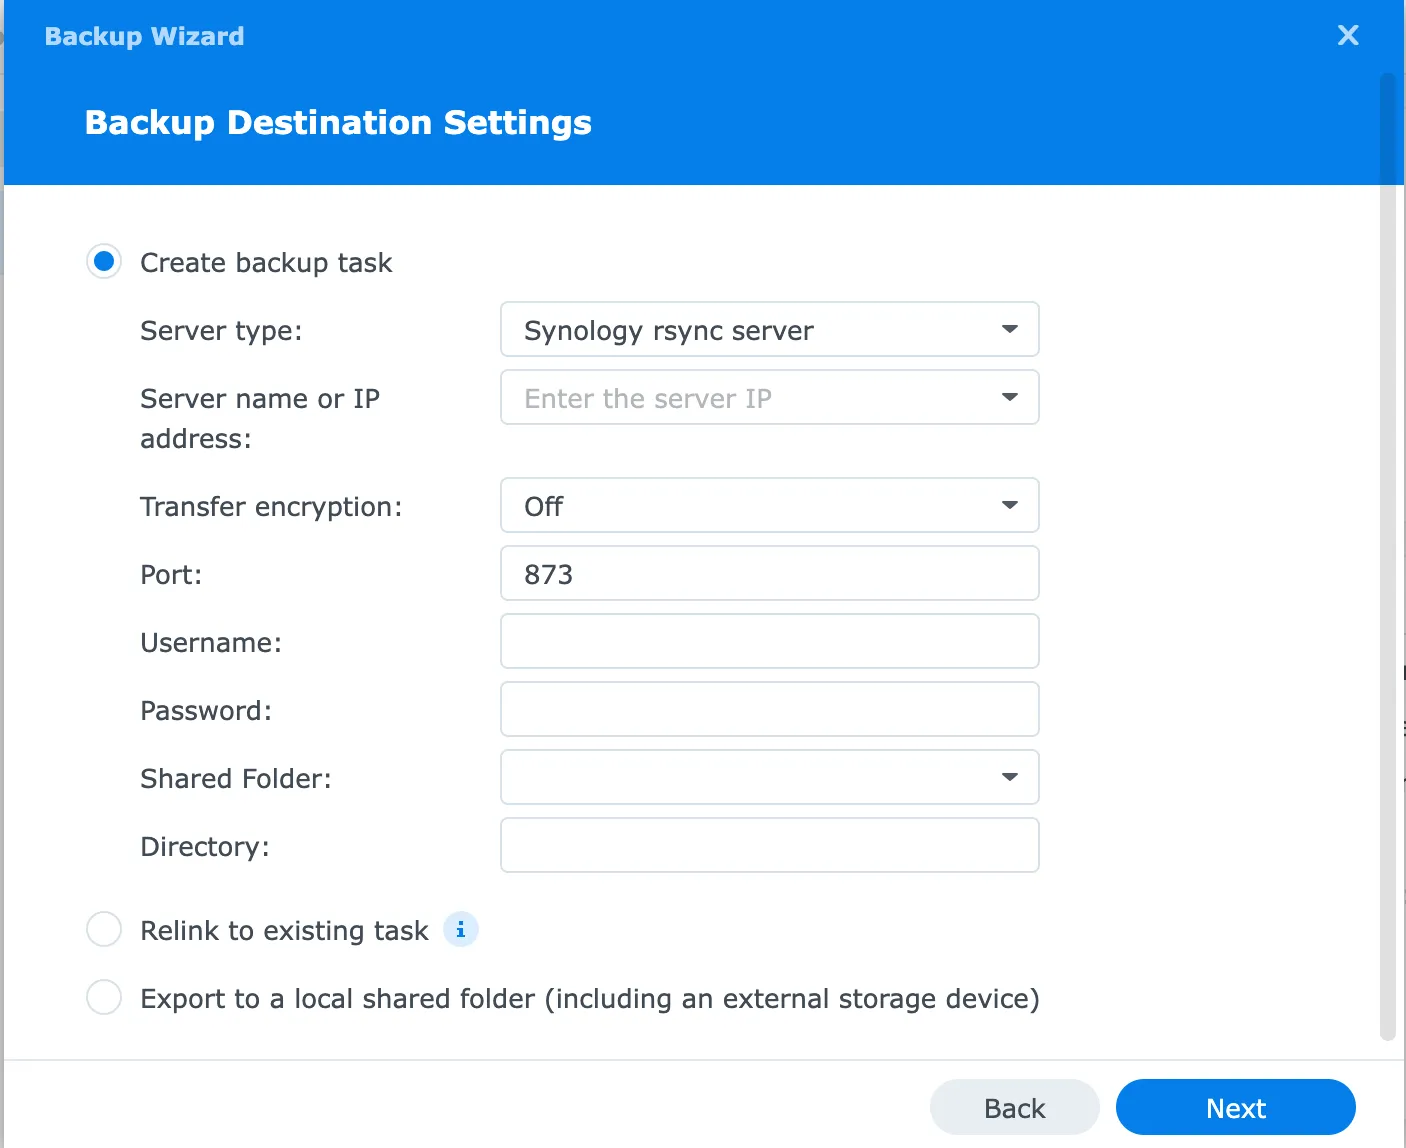
Step 7: Configure Hyper Backup on the Synology NAS
Now go back to Hyper Backup on the Synology NAS and create a new backup task.
Reference to Synology Hyper Backup rsync-compatible server settings
Use these settings:
- Server type: rsync-compatible server
- Server name or IP address: your remote server IP or hostname
- Transfer encryption: Off
- Port: 873
- Username: your rsync account, for example synoadmin
- Password: the password defined in /etc/rsyncd.secrets
- Backup module: hyperbackup
- Directory: choose a task folder name, for example Yumiserver
Once I entered those values, Hyper Backup finally connected.
From there, I selected the shared folder data and the packages I wanted to include in the backup task, following the broader workflow described in my comprehensive Synology Hyper Backup guide.
Why I used transfer encryption off
I prefer encrypted transfers, so I first tried transfer encryption on. Since port 22 was already open, I assumed that it should work.
But in this case, Hyper Backup still expected an rsync module, and the working setup ended up being the classic rsync daemon on port 873. That means I had to use transfer encryption off to get the backup running cleanly.
Is that ideal? No.
If you use transfer encryption off, traffic is not protected by SSH in transit. So I would only do this if you also control the firewall properly. In my case, I restricted access to my own public IP only, which reduces the exposure a lot.
If you need stronger transport security, you may want to test a different design, for example a VPN tunnel between sites, and also consider installing an SSL certificate on your Synology NAS to protect web-based access. But for my setup, the restricted firewall rule made this acceptable.
How fast was the backup?
The first run took almost three hours, and transfer speed was around 40 to 50 MB/s, which I think is quite decent for an off-site backup.
That first job also taught me something useful. The real backup size was much larger than I expected. I originally assumed 500 GB would be enough, but the completed backup ended up using around 526 GB.
So if you build a new backup destination, leave some room for surprises. Initial estimates are not always accurate, especially when you include packages and application data or Synology Drive private cloud data in addition to file data.
Can you use SSH instead of the rsync daemon?
This is a common question, and I had the same thought.
Because SSH already worked for me, I expected Hyper Backup to use that directly. But in the Backup Destination Settings screen, Hyper Backup still asked for a backup module. That told me the destination must behave like a real rsync-compatible server, not just a shell account on a Linux server.
So yes, SSH can still be part of some rsync workflows in general, but for the Hyper Backup setup I built here, the practical solution was the rsync daemon with a defined module.
That is why this guide focuses on the rsync service, rsync configuration, backup module, and port access, rather than a pure SSH approach.
If you are planning a similar setup, here are some Synology NAS models I think are well-suited for Hyper Backup and off-site use.
-
-
 Buy on Amazon$1,902.72
I earn a commission if you make a purchase, at no additional cost to you.
04/06/2026 04:53 am GMT


My final thoughts
If you want to use Synology Hyper Backup to rsync server, Ubuntu works well, but the important detail is this: Hyper Backup expects a proper rsync-compatible server, not just a Linux box with SSH access.
That was the missing piece in my case.
Once I created the rsync service, defined the backup module, and opened port 873 on the firewall, the job worked exactly as expected. The first full backup took almost three hours and used about 527 GB, so I later expanded the target disk to 1 TB to give myself enough room.
Would I do it again? Yes. But I would go into it knowing that the rsync daemon and firewall side matter just as much as the Synology settings.
If you are already using Hyper Backup and want more control over your off-site destination, this is a solid option.
FAQ
Does Synology Hyper Backup work with a Linux server?
Yes, it can work with a Linux server if the destination is configured as an rsync-compatible server.
Do I need to enable rsync service on Ubuntu?
Yes. Installing rsync alone is not enough. You need to enable the rsync service and configure a module.
What is the backup module in Hyper Backup?
The backup module is the named rsync destination defined in rsyncd.conf. In my example, it was hyperbackup.
Can I use transfer encryption on?
You can test it, but in my working setup, I had to use transfer encryption off and allow port 873 through the firewall.
What port does Hyper Backup use for an rsync server?
In the working daemon-based setup, it used port 873.
Is this a single-version backup?
No. Hyper Backup can store multiple versions depending on your task type and backup settings. Check your task design carefully before assuming the storage usage will remain small.
I’d love to hear from you — was this article helpful? Share your thoughts in the comments below. If you prefer, you can also reach me by email or connect with me on Reddit at Navigatetech.
About the author
Hi, I’m Edy Werder. I write hands-on guides about Proxmox, homelab servers, NAS, and WordPress, based on real setups I run and document.
No sponsors, no fluff—just real configs and results.
Enjoying the content?
