
By Edy Werder — IT Consultant & Tech Blogger
Putting an Exchange Server into maintenance mode pauses its normal operations before you install a cumulative or security update. Mail stops routing through it, database copies move to other servers, and nothing reactivates behind your back.
I do this for every Exchange update, on single servers and on DAG members alike. Below, I explain what each step does and why it matters, so you can adapt the sequence to your own environment rather than blindly copying commands.

Quick Answer:
To put an Exchange Server into maintenance mode, follow these five steps in order:
set the Hub Transport to draining mode, redirect the message queue, suspend the server from the DAG, disable database copy auto-activation, then set the server components to Inactive.
Verify it worked with:
Get-ServerComponentState "YourServerName" | Select Component, State
Every component should read “Inactive” except for two.
Note that Exchange services keep running in maintenance mode; they do not stop.
Take a snapshot before you start, and run an Exchange Server health check after the update.
Absolutely. Switching to maintenance mode when updating or maintaining your single Exchange server is wise. Here’s the straightforward reason why:
In essence, engaging maintenance mode on your single Exchange server isn’t just a technical step; it’s you taking the reins to ensure the update process is smooth, controlled, and free of unexpected email flow or service hiccups. This way, you keep surprises to a minimum and reliability to a maximum.
Okay, let’s move on to Exchange DAG; here, it is more obvious why you should put the Exchange server in maintenance mode.
If you manage servers as part of an Exchange Database Availability Group (DAG), you’re in a unique position regarding updates and maintenance. Here, putting your server into maintenance mode isn’t just recommended; it’s a crucial part of ensuring the smooth operation of your email services. Let’s talk about why:
In short, the interconnected nature of DAGs makes using maintenance mode not just a best practice but a foundational aspect of effectively managing your Exchange environment.
Let’s dive deeper into what this looks like in practice to put an Exchange Server in Maintenance mode.

Draining mode is a preparatory state for the Exchange Hub Transport server, where it begins to cease accepting new messages and processes any existing messages in the queue. Here’s what it entails and why it’s important:
By redirecting the message queue, you ensure that email communication within your organization is not interrupted, even as one server is being prepared for maintenance.
The step of suspending the server from the Database Availability Group (DAG) is pivotal when preparing for maintenance. Here’s what it entails:
This step is essential for a smooth maintenance process, keeping the server isolated from the DAG’s active data management tasks.
This step focuses on preventing the automatic activation of mailbox database copies on the server slated for maintenance. Here’s a straightforward explanation:
By taking this step, you ensure that your maintenance activities can proceed without the server inadvertently taking on active database roles, maintaining the stability and efficiency of the maintenance process.
The final step officially puts the server into maintenance mode, preparing it for the upcoming update or maintenance tasks. Here’s the essence of this step:
Remember that Exchange Services will not stop when Exchange is in maintenance mode.
That covers what each step does and why. For the exact Exchange Management Shell commands, Ali Tajran’s guide sets them out in order. If you would rather script it, Roman Gelman’s PowerShell module puts the whole sequence behind a single command.
Once you have executed the steps to put your Exchange server into maintenance mode, it is crucial to confirm that the server has entered this state correctly. This verification step ensures that all preparatory measures have been effectively applied, safeguarding your maintenance activities. Here’s how you can check if the server components are successfully in maintenance mode:
Get-ServerComponentState "YourServerName" | Select Component, State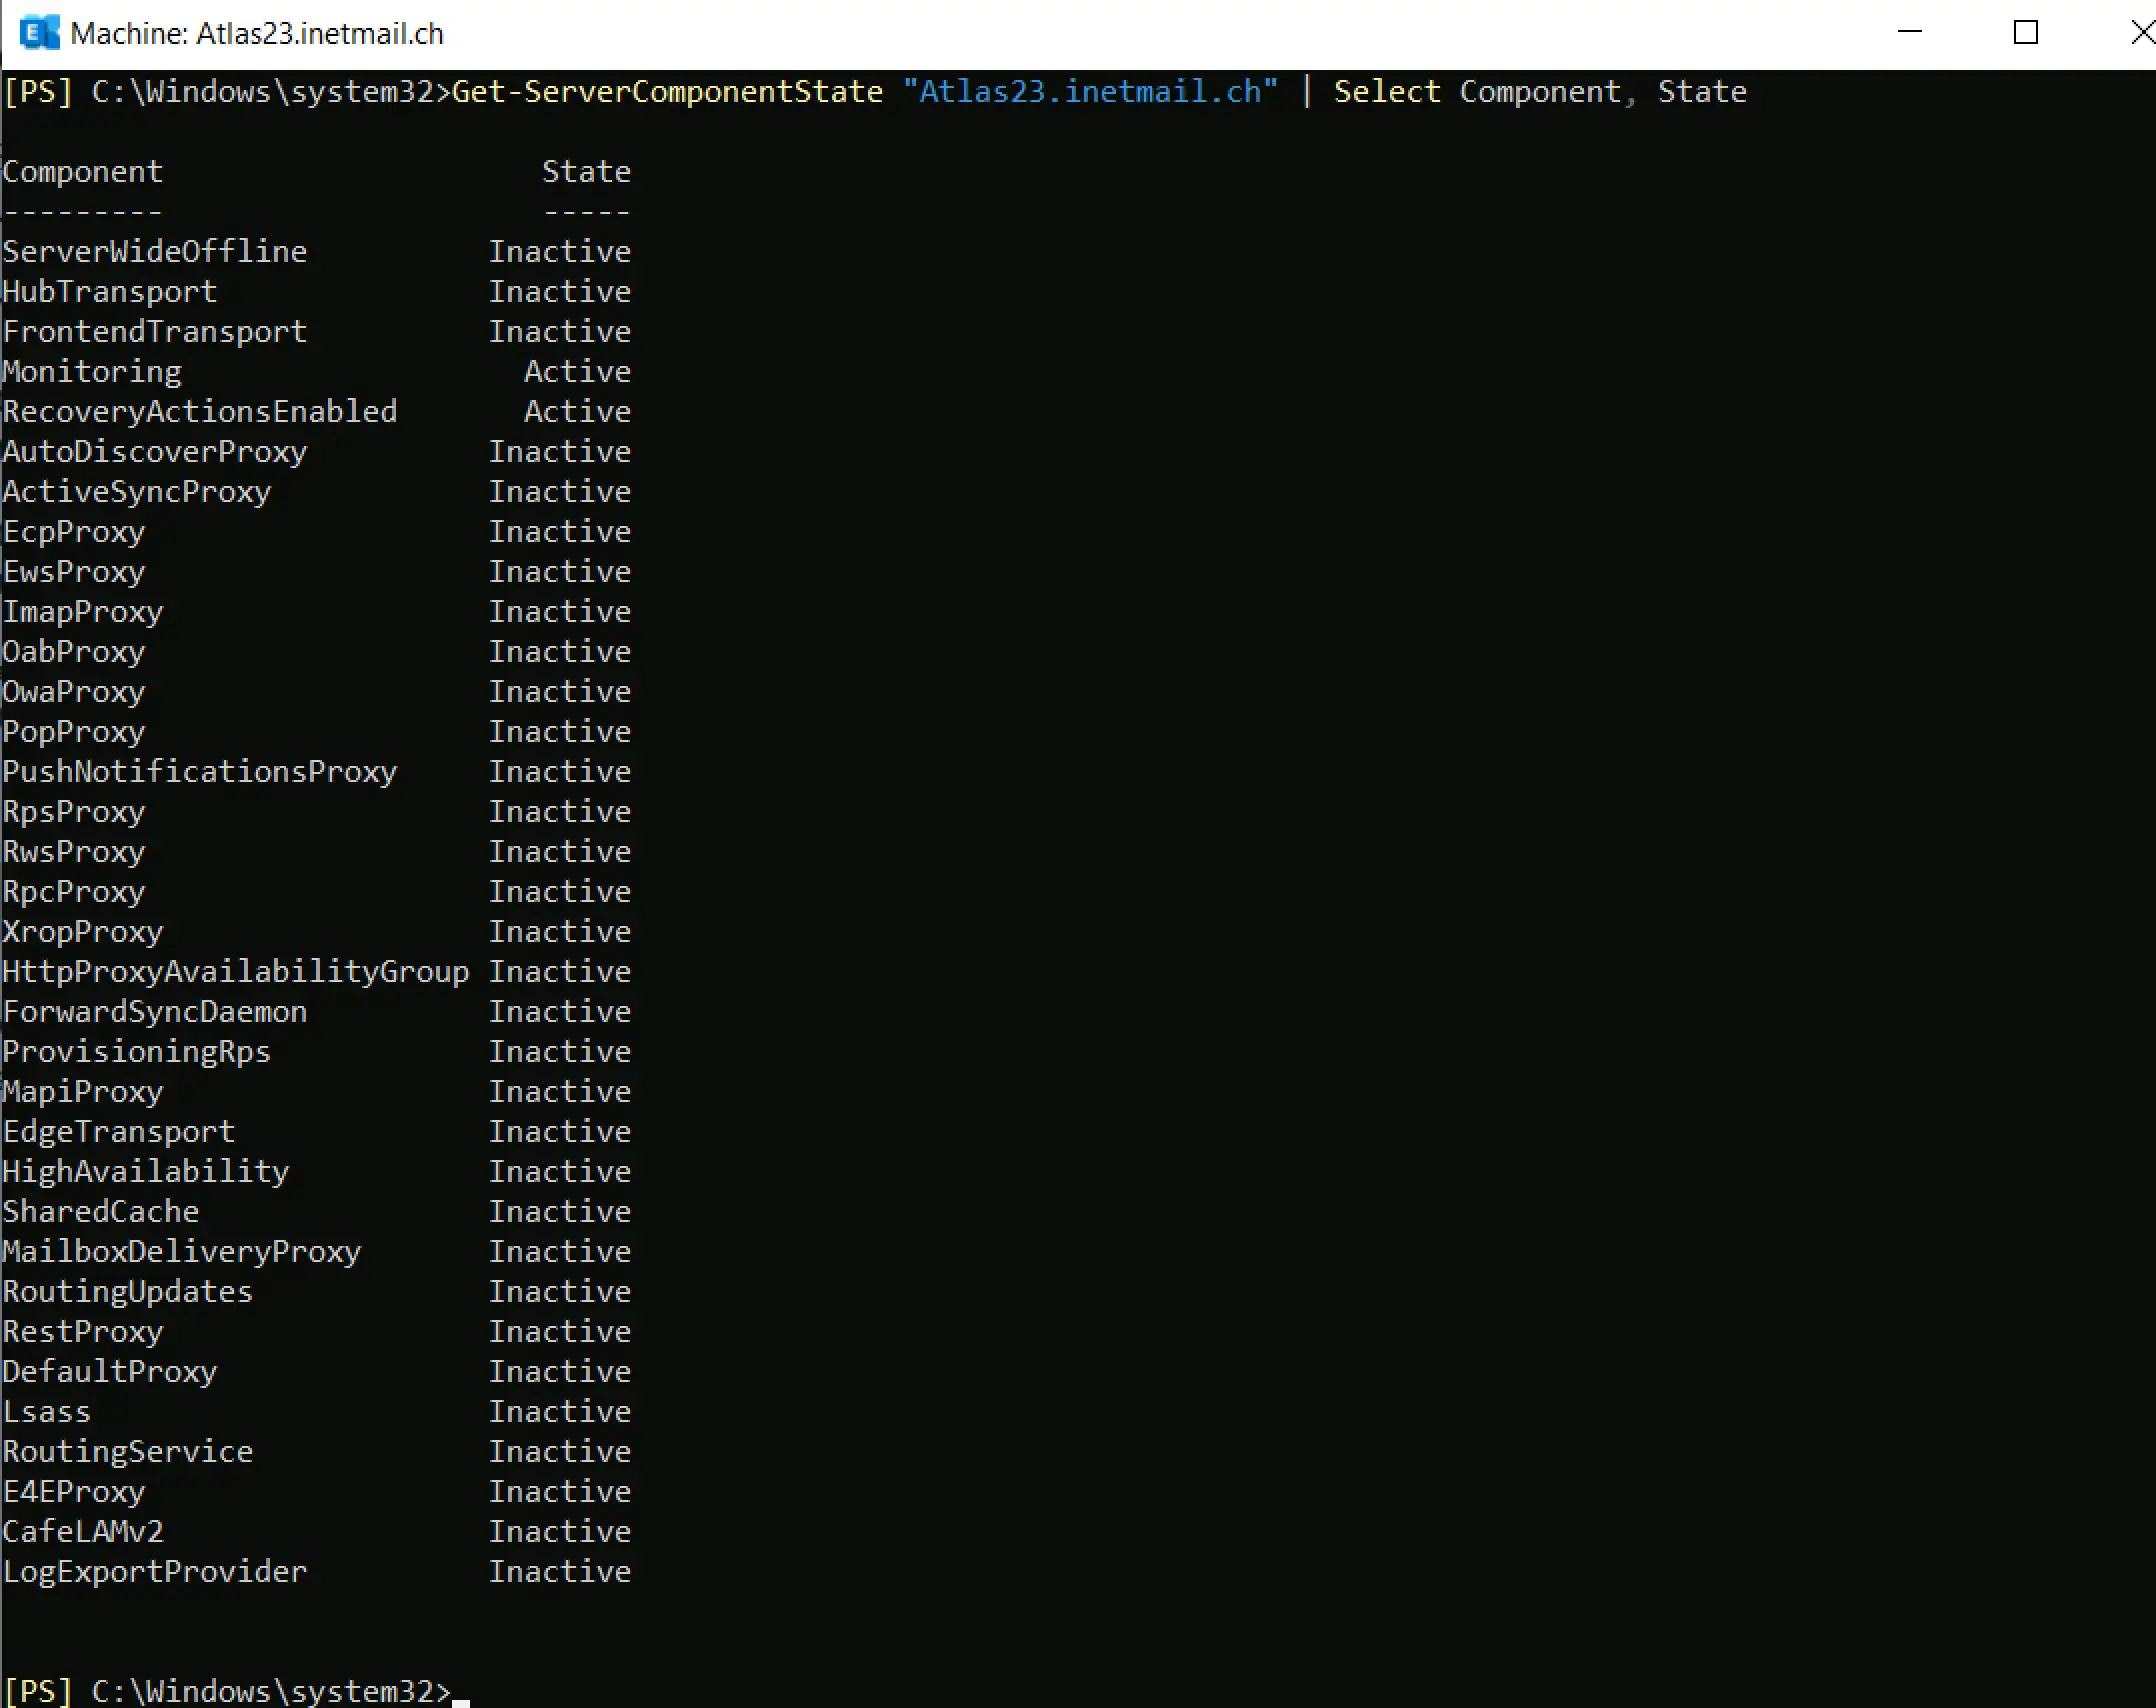
The state of all components should be ‘Inactive’ except for two components listed in the screenshot above.
The Exchange servers I administer are VMs on VMware or Proxmox. Before I start performing updates with the new Exchange CUs, I reboot the server after putting it into maintenance and take a snapshot. You should know that a recent backup is on hand. It’s better to have more than one fallback possibility.
I have performed updates with two Exchange Servers in a DAG during business hours in a production environment and have not received any user complaints.
You can use the PowerShell script in the collection above to remove the Exchange server from maintenance mode.
I always rerun
Get-ServerComponentState "YourServerName" | Select Component, Stateto check if all components are in an active state
With
Test-ReplicationHealthyou check if the process database copy has been resumed
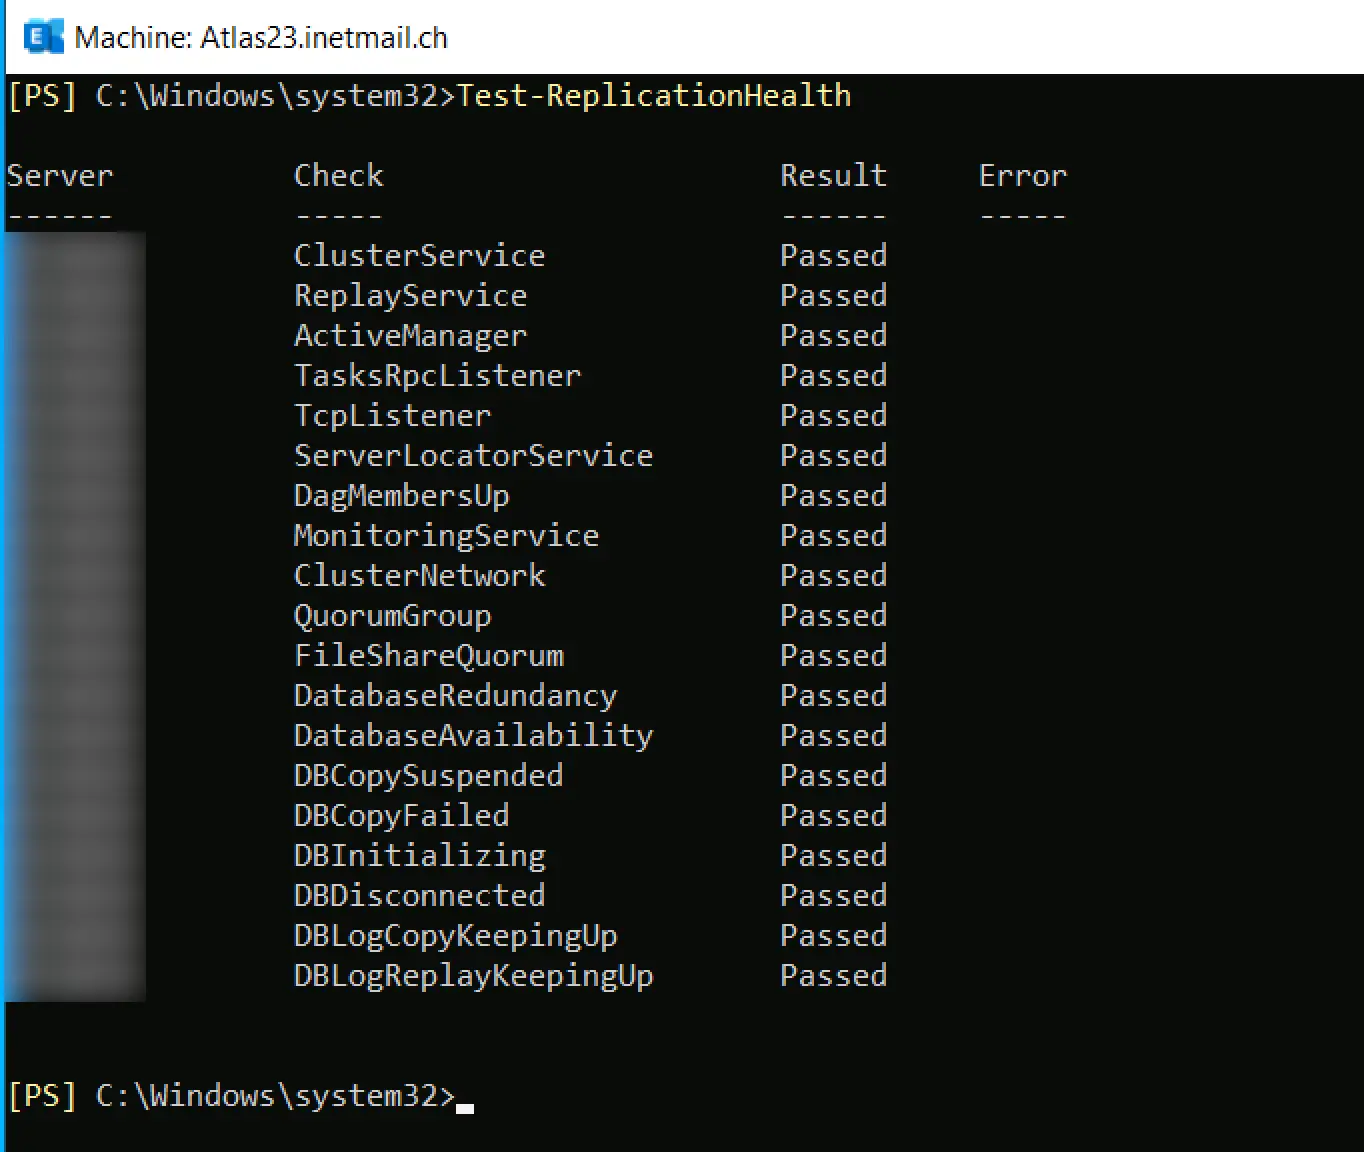
Lastly, it is good practice to run an Exchange Server health check after each update to ensure everything is in good shape.
I’d love to hear from you. Was this article helpful? Share your thoughts in the comments below. If you prefer, you can also reach me by email or connect with me on Reddit at Navigatetech.
It’s also crucial to ensure that your server’s security is up to date. A key part of this is maintaining the certificates that secure communications. I recommend checking out how to renew your Exchange certificate, which can help prevent potential security issues and ensure uninterrupted service. This follow-up is essential for keeping your Exchange environment secure and operational.
Hi, I’m Edy Werder. I write hands-on guides about Proxmox, homelab servers, NAS, and WordPress, based on real setups I run and document.
No sponsors, no fluff—just real configs and results.
Enjoying the content?